Why you should grow Kale
September 13th, 2011Cruciferous vegetables, such as broccoli, cabbage, brussels sprouts, cauliflower, and kale are some of the healthiest vegetables you can grow. The health benefits are almost too numerous to mention, but they can help prevent cancer in more than one way, and they can even help fight cancer, literally. Regular readers will know I’m a fan of science, so this isn’t just holistic hearsay, there are actual peer reviewed studies showing these effects. They contain antioxidants, which can help prevent cancer by removing oxidative stress on our cells. They also contain relatively unique compounds that help our cells detoxify, thus removing potential carcinogens from our body. Then there is another compound that can literally cause cancer cells to kill themselves. They’re also good for preventing inflammation, and can lower your cholesterol. Cruciferous vegetables are superfoods, some more than others, kale would seem to be more than others.
But this isn’t a health blog, it is a gardening blog, so lets talk about gardening.
I’ve grown cabbage, and it works, but critters get into it like crazy. Slugs, ground hogs, rabbits. When it gets damaged it ruins the head, and you have only 1 head per plant. Plus, cabbage is has a little less nutritional density compared to the other cruciferous vegetables, and it is really cheap at the store so why not just buy it? I always try to consider cost when planting something, since I have limited space, I want the most bang for my buck.
I’ve grown brocolli, but it takes a long time to grow, needs sun, and has a very specific harvesting window. You have to harvest it at the perfect time when the florets have formed, but not formed too much. If you wait it gets really bitter. You also have some critter risk, if it gets damaged prior to full maturity, there isn’t much you can salvage.
I’ve grown brussels sprouts, and they took a really really long time to grow, and there were some critter issues, but mostly they tasted horrible. I guess I did it wrong or something, but they were so incredibly bitter, we couldn’t eat them, and we like brussels sprouts. I cook them a couple times a week – but I buy them at the store.
I’ve tried growing cauliflower, it also takes a long time to form, and you have to do things like tie up the leaves over the head, sounds like work. I have never had to do it though because my plants have never gotten heads.
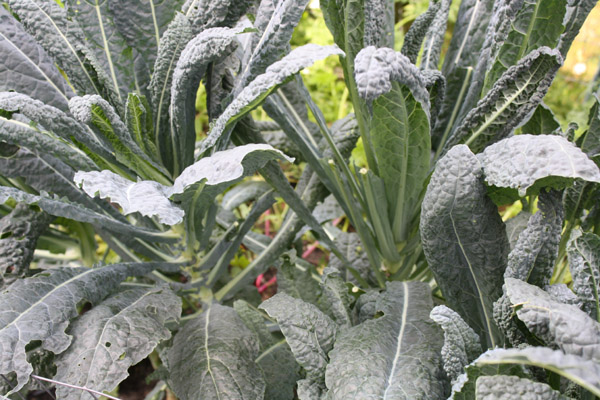
Then I come to Kale. Kale grows very fast, because you’re not harvesting a flower or a fruit, you’re harvesting mere leaves. You can harvest it all through the growing season, taking leaves as needed, while letting the plant live to keep making more. Critters like it just as much as the other ones, but if they eat a leaf, no big deal, there are more. If a cabbage looper eats a hole through the leaf, no big deal, there is more leaf left. I rarely harvest a leaf without a hole in it, but it is still good. The other ones all produce a single head (more or less) per plant, and if it is ruined, it is ruined. But Kale plants can produce dozens and dozens of leaves.
If you plant a row of brocolli you best love it, because you’ll be eating it nonstop when it is in season. But if you plant a row of kale you can harvest it all summer long, even into fall since it will tolerate cold and frost. For the home gardener who has only limited room, that is very efficient.
Due to the wrinkles in the leaves store bought Kale has a reputation of holding onto pesticides, but at home you can just not use them (and again, who cares about a little leaf damage, so long as the plant keeps producing). So that is another reason to grow at home.
So you think, fine, I can grow it, but what would I cook with it? I love Kale because it is so versatile in the kitchen. You can add it to anything, it even holds up very well in soups (as anyone who has had Olive Garden’s Zuppa Toscana knows). I add kale, chopped up, to the following: any casserole, any soup, eggs, stirfry, sloppy joes, any pasta dish, pizza, macaroni and cheese, any skillet dish. It is great for kids who don’t like vegetables because you can just sneak it in.
For all these reasons, kale will always have a place in my garden, and I recommend you put some in yours too.
Red Hot Poker – Something not to grow, and bunnies.
September 2nd, 2011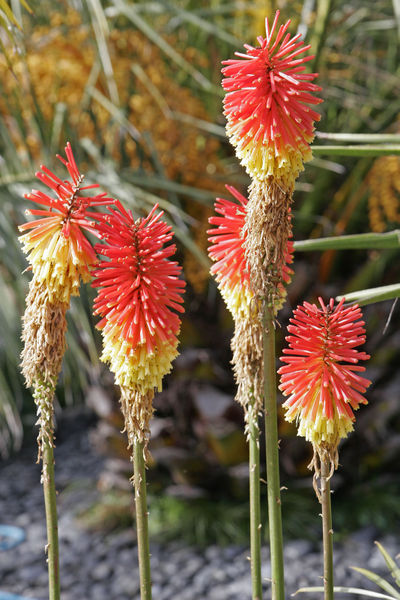
When I first got into gardening I was attacted to large blooming perennials, and planted mostly those. I have come a long way since then, namely I appreciate things like edibles more, interesting foliage, and length of bloom time as much as bloom shape, size, or color.
But sometimes that interest in large blooming perennials rears up. Enter Kniphofia, other wise known as Red Hot Poker plant. A few years ago on a walk I saw it in bloom, thought it looked cool, and wondered why I had never seen it before. I couldn’t find a good source for plants, so I bought some seeds and started them.
Unlike many of my seed starting endeavors this worked out, and I transplanted them outside, and generally took care of them. Three years later they got big and bushy and were ready to bloom. For a perennial from seed that sort of length is typical. I was pretty excited as I watched the scapes rise.
In the end this plant only bloomed for about three days, and it never got “red hot” remaining more a muted salmon color at best. What is more it had the bloom habit of a gladiolus where the lower flowers bloom and close before the uppers open, so the whole “poker” was never in bloom at once.
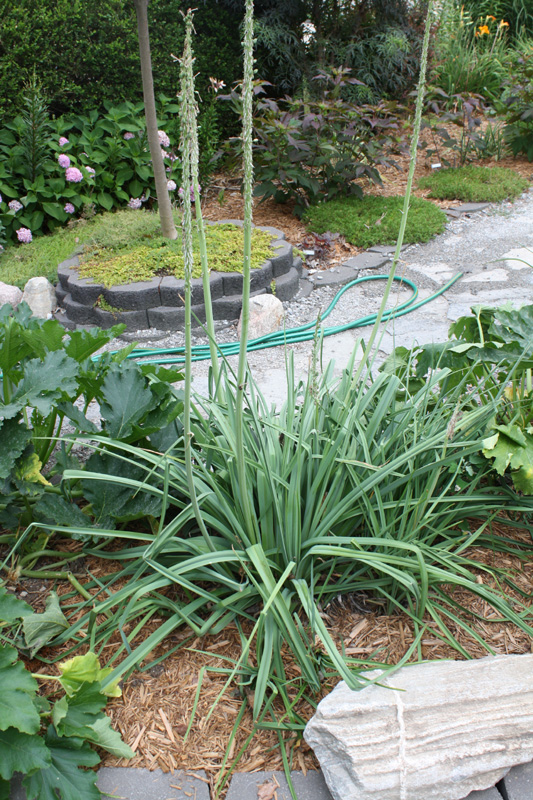
It bloomed for such a little amount of time, that I didn’t get a chance to take a picture of it, so below you see it not in bloom.
Now, if I’m going to give roughly 4 or 5 square feet to a plant in my garden it better bloom for more than 3 days, or provide me something edible.
A few days after it had stopped blooming, I dug it up… oops.
A rabbit had taken advantage of the messy foliage mound and dug a burrow directly underneath it, which I had now destroyed. Luckily my shovel did not crush any of the 4 eyes-still-closed baby bunnies inside of it.
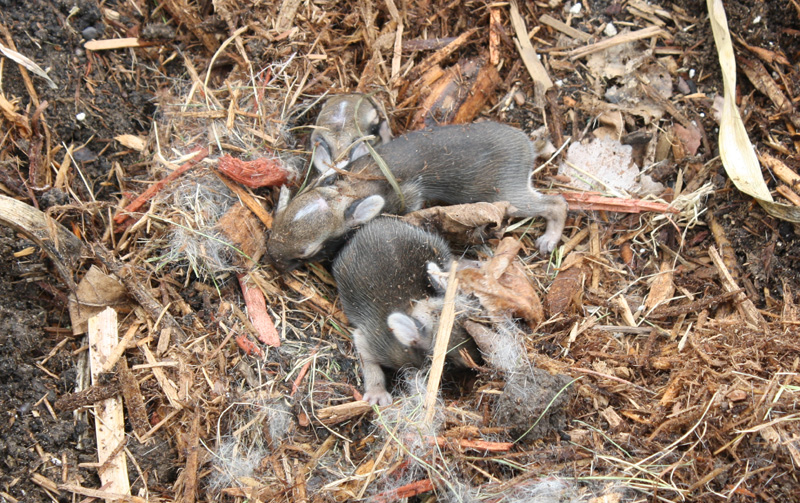

I reconstructed a fake burrow by cutting a black plastic nursery pot in half and then covering it with mulch. I placed the babies back inside and on advice put down markers so I could tell if the mother returned. After two days the mother had not returned so I took the babies to a local wildlife rescue place where they could be nursed. Apparently they were really closed to being weaned naturally, despite still having their eyes closed, so they had a good chance at survival I was told.
This just shows you never know what you’ll find when digging in your garden, though next time I’d rather it be gold coins.
In the place of the horrible Red Hot Poker plant I ordered something truly hot, a double echinacea called ‘Hot Papaya’. Coneflowers have a long bloom period, which I like, but I dislike the big brown center on the standard coneflower. The double varietes are like much more attractive to me and I grow one of the original pink cultivars already. I noticed my neighbor had one of these the other day, and it was doing well, and it seems like it would be the perfect plant for the spot where the kniphofia was. I had originally wanted a nicely blooming bright red perennial for that spot after all.
Knockout Rose Tree
August 13th, 2011For many many years roses were hybridized for fragrance, or hybridized for color, or for size. Things like hardiness and disease resistance were not as much of a concern. It is only recently that gardeners in general started worrying more about these more functional attributes. The “Knock Out” brand of rose is one such newer line that professes to be hardy and disease resistant.
I’ve been hearing about these for years, but never bought one. Then I got an offer from Brighter Blooms for a free plant (one of the benefits of being a garden blogger, you get swag). In particular they had a rose tree, and that really appealed to me.
A standard form plant is one in which a bush or weeping style plant has been either pruned, or more likely grafted, onto a standard (a trunk). Almost all weeping cherry trees sold are in fact standard form grafts, where a normal cherry is grown to the desired height, a weeping bud is grafted on, and then once it is established any regular cherry growth is pruned off.
So a rose tree isn’t a rose that genetically grows like a tree, it is just a rose shrub of one type of rose that has been grafted onto a strong trunk-like cane of another rose.
In anycase, to me the benefit of a standard form rose tree, was that it was easy to find room for it. I stuck it between two very large hardy hibiscus plants. The standard form provides height which provides separation. Had it been a normal shrub rose it would have been crowded by the hibiscus, it would have needed more room. In fact, if it had been a normal shrub, I would not have had room in my garden for it, anywhere. I’m really low on space, but the standard form allowed me to sneak it in there.

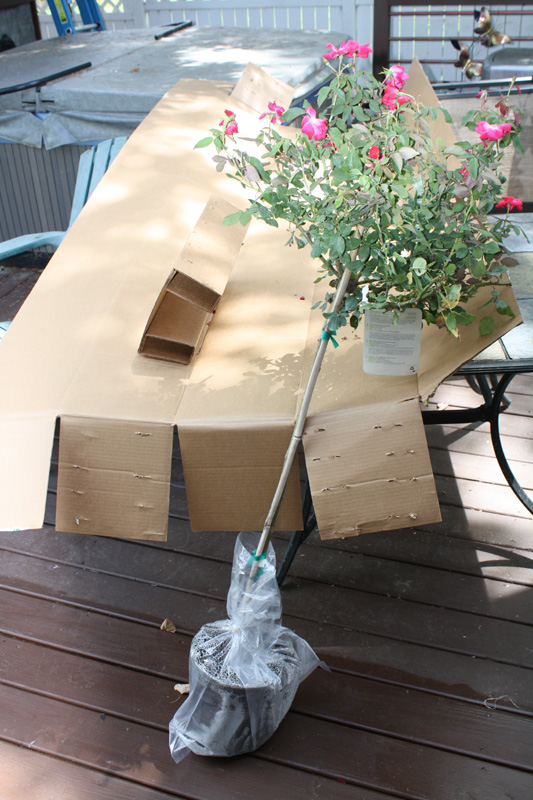
So I was all set to turn Brighter Blooms down, thinking I didn’t have any room, but then I saw the rose tree and thought “I could use one of those, and I’ll finally get a chance to checkout if “Knock Outs” are really all they are said to be. So I asked them for one, and a couple weeks later it arrived.
The tree arrived really well packed, the FEDEX driver couldn’t even fit it on my porch. It was an 8 foot box, seriously. Very strong double wall corrugated material, the tree is nowhere near 8 feet tall, but maybe that was the best sized box. In anycase, it definitely arrived safe, and full of blooms. Though it did bear a pesticide residue on the leaves that I mistook for powderly mildew, but I’m told the government requires the nursery to use it.
The blooms have petered out since then, just one on it now. Knockout roses are supposed to be “self cleaning” in that they do not need to be deadheaded to spur new blooms. I don’t know if I buy that. There were lots of hips (the rose fruit from a fertilized flower) forming. So I finally pruned them off. Roses do bloom in cycles, and it is on an off cycle now. But I didn’t see any “self cleaning” activity.,
It will of course take until next summer for me to assess hardiness. I am in zone 5, and they are supposed to be hardy to zone 5, but I worry about the tree. Grafts are notoriously weak points and often a grafted plant will die back to the graft, basically killing the plant. Now on a normal rose the graft would be way down at the ground level. With this one it is up higher, so more exposed to weather. That could prove decisive. I would feel safer in zone 6. But we will see.
I also hope to monitor disease resistance. I definitely normally get black spot and powdery mildew on my roses. Though some of my roses are obviously more disease resistant than others. You can have two roses right next to each other and one will rarely get badly infected, but the neighbor always will. So genetics do matter, and I’m hoping this tree will be the type that rarely is affected.
So next summer I will be doing a followup post on my overall impression of the Knock Out Rose’s performance.
Dealing with Daylily Aphids
July 27th, 2011I grow a lot of daylilies, I have grown a lot of daylilies for years. This year I have had an infestation of daylily aphids. This has never happened before, I’m not sure why I was spared previous years, or hit this year. I think maybe the high rain earlier in the summer allowed the foliage to get high and lush, which provided a better more sheltered eating environment for the aphids down deep by the crown, but I’m not sure.
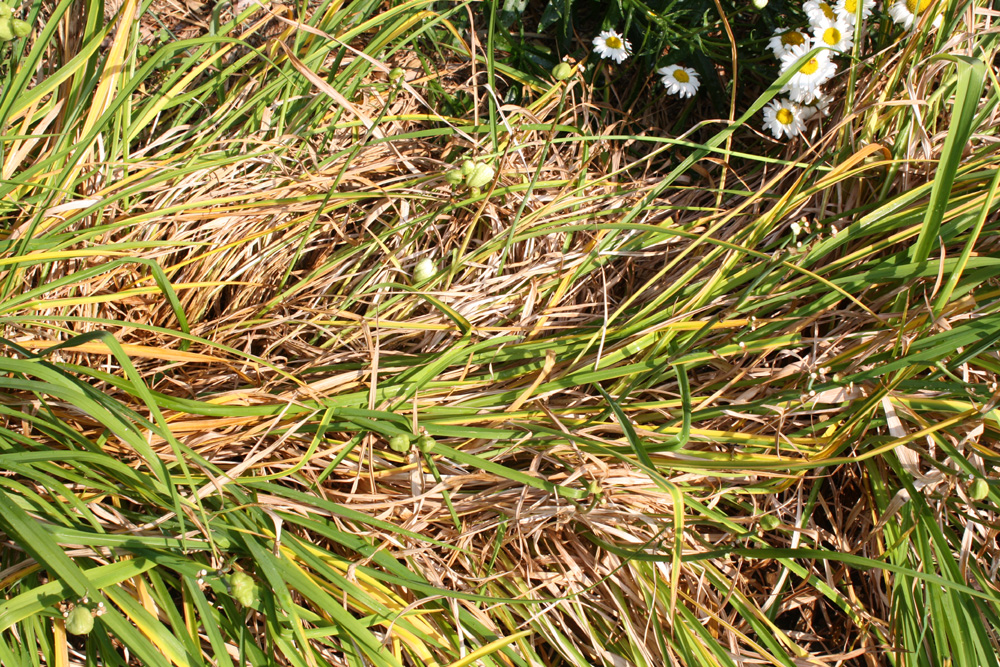
That rain was earlier in the year, lately it has been hot and dry. I noticed weeks ago a section of my “Happy Returns” daylily hedge lying down. I thought at first maybe an animal, or a toddler, had done it. It resembled what you’ll find in the grass after a deer has bedded down for the night. There was also then some yellowing, so I thought maybe it was the drought.
Finally, when watering heavily did not help at all, I thought maybe it was a pest. So I dug down underneath the foliage and found tons and tons of aphids. They had been eating from lower on the leaves causing them
to lack vigor and strength and fall over. Some of the plants looked nearly dead.
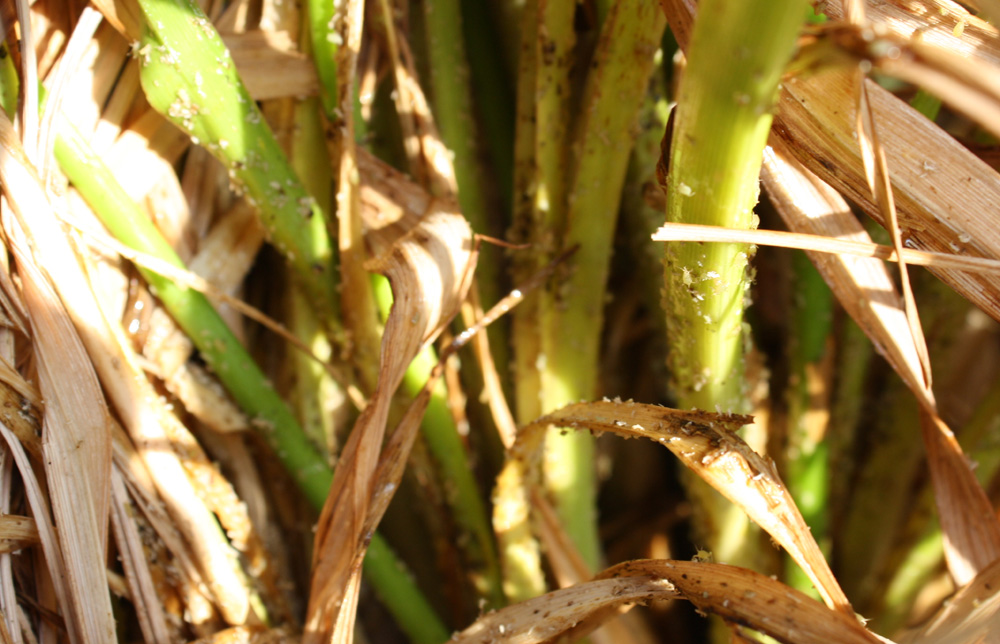
I immediately got out my duster and filled it with some diatomaceous earth. This is a white powder substance to us, made up of ground up ancient seashells. But to small soft bodied insects it is like razor blades, and it is a non-chemical way of killing them. So I injected the dust all on the row.
But the foliage was very thick, and I worried I couldn’t get coverage, so later I then cut the most affected ones back to better get at the lower growth. There was so little green left that they really did look dead, and I don’t think they’ll recover yet this year, but daylilies have such strong roots that I’m sure they will be back next year.
Then, next time I was at Lowes, I got a systemic pesticide. If I had caught it earlier my initial efforts may have been enough, but this was a full blown infestation, very progressed, and I had to not only treat the affected plants, but protect the ones not yet attacked. A systemic product doesn’t kill bugs on contact, instead it is taken up by the plant, and then the bugs who eat the plant injest it. A indiscriminate pesticide could kill bees or lady bugs or other beneficial insects, but a systemic one should only get the bad ones, the ones that eat the plant. It was a Bayer product and it says it lasts for 30 days in the plants, providing long term protection that should hopefully get rid of my aphid problem.
Aphids can often be treated without chemicals. When on trees or roses or other plants that stand up straight, you can often blast them off with a hose, use a soap based product, or the diatomaceous earth as I used. However with these daylilies they were really down in deep where they couldn’t really be sprayed away or accessed well with any sort of spray. There was too much daylily foliage providing coverage. A systemic pesticide was really the best solution as I did not need to worry about spraying all the aphids, but only all the affected plants.
In the future, if this happens again, I will know what to look for and hopefully be able to head it off before it gets this bad.
Detroit Area Homeowner faces Jail for Front Yard Vegetables
July 21st, 2011Being in Michigan, (though thankfully not Detroit) I am somewhat familiar with Detroit. The city is basically a hole, miles of abandoned buildings. It has suffered under decades of big government mismanagement. It is the only city in the US to surpass 1 million people, but then fall below that, and in fact it’s population has dropped by over 50% from the peak. The continued mass exodus from Detroit is a big reason why Michigan was the only state, the only state, to lose population in the last census. 49 states gained people over the past 10 years, and Michigan shrunk. You would think government officials in the Detroit area would not try to chase off what residents they have left, but you would be wrong. Apparently you can lead a horse to water, but you can’t shake the government knows best attitude out of a big government bureaucrat.
So, an Oak Park (Detroit suburb) woman is facing jailtime for planting vegetables in her front yard. I take personal offense at this because I have advocated for growing your own food and front yard farming.
As I’ve mentioned before many cities have really archaic ordinances on the books about what you can do with your yard. And God forbid you live in a Homeowner’s Association full of people who just can’t mind their own business. Often the laws have to do with grass coverage. Grass being the most useless and most resource intensive thing you can possibly plant. It needs more water, more fertilizer, and of course more mowing, than traditional gardens. It is very wasteful. All grass really has going for it is it makes a good play surface. But who wants their kids playing in the front yard by the road? I know I don’t.
So this poor women, who is only trying to combat ridiculous high food prices thanks to other misguided government policies, planted a garden in her front yard. Maybe because the back yard is full, maybe because the back yard is shady, maybe because she wanted to share and be social with her neighbors. Most of her neighbors like it, and people are voicing support online. But the pencil pushers at city hall are taking her to court, wasting even more taxpayer dollars.
Michigan cities all over the state are having budget problems. Laying off police or fire fighters, not fixing pot holes, etc. I wonder how much Oak Park pays to have the “grass police” drive around writing tickets. Now sure, no one likes a house overgrown with weeds. Those weeds can go to seed and infect the whole neighborhood, and it can bring down housing values, no one likes that. But a house with a garden in front is a homeowner who cares, it shows character, and to me would make the street seem safer. A garden is not an eye sore, and should not be treated as such.
If Detroit really wanted to get their act together they should bulldoze the tens of thousands of abandoned buildings and turn all that space into urban gardens, where everyone can grow food. In fact, imagine if the whole country planted food in their front yard? Imagine all the extra food we would suddenly be producing.
Weeping Larch, Larix decidua ‘Pendula’, Like a big Bonsai
July 10th, 2011Somewhat as a followup to my previous post Niwaki: Bonsai in the Garden, about training unpotted garden trees in a bonsai fashion, today I bought a weeping larch.

Long time readers of this blog will I know that for years and years I have wanted a Weeping Blue Atlas Cedar, Paul James had one on his property and it showed up often in his TV show and I wanted it bad. Unfortunately, they aren’t quite hardy here. I eventually got a different cedar, an upright version, that was hardy, but I was still missing that architectural interest of the weeper.
Then I discovered larches. They are hardy here, hardy to zone 4, not the zone 6 of the atlas cedar. They have very similar needles (short, soft), and while they are a deciduous conifer, I don’t mind that. So, today I bought one.
Often you will see these grown in an overgrown, mop head, or dreadlock-y fashion, where the plant looks like some swamp thing reaching out of the ground with tendril-like branches draping it from head to toe. I didn’t want this. I wanted to show off the interesting growth habit, and an interesting trunk. So I bought a tree that emphasized the trunk, and then I did some additional pruning to expose more of the trunk to view.
Untrained, these trees will grow along the ground, so you have to train them to grow upright, and if you have to train them anyways, you might as well train them to grow in an interesting way, like you would with a bonsai.
So this tree is very very similar in shape and form to a nice bonsai you might buy, only it is 6 or 7 feet tall. Check out that contorted trunk. Of course, to get a bonsai this big or old you’d pay a fortune, tens of thousands of dollars. Whereas this tree was only $200ish, I call that a bargain. Check out that cortorted trunk.

Good for me the needles even are slightly blue, though not as blue as the atlas cedar. Still, compared to the bald cypress needles (which is growing behind it) it looks quite blue. The cypress will grow formal and upright, so this will be a nice contrast, and good garden design is all about contrast. I’m really excited about this new tree.
Niwaki: Bonsai in the Garden
June 25th, 2011Sushi is about the rice, not the fish. This is why a California roll, which contains no fish, is still sushi, but sashimi, which is just a slice of raw fish, is not. So while most people immediately associate the word “sushi” with raw fish, it is actually named for the rice which accompanies it.
Bonsai is another one of those Asian words with perhaps the wrong instictive meaning. I say “bonsai” and you think “highly trained small trees” but bonsai is really named from the shallow pot in which the trees grow. Without the pot, it isn’t bonsai. I really dig bonsai, I don’t own any bonsai, but I love looking at them. I suppose there are many reasons to grow bonsai, but it seems mostly the desire is to make the trees look older, and have more character. Old, twisted, gnarled trunks, or straight trees that droop stately with age. Character isn’t found in young trees and so bonsai training techniques are generally used to make trees older.
It is a misconception that a bonsai artist wants his tree to grow slowly, he actually wants it to grow faster so it can react to his training faster, he’ll keep it small by pruning, but wants that trunk to keep getting wider. With bonsai you’ll prune the leaves and branches, and use wires to guide the plant to grow as you like, but you’ll also lift it out of it’s pot and prune the roots to keep them smaller as well. Hence the necessity for a pot. You can’t root prune if you plant in the ground, and if you plant in the ground it isn’t bonsai.
But what is it? Well, it is Niwaki (alternately spelled Niwagi or Niwa-ki or Niwa-gi). If you’ve ever been to a really nice Japanese garden you may have noticed trees planted in the ground yet obviously trained to look older or with more character as in bonsai. This is niwaki. Same rough practice, different sized plant.
I don’t own any bonsai, I really can’t. In Michigan, the pots wouldn’t do well outdoors, and I don’t have any indoor space with enough light for a bonsai (no south facing windows in my house). I can, however, do niwaki, because I really like old looking trees.

So, I’m trying to do it. A few years ago I bought a bald cypress because I really like the formal upright bonsai form of bald cypress, where you basically make it look like a giant 500 year old tree. I haven’t done anything with it yet, because I also just like big bald cypresses. I do however have two other trees I planned to work with, and I finished both today.
The first is a dwarf hinoki cypress planted near my water feature. Hinoki cypresses are very similar to our native arborvitaes but their leaves twist outward a little more creating, what I think is anyways, a more interesting texture. This plant is a dwarf, which I chose because I will be unable to do actual root pruning (as I could with a bonsai) and it is a very small space.
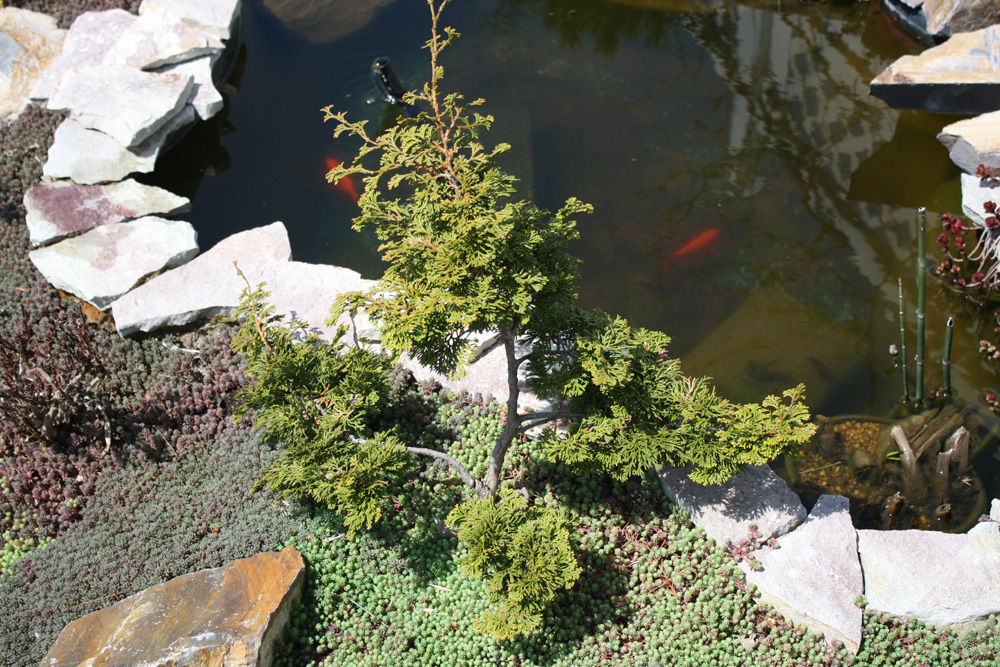
I had done some pruning and training on this plant previously, but I really went at it now. So, if you desire a plant to look older, what do you do? Well, on a new, young tree branches tend to reach upward, whereas on a very old tree the weight of them has pulled them more parallel to the ground, or even angling towards the ground. So trying to train branches to grow straight out from the trunk, or slightly downwards, can give an illusion of age. The other thing you look for is separation between sections of a tree, especially on conifers. There should be a gap, an emptiness, between where foliage on one branch ends, and where foliage on the next highest branch begins. This gap is a characteristic of really old trees (that have lost branches from natural attrition) and creating it on your smaller, younger trees, will give them character.
The other thing you can do is, since we don’t pick in what direction branches extend out from the trunk, use wires to point them in the direction you wish to grow, to make sure the tree branches evenly, or unevenly, if that is what you are going for.
So after I was done with the hinoki cypress it looked like this:
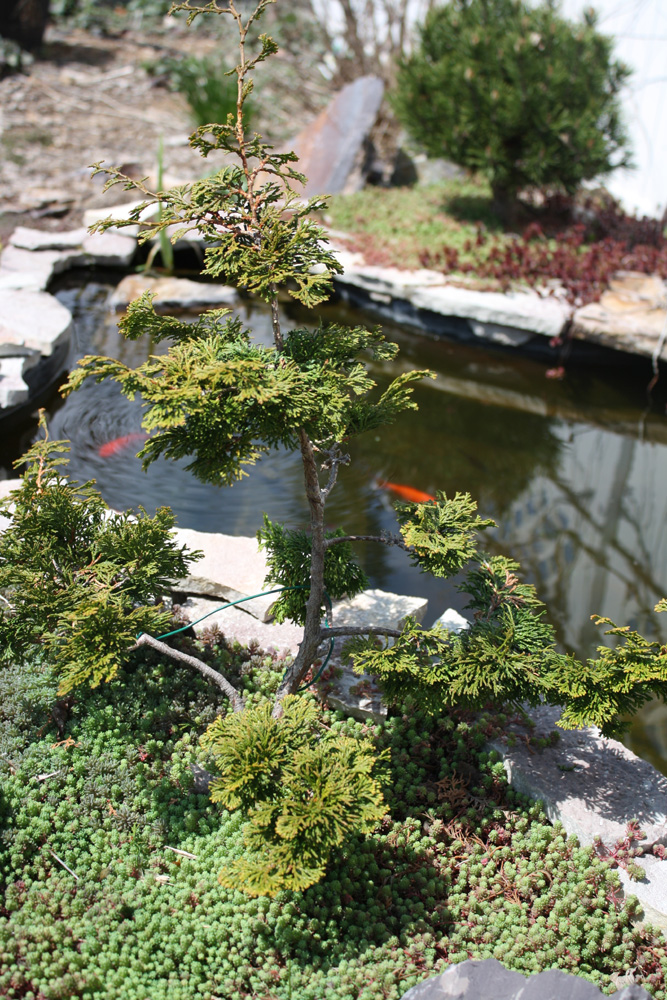
I created separation by removing foliage and branches where necessary, I exposed more of the trunk (another thing that makes a tree look older), and I used some wires to bend branches in interesting directions, or to where there is a gap I felt needed filling. When using wires do NOT leave them on longer than 1 season, or the tree can be strangled by them. As I show in a picture in this post on tree staking a wire left in too long is a very bad thing.
The other tree I did was my tanyosho pine I had planted it in 2007 and it had really grown well last year, and put on huge new candles this year. The trunk was also finally starting to get a crinkle texture. But I had always planned to train it in an interesting way. Still, I was nervous. This tree was nice, and was right in front of my house, front and center, the middle of my front yard, raised on a raised bed pedestal even. When you prune a limb off, you can’t hit the undo button. I had been putting off the moment for weeks, thinking “Do I really want to do this?” Finally, today, I did it. No going back now.
Here you see my tanyosho pine just before I hacked into it:
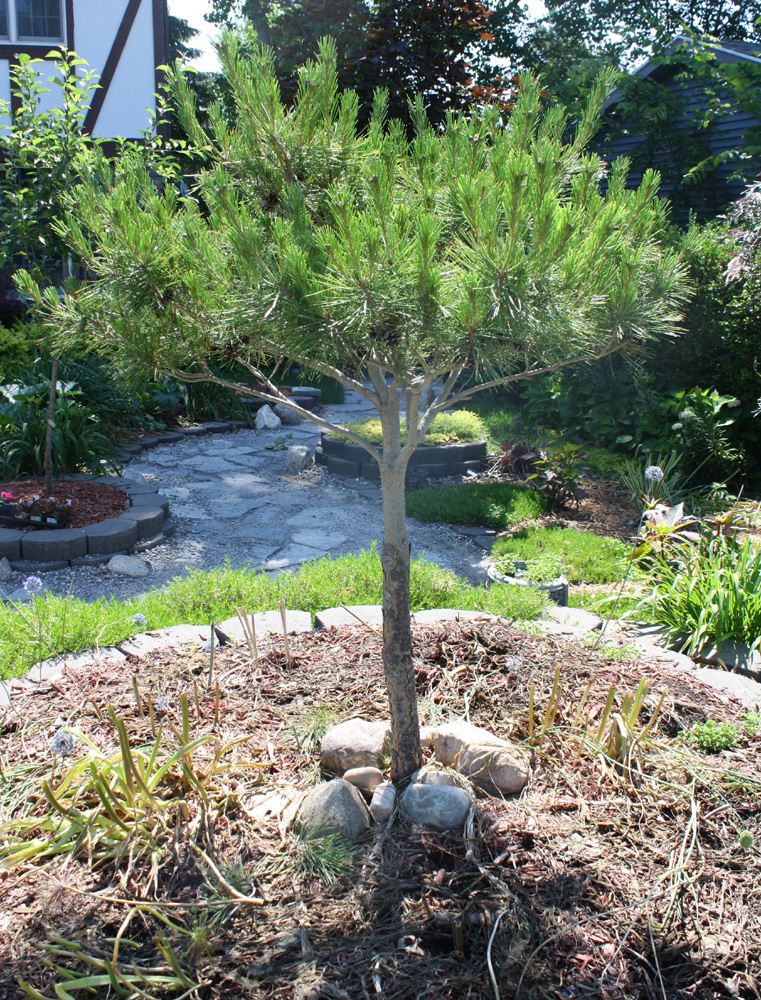
As with the hinoki cypress I wanted to emphasize the branching structure by opening up the middle, I wanted to angle the branches more downwards, and I wanted to create separation between the foliage sections.
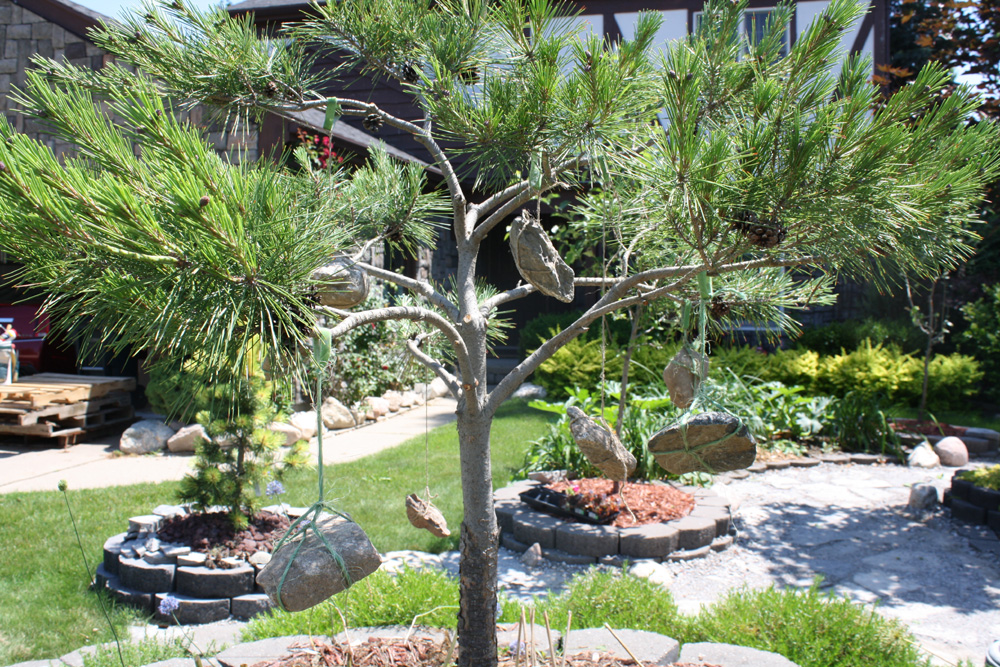
However, with this pine, there was another issue. Tanyosho pines are also called umbrella pines because they have an upswept growth habit, a flat-top if you will. Had I let it continue to grow, it would have that flat top. So the natural growth habit is interesting. But, I had seen some pictures of some interesting shapes you could achieve with it in the Niwaki book I had gotten for Christmas. Basically by pulling the branches downward so that they now left the trunk at a 90 degree angle, I could get a really neat look because the growth would still go upswept at the ends of the branches, it would basically take on the look of a very old pine tree. To achieve this, because this tree was much bigger, I had to use a niwaki technique of weighting branches with rocks.
This also made me nervous. Too light of a rock and the branch wouldn’t move enough, too heavy, and it could snap. Also, I had to think about wind, rain, and snow, all of which can increase the load on the branches. I hope I did it right. I should only have to leave the rocks on through the growing season this year, and the branches should conform to their new shapes (I hope). I will definitely take them off before winter hits, both for snow and because the cold will make the tree more brittle.
I also pruned all the downward secondary branches that were growing. They wouldn’t actually grow downward, but they would start on the bottom of the branch, and then curl up around it (with the upswept growth habit). It gave the tree a much cleaner look without them.
All told, I removed a lot of material from this tree, but there is no going back now, I hope I don’t regret it.
I basically picked one branch I wanted for each direction, and pruned off ones that were doubled up (pruned off the weaker branch of the two that were growing due west, for instance). I also thinned it out in general towards the middle, leaving tufts of needles at the ends of the branches.
Trunks, to me, can be as interesting as leaves. So by opening up the inside I hope to show off the branching pattern of the tree. I’ll post updates as the years pass (until I move anyways) to show the progress of this tree, and how it is growing with my training attempts. If it continues to grow as vigorously as it did this Spring, it shouldn’t take too long for it to adapt to the new form.
A note on using the rocks. Don’t tie the rocks directly to the branches, the ropes can cut into them. I first looped wider (about half an inch) velcro plant ties around the branches, then tied the rocks to the plant ties (using twine).
Rogue Climber
June 17th, 2011I awoke to a disappointing sight the other day, some fiend had meandered through my front yard, pooping, and eating leaves off plants. This would be bad enough, but what is worse, it tried to climb up my honeycrisp apple tree, and then I assume out onto the two lowest scaffold branches, and it broke both of them. So now my tree is permanently mutilated. You can’t replace primary branches easily or quickly.
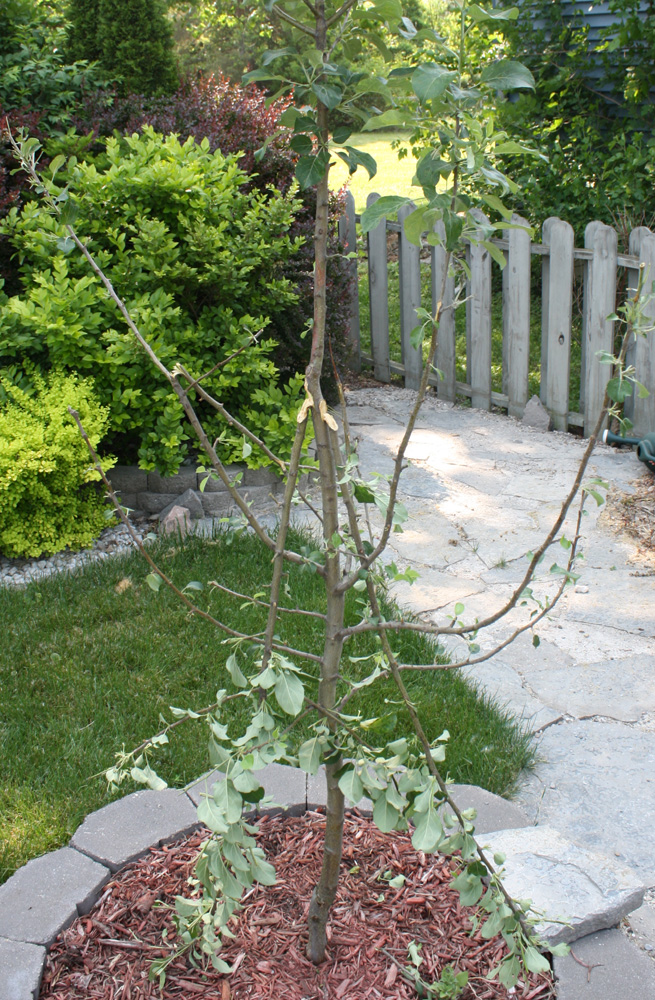
I can tell where the creature, undoubtedly a groundhog I’m sure, entered my yard. It ate the leaves off a new paw paw tree I had just planted. Then ate the top growth off my single small boysenberry plant. Waltzed across the driveway, ate 3 or 4 small petunias I had just planted, ate all the small leaves off the lowest branches of my yellow delicious apple tree, ditto on my honeycrisp apple tree, which it then climbed to destroy my primary branches. Then it continued to eat the tops off some hardy hibiscus, and finally off to the neighbor’s yard.
It figures too. I had just critter-proofed my back yard. Nothing bigger than a squirrel can get in the entire backyard now (not unless it can climb a 6 foot privacy fence). I had to do it because every once in awhile a skunk will wander in, and my toddler son has no idea that a skunk is not a dog or a cat and would probaby run at it waving and screaming and that is not something I wanted to deal with. Not that I needed much arm twisting to do so, having dealt with groundhog damage over the years. But, now they’re hitting my front yard, the devious rodents.
So, I learned a lesson. I normally leave limbs on trees as much as possible, to provide more leaves, and thus more energy for growth. But I immediately went out and pruned off all the small lowest branches on my dwarf apple trees. On the honeycrisp the critter had used these small lowest branches as a ladder to reach the higher and thicker (and far more important) primary branches, which it then tried to climb to the end of, until the branch snapped. Then the stupid thing went back and did it on the other side. The point being, without the ladder-like small lower branches, I don’t think it could have reached so high.
So, from now on, I’ll remove the option of climbing the tree. Now, hopefully, I just have to worry about them gnawing at the trunk.
Pinus Cortorta Taylor’s Sunburst Update
June 15th, 2011I first blogged about this tree last summer when I planted it, well after it’s spectacular Spring color had faded. So, it was definitely time to do an update, with the pretty colors, which have lasted, so far, around 8 weeks.
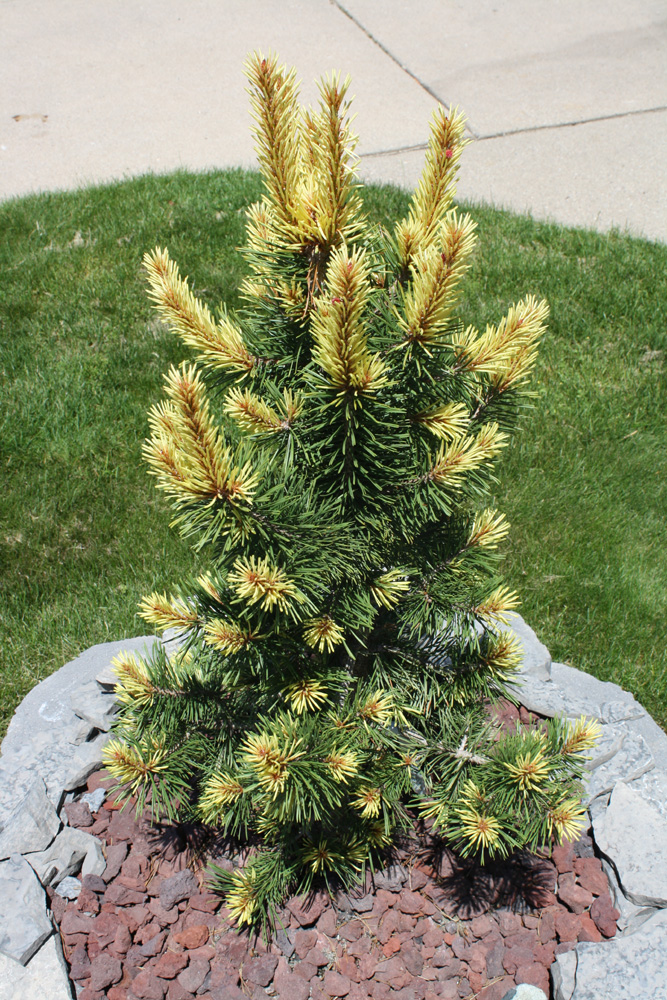
The color is spectacular, just as I had hoped. This is basically a conifer that “flowers”, in the sense that it puts out some bright yellow color, not unlike the yellow of a “Happy Returns” daylily, for at least 2 months here in the Spring. It grows very slow, only a couple inches per year. But, by measuring the candle length the top growth on mine gained at least 6 inches, which is above the norm for this hybrid. So I think planting it in high quality soil, as I talk about in my original post on the tree, worked.
Interestingly, new branch nodes on the candles are coming in hot pink. I never knew about this feature of this cultivar, didn’t see it mentioned anywhere, but there are definitely hot pink spots on the candles as in the below picture.
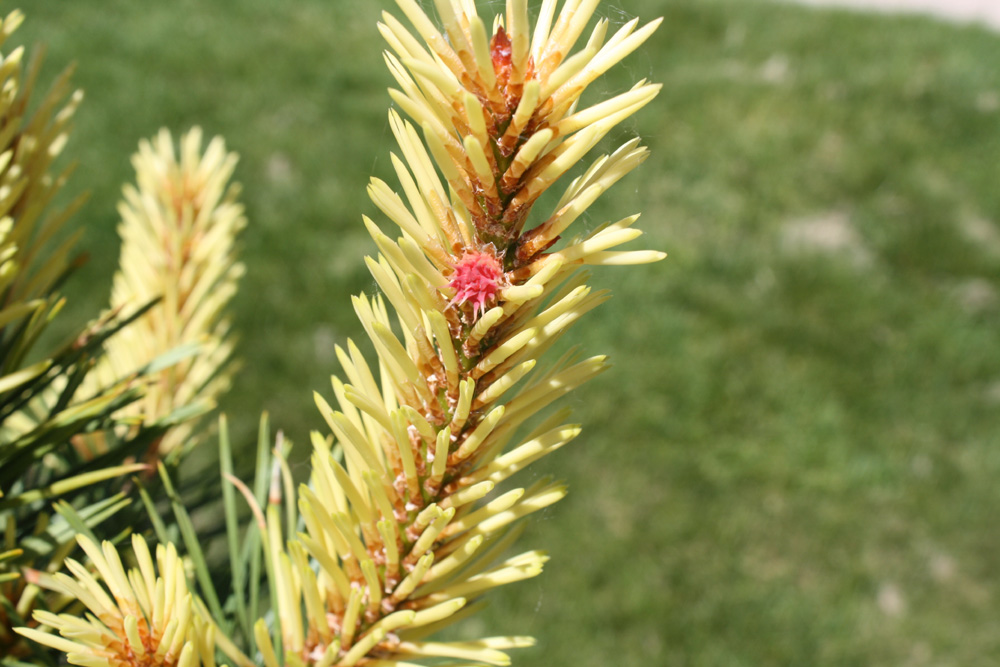
It is always nice finding out about an unknown but attractive feature of a new plant.
If you notice on the first picture, the candles (that is, by the way, what new growth on such pines is called, “candles”) are longer on top for the vertical growth, than on the sides for the lateral growth. This tells me that this tree will tend to grow tall and skinny, more columnar, than wide and spreading (or short and squat). It is important to note this growth habit. Not all pines, or all conifers, will behave the same way, and how they grow will affect the optimal planting locations. This tree, for me, is right near a path, so it is good it grows tall, and not wide, because if it got too wide it would block the path. On the flip side, for a foundation planting, or underneath a window, it may not work as well because it would get too tall, blocking the house. Growth habit is another attribute to pay attention to when planting a tree or shrub.
Pinus Contorta “Taylor’s Sunburst” is definitely a plant I recommend, being only a couple decades old as a cultivar though it can be hard to find, and it on the expensive end, but where else can you find a conifer that provides year round interest, Spring “flowers”, a cool structure (naturally bonsai-ish, hence the contorta species name), and possibly even, when it gets big, food for wildlife via the cones. I know of few other conifers that get this bright in Spring, especially with the contrast between the old growth and new (a few, very very fragile and less hardy conifers can be bright yellow, but they’ll be all bright yellow), and I certainly know of no Spring flowering trees that are evergreen (atleast here in zone 5). This tree is definitely unique.
Found a Large Egg in my Garden
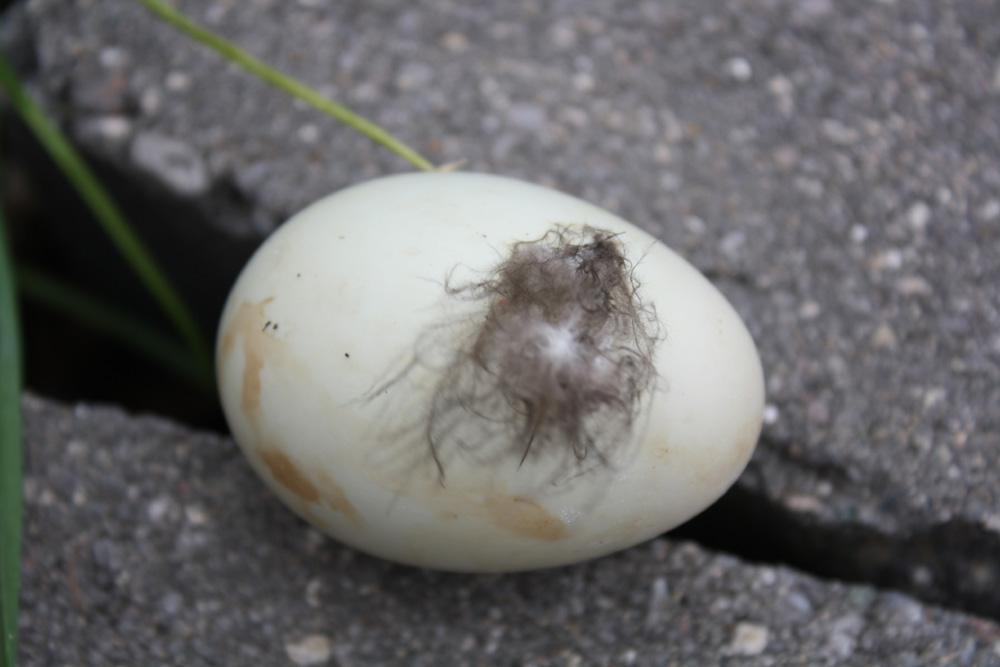
May 17th, 2011So, I am out mowing the lawn and I see a large egg in one of my raised brick beds.
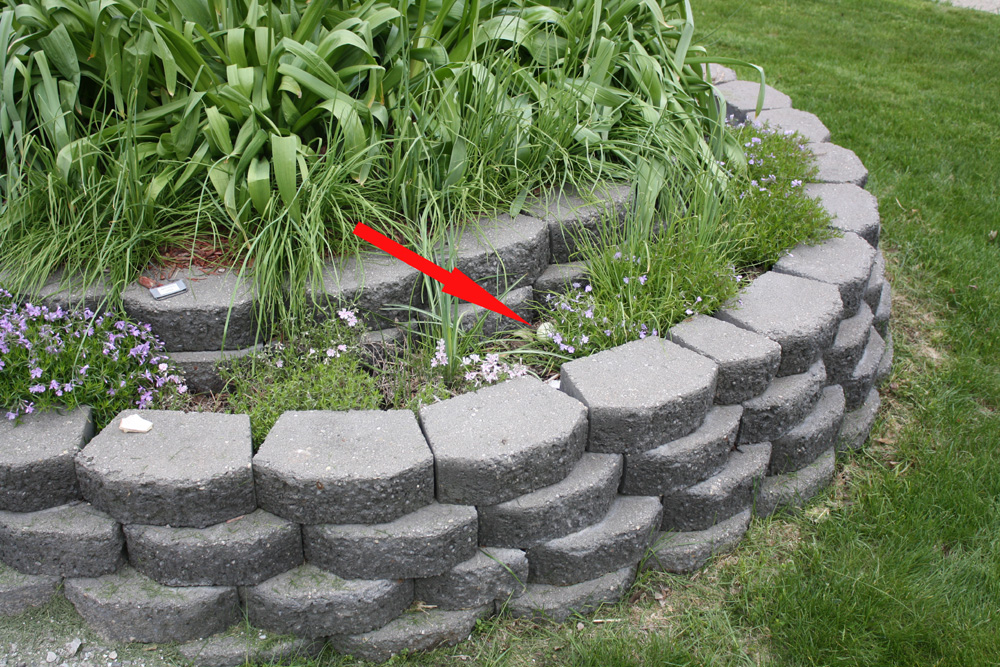
It immediately jumped out at me, so I’m sure it hadn’t been there long, or I would have seen it previously. It is a big egg, maybe a little bigger than a chicken egg. It has a tuft of feather attached to it, a few brown smears, and a somewhat waxy smooth texture, not the gritty texture of a chicken egg. It also felt sturdier. I tested it with a flashlight and it definitely is a real egg, there is something in there (something small).
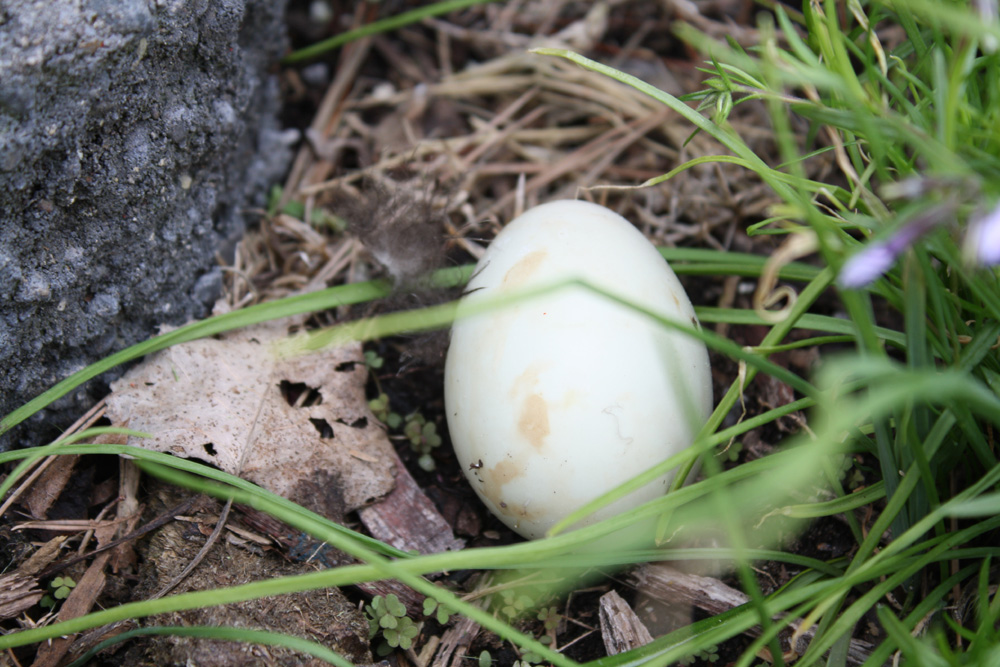
I’m told by Google that it may be a Duck egg, well, it is big enough certainly. But how did it get there? Did Mrs. Duck lay it there on purpose? Why? I’ve read that some animals will carry an egg, like a fox, but we don’t have foxes, and I can’t see a squrrel doing this. I’ve seen one raccoon in 7 years of living here, and this is also fairly near a fairly busy 4 lane road. Plus… if it was stolen from a duck nest, where is the nest? It would seem like if it was stolen, the thief brought it a long distance. I’ve got a small water feature in my back yard, but it doesn’t support ducks. There is some wetland areas about a half mile away where I have seen ducks, but that is still a half mile, and surely there are better hiding places for your cache of stolen eggs in forest and wetlands than a city neighborhood by a street?
Any ideas? Can I do anything to help this egg hatch? Or is that a lost cause without mom around?