
Growing Mullein in the Garden
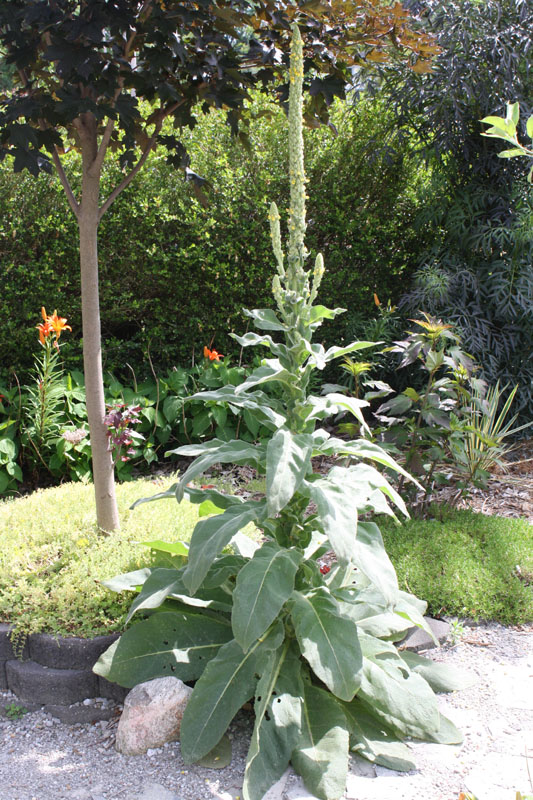
June 27th, 2012I had a volunteer mullein sprout in a crack in my stone walkway (at the end by some rocks) last year, and despite it being considered a weed by most, I left it, and this year I am rewarded with a great show.
Why not grow this plant on purpose? Many actually do, it has a variety of uses. One of the uses are the soft leaves, which is how it gets common names such as “wooly”, “feltwort”, “velvet”, and yes “cowboy toilet paper.” The stalks also create excellent spindles for primitive fire making techniques. Various parts of the plant are also used in herbal remedies (teas to soothe sore throats and the like).
But, from where I’m standing, it is just plain pretty. The silver color of the leaves, with their interesting soft texture, the vertical statement of the stalk. It is a very showy plant. It is also adapted to a wide range of soils and does well with very little water or fertilizer. Mine is literally growing out of patio base gravel between cracks between rocks.
It isn’t invasive as most would consider a weed to be, it is easily controlled by mechanical means if it grows somewhere you dislike.
There are cultivars that are specifically not weeds of course, but I like the big great mullein Verbascum thapsus.
These are biennial plants, which means they live for two years. The first year it will just grow a rosette of leaves, storing up energy in its roots, for the massive flower spike push in year two. Then it will die and need to be replanted.
If one sprouts in your garden, maybe don’t weed it, maybe let it grow and see if you like how it looks. Nature sometimes has happy accidents.
White Clover Lawn
June 23rd, 2012What if I told you there was a way to have a greener lawn, that needed less water, less fertilizer, attracted beneficial insects, and yes, it would be greener? Would you believe me? You should. White clover is the answer to this riddle.
A white clover planted lawn is sometimes called an ecolawn, you simply overseed or co-seed white clover with your grass. White clover is one of those magical plants that form a symbiotic relationship with nitrogen fixing bacteria, which means it is able to take nitrogen from the atmosphere and place it into the soil which in turn fertilizes plants. A lawn that fertilizes itself, what a good idea!
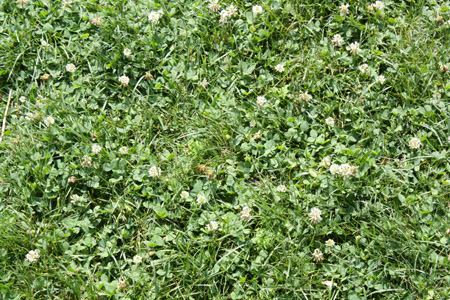
White clover also establishes a deeper root system that typical grasses allowing it to better deal with heat and droughts, staying green even when nearby grass gets brown. The green of white clover closely matches that of most grasses allowing it to blend in almost seamlessly.
White clover will flower, and at times in summer you’ll have white blossoms rise slightly above the foliage, still pretty low. These flowers can attract and feed honey bees, which will happily also pollinate your crops and fruits. They can also attract parasitic wasps, the kind of wasps that eat aphids, not the kind that stings people. If you really dislike the white flowers, you can mow them, but I say keep them.
White clover can take foot traffic and mowing, though it grows lower than what your mower setting should be. It is soft underfoot and certainly does not hurt to walk barefoot on. It may also shade the soil better, thus stopping weeds.
Yes… weeds… some people would call white clover a weed, while others plant it on purpose, and some manufacturers even include it in grass seed mixes. Manufacturers of herbicides will call it a weed, and kindly sell you a chemical to kill it. I won’t say I’ve never used herbicides, I have, but they haven’t killed my clover. However the manufacturers typically claim they will kill clover so if you do add clover to your lawn you should avoid using broad post-emergent herbicide sprays in the future. Instead use spot treatment sprays, or mechanical methods of weeding. Pre-emergent herbicides of course wouldn’t affect it once it is already established.
Once planted your clover will crawl slowly over your lawn, expanding over a course of years. So you do not need to seed the whole lawn to eventually reach full coverage. It isn’t really meant to replace grass entirely, though such a thing is possible, but rather to coexist, with blades of grass jutting up between the shamrocks of clover.
If you cannot find white clover seeds locally, Amazon.com has some available.
Cut Down My Cherry Tree
June 10th, 2012A couple days ago I cut down my cherry tree, and unlike George Washington, I didn’t feel bad about it.
I bought this tree in 06 or 07, and it grew like crazy, lots of wood, lots of leaves. The caliper (diameter of trunk) on it flew past a pear tree I had planted in 04, about 10 inches across, and this was supposed to be a dwarf. It also got significantly taller than that pear tree, even with some pruning.
I believe it was supposed to be a starkcrimson sweet cherry, but maybe they messed up sending it to me.
It fruited for me a couple years, I probably got only about 10 total cherries though, and they didn’t taste good. Not sour, not sweet, bland.
Meanwhile it had completely shaded one of the few areas of my property that gets significant sun, depriving me of some real estate to grow vegetables or other edibles.
It was also infested with black cherry aphids, every year.
So I think I have discovered why cherries are so expensive at the store, they’re difficult to grow. Apparently they need some pretty specific pruning and won’t otherwise fruit like an apple would, they also need more in the form of pest controls. I am still convinced though that I got some supervigorous rootstock graft or something.
So I cut it down, and now I will never get cherries, but that is okay, because in the space that is now no longer shaded I have planted a bunch of squash and a few other things in containers. I should get at least 50 pounds of butternut from this area. So when I look back and weigh 50 pounds of squash vs 6 or 7 cherries, maybe, it wasn’t a hard decision.
I just wish I had never planted it in the first place.
I did save a bunch of the wood, I think I’ll use it in my smoker.
Four Herbs Everyone Should Grow
April 30th, 2012It has been a horribly cold April here in Michigan, after a blissfully warm March. I haven’t wanted to go outside, let alone do any gardening, I hope May is better. I have, however, wanted to do a post on herbs for awhile and since I’ve got nothing else to post about (except maybe to complain again about late frosts) I thought I would do so now.
I really enjoy growing herbs for a few reasons. I like to cook, and no matter how you slice it fresh herbs generally knock the pants off of store varieties. I like to save money, and herbs are pretty expensive in the store, especially fresh ones. They also make unique and interesting plants, at home in the vegetable garden or the ornamental garden. If you only grow four herbs, these are the four I recommend.
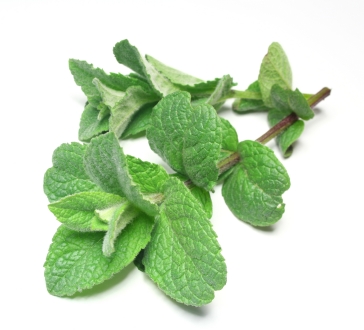
1. Mint
Mint is awesome, I personally love mint flavored deserts, shakes, chocolate, etc. In the summer I like to make a cool cucumber salad with a little mint and cukes from the garden. Mint also comes in a wide variety of flavors. Spearmint and peppermint are standard, but gardeners have hybridized a whole variety of other cultivars with hints of various flavors like pineapple, apple, even chocolate. Plant them all.
Kids like mint too. My son, who is almost three now, spent all last summer eating mint out of hand when he was outside. He would take a little chair over to the mint container, put it right in front, sit down, and spend 20 minutes picking and eating leaves. He really likes it, and like most herbs it is healthy for you.
Mint is versatile and very easy to use in the kitchen, it is also really easy to grow in the garden. It is hardy in most places and so you only need to buy it once and it will keep coming back. It is such a good grower is can be invasive, so most people plant it in large containers. Dig and divide your plants as the containers will up, using the divisions to start new pots, or give to friends and family so they can enjoy fresh mint too. Like most herbs, mint likes sun, and well drained soil.
2. Thyme
Thyme also comes in many varieties and flavors, and just to confuse you more, there are many non-culinary varieties as well, though I’m not sure eating them would hurt you, they’re just not typically eaten.

Thyme, like mint, is also a perennial ground cover that spreads, however, it isn’t as vigorous and is not invasive, so you can safely plant it in and among your garden. It does like well drained soil, and seems to do well in rocky areas, between cracks and crevices. It can even take some foot traffic.
My favorite is lemon thyme, which is hardier than some of the others and has a nice lemony hint to it. I use it in the kitchen either by chopping it up fine and adding it to dishes, or sometimes I’ll just tie a bundle of sprigs and let it simmer in a pot (soup usually), removing it as I would a bay leaf prior to serving.
Thyme, in my opinion, does not provide as much bang for the buck as other herbs. Dried time is still pretty expensive at the store, on a per pound basis, but it at least works decently well. Thyme is one of the few herbs that doesn’t lose too much flavor from drying or aging. Recipes also rarely specifically call for fresh thyme, though I enjoy having it on hand. I also enjoy the ability to grow more varieties than can be bought at your local super market.
Even if you do not plan to use it in the kitchen, it makes a durable and attractive ground cover, and some variety of thyme should exist in almost every garden.
3. Basil
Basil is perhaps the ultimate chameleon in the garden. Mint varieties still taste minty, thyme varieties still taste, well, thymey, but basil varieties can taste like almost anything. There are almost too many types to mention, but I find pineapple basil particularly good, as is cinnamon basil. The most common basil is usually labeled just basil or Italian basil. When a recipe calls for it, this is the one they mean.
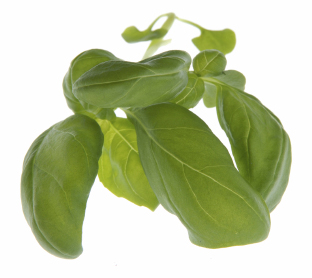
Basil is an herbaceous annual with small leaves the consistency of young spinach. It likes moist well drained soil and full sun. Basil is not bothered by many pests, and indeed supposedly wards off some insects. It can get leggy and so you should pinch, cut, or eat terminal growth regularly to promote a more bushy plant.
It is an annual, so you do need to plant it every year. However it can grow well inside. It is what I grow in my aerogarden, and when I have a greenhouse some day I plan to make big use of it. When grown outside it will last until cold sets in, when grown inside it can last much much longer so long as you keep it fertilized and give it lots of sun. I’ve had it last almost a full year before, and I think it merely outgrew my aerogarden or it would have lasted longer.
I do prefer growing perennials because I feel they give you a nice bang for your buck, having to only buy them once. However basil is very very very easy to grow from seed, and seeds are cheap. Also, basil is ridiculously expensive at the store. A couple bucks for a few sprigs. It has a really short shelf life so you pay a premium for it. Anyone who has ever made pesto at home and thought to buy the basil at the store probably knows what I’m talking about. Most pesto recipes will call for one or two cups of packed basil leaves, you might as well be buying lobster and tenderloin for what that can cost.
As for dried basil? I never touch the stuff, I find it disgusting. The essential oils in basil must go rancid really fast or something because dried basil both does not taste good, nor does it taste like fresh basil. I like fresh basil.
Basil is very healthy for you with a bunch of antioxidants and everything else, and it goes well in many foods. Most Italian dishes can take it from pastas to casseroles to pizzas. It goes well with fish. It goes well with roasted potatoes, it goes well with anything you would add garlic to. Pesto, is a very heart healthy condiment that you can easily make with basil. I also happen to like basil in scrambled eggs. When I grill steaks I like to put basil leaves on top, and then parmigiana cheese on top of the basil.
There are also some very attractive varieties of basil with interesting leaf colors that would be stand out plants in an ornamental garden, and you can still eat them too. It is a nice dual purpose plant, even if you do need to start it from seed again after every winter.
4. Parsley
No, I do not mean the curly leaf parsley used as a garish in so many restaurants. I mean flat leaf Italian parsley which is a great addition to many dishes. To my knowledge, parsley does not have many flavors as the other herbs I mentioned above, there is pretty much just the standard variety, and yes flat leaf italian parsley does have a taste similar to the curly leaf parsley, but they’re not quite the same.
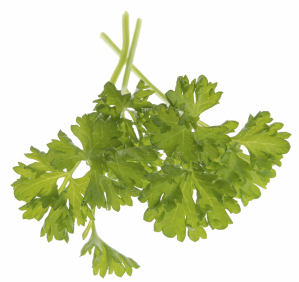
I like parsley because it is a biennial, which means it lives for two years. Not quite an annual, not quite a perennial, but it can survive outdoors in a pot in my zone 5 garden. Like the other herbs it likes sun and well drained moist soil, and it grows pretty vigorously once established, to the point where you can harvest it heavily and it’ll keep growing back.
Parsley, like basil, is used in many many Italian dishes, but it has a particular affinity for potatoes. Almost any potato dish is improved with the addition of chopped parsley. This includes soups, mashed potatoes, fries, roasted potatoes, scalloped potatoes, and potato casseroles. During summer when I am growing it I will add it to anything that has potatoes in it. Parsley is in the carrot family and it also compliments carrot dishes very well.
Like basil it is easy to grow and easy to start from seed. I usually take a large container, 18-24 inches across at the top, and just sprinkle parsley seeds randomly on it, then sprinkle a handful of potting mix on top of the seeds, and water well. Soon enough the entire container is full of parsley.
Also like basil it does not store well. Now you can store fresh basil and fresh parsley via freezing, but it is very expensive when bought fresh at the supermarket and the dried stuff is horrible. Parsley suffers from the same taste failure as basil does when dry. I would not ever recommend buying it.
Parsley is significantly more hardy than basil, it dies after two years but not because it got too cold. You can often harvest it still in the winter when snow is on the ground, I often find it still green, and frozen, buried beneath some snow. Other times it will die back to the roots, like a perennial, only to come back in Spring.
Honorable Mention: Rosemary
I like Rosemary, I do, but it isn’t as hard to grow as the above, nor is it as expensive. Like thyme, rosemary takes well to drying, so you can reasonably buy it dried, unlike thyme it is not as fast a grower, or hardy for much of the country. Someday, when I move to zone 7, I will grow rosemary year round outside and be happy with it, but in zone 5 I need to buy it every year. I can’t even start it from seed because it is a woody shrub and so grows slowly at first. For me to get the volume I need for cooking during the Summer I have to buy an established plant every Spring.
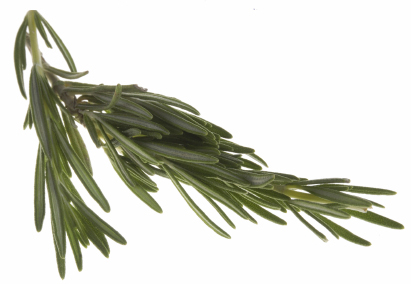
Rosemary does not come in a variety of flavors, but it has a very strong and recognizable scent and flavor and certainly is attractive in the garden both from the silver-green evergreen foliage, as for the scent which is strong enough for you to pick up without sticking your face right down into the plant. It does very well in the kitchen in many meat dishes, stews, and it also likes potatoes (is there anything better than herb crusted potatoes roasted with salt and olive oil and garlic?). You can take a little rosemary, a little garlic, and a little olive oil and mash it up into a paste in a mortar and rub it on practically anything as a flavor booster. I sometimes like to season the oil in our deep frying with some rosemary just to add some hints of that flavor to everything I might fry.
It can grow into a very large shrub if you live in a warmer climate, but for us northerners it will not do that well. Some people do take it in the house or in a greenhouse during the winter, and if you have one, and you keep it water, and you keep humidity up, and it gets enough sun (it needs a lot of sun) it can survive the winter indoors, but you really need the right setup. If you don’t have a humidifier and a big southern facing window to put it in though, it tends to suffer and die.
So Rosemary didn’t make the list because it is too slow to start from seed, doesn’t last through the winter for many people, and is able to be used in dried form from the supermarket. However, I do give it an honorable mention and I do recommend it for gardeners in the South.
I received a review copy of this book called Herbs, The Complete Gardener’s Guide and I do think it would be a useful purchase if you wanted to learn more. It isn’t perfect, it is written by a Canadian who seems to have written for a Canadian audience which means he often assumes you’re in Ontario like him and doesn’t address the variety of climates in North America that much. It is, however, comprehensive, covering all aspects of herb gardening, and includes many large photographs and illustrations.
Putting the P back in Fertilizer
April 3rd, 2012So we have come to this, you’ve heard of the “golden rule” but this is perhaps the “golden question” can you use pee to fertilize your garden?
The answer is yes. Not only have you been wasting a perfectly good nitrogen source down your toilet, you’ve also been using water unnecessarily too. My city bills me for water usage, and I figure every time I pee outside I’m saving a nickle while providing free fertilizer to my garden.
For those who do not know, pee is sterile, yes, it is. Unless you have a UTI, it is sterile. Pee is filtered from the blood, not from your colon. Once it gets into the air it can be colonized by bacteria and whatnot, but as it leaves the body, its sterile, you aren’t spreading anything, except good fertilizer. That doesn’t mean, necessarily, that you could drink your pee like an idiot. Urinating is how your body filters your blood, adding the stuff right back in is not healthy. If you’re ever in a survival situation, don’t drink your pee. Just don’t do it. Make a simple solar still, it isn’t hard, you can purify it easily enough, don’t be lazy like Bear Grylls.
Urine is mostly water, with added urea (which is basically nitrogen), some salt, and trace other compounds, nothing dangerous to your garden. It can be acidic though, so you don’t want to actually pee on your plants. Also, just personally, I don’t pee on my vegetable garden. It isn’t dangerous, but that doesn’t mean I want to risk splashing on my food. I’ll grow vegetables in well composted cow manure, which is definitely more gross, and plenty of people will do the deed in the veggie patch, but I won’t. I will pee into my compost and then later use that compost in the vegetable garden, but I let it all compost for awhile of course.
What I like to do is fertilize trees with it. It is a nitrogen fertilizer after all, and if you want a tree to grow bigger it needs nitrogen.
Just make sure to spread it around, chances are your pee is not that acidic, but over time you could affect the soil PH, additionally if your diet if really high in salt you could end up making unwanted salt deposits. The easiest thing to do is to just eat less salt, you’ll be healthier anyways. So what you want to do is find a plant you think could use more nitrogen, and pee around the root zone of it. Easy peesy, you’ll help the plant and lower your water bill. Additionally, anecdotally human urine can act as a repellent for critters that might otherwise come and munch on your garden.
This is so easy to do I recall the country of Australia running some sort of public campaign a few years back trying to get men to use the great outdoors, for them it was about saving water, but I’m sure the lawns loved it too.
If you really wanted to get into this more you could even buy what is called a urine diverting toilet which has been used more in less developed countries but is finding greater use here as well lately. This allows an easier method of indoor collection of urine to be used in the garden. What will they think of next?
The main point I want to get across is that when you’re out gardening, and you feel the urge, you don’t have to go running inside, you’re not only choosing the more convenient option, it is earth friendly too.
First Flower of 2012
March 13th, 2012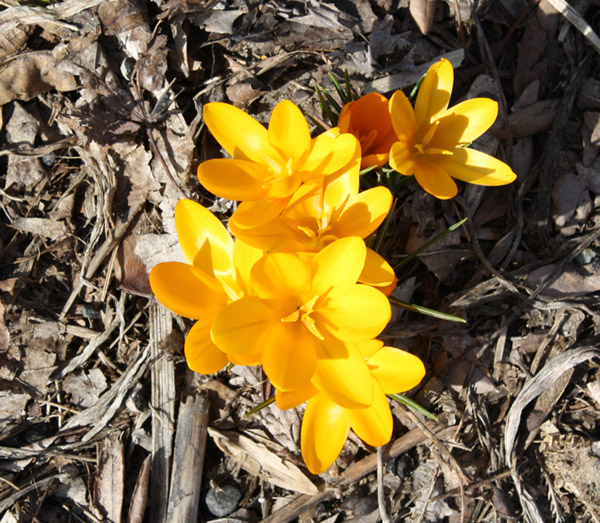
My first bloom of 2012 has surfaced. A crocus as normal, this time out by the road. Though a yellow crocus again.
It bloomed on the 10th, which is early.
In 2011 my first bloom, also a yellow crocus was the 15th. In 2010 it was on the 16th, in 2009, again a yellow crocus, it was on the 15th. In 2008, which had a really cold Spring it wasn’t until early April. That is the extent of my records.
So it portends a slightly longer growing season to have it come a week earlier than the recent norm this year. Should get better yields on my fruit trees and vines, if a late cold snap doesn’t freeze off the buds. That is always a risk with an early Spring. The trees get all excited and start flowering and then a freeze comes and kills all the buds, vastly reducing or eliminating the fruiting potential for many plants for a full year. But a warm Spring is a good thing, so long as it lasts.
How to Build an Island Bed with Retaining Wall Bricks
March 4th, 2012Island bed? What is that? No, it isn’t a bed with palm trees. An island bed is a bed not connected to anything, such as your foundation or property line. It exists as an island, alone in a sea of grass. This blog post will be about how to make a raised one with retaining wall bricks. Why build it up as a raised bed? Well, in additional to looking better, giving you the opportunity to improve the soil, and improving drainage. You also have to bust up less sod, which is my least favorite gardening task, and I’m sure your’s as well.
Step 1: Draw your shape
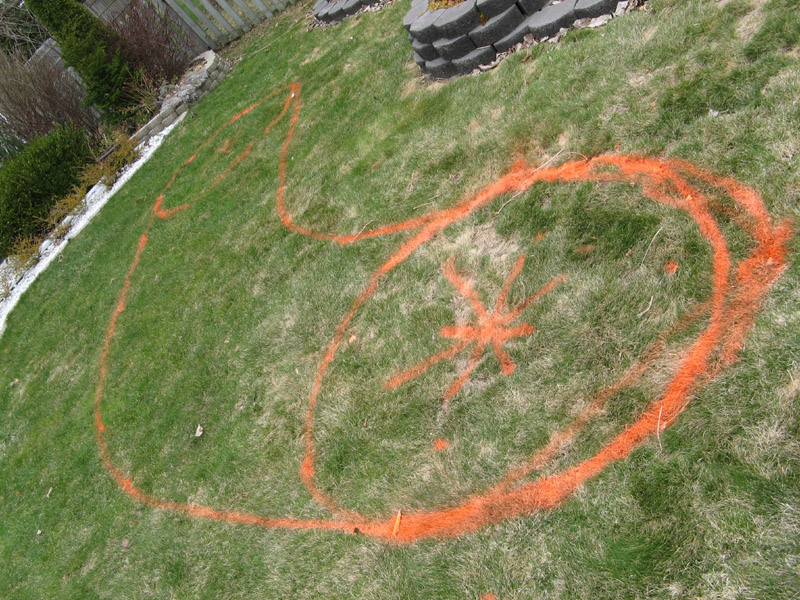
The first thing you need to do is draw an outline for your raised bed. I recommend large sweeping curves, organic shapes. If you want a perfect circle you can do that as well, I recommend cutting a board to the diameter of your circle and using that as a guide. You can use a hose or string or rope to create your shape, but spray paint works best.
Step 2: Put down a liner

The next thing will be to gather some plain brown corrugated cardboard or a bunch of black and white newspapers and place it in the middle of your new bed on the grass. This material, which is completely safe for the garden, will act as a temporary weed/grass barrier until it decomposes in about 90 days. You don’t want to use a permanent barrier that will block future roots, you just want something that’ll last long enough to block the grass and whatnot.
Step 3: Dig trenches
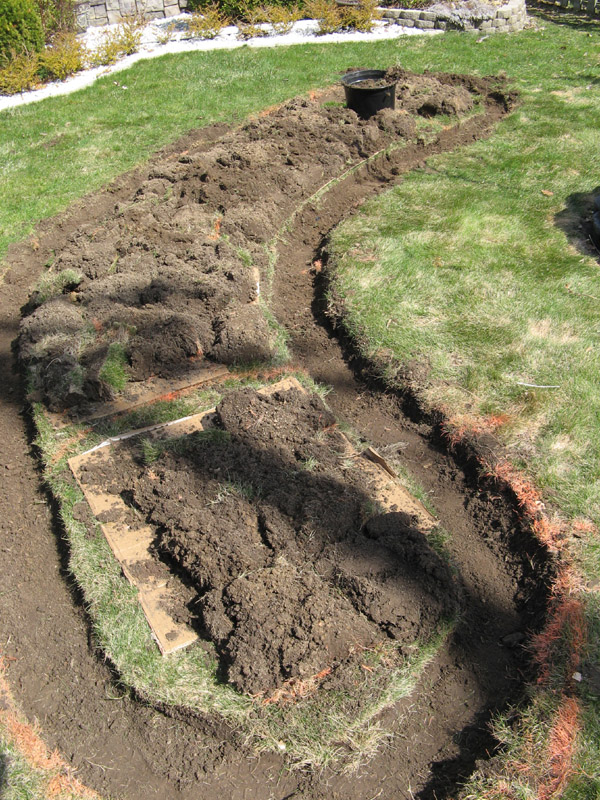
The only bit of sod busting you must do is an approximate 10 inch wide trench along the inside border of your new raised bed. I recommend a flat shovel for this as the bottom needs to be flat and fairly level. If you have a sod cutter/edger you can use it to perforate the area into blocks making it easier to pick up the sod. As you dig, flip the chunks sod side down on top of your cardboard. When done, pile bags of composted cow manure (or whatever type of soil you plan on using) inside the bed. I recommend manure because you only get one chance to improve the soil like this.
Step 4: Lay your first bricks
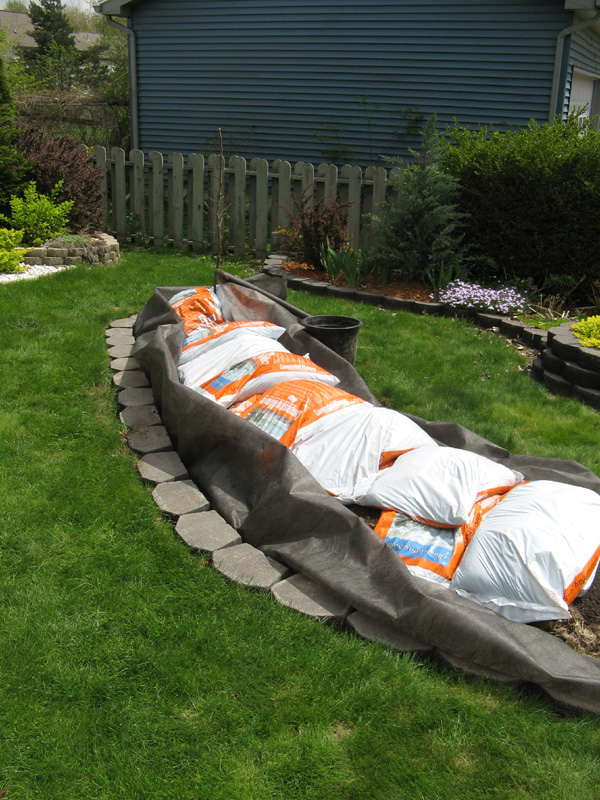
The first thing you need to do here is unroll some high quality weed landscape fabric in your trench with the excess going towards the inside of the bed. This will line your future bricks on the inside to prevent soil from draining out. Then you can lay your first brick in the trench, level it with dirt if needed, and move along with the second brick. This first row will take the longest.
Step 5: Finishing Laying Bricks and Fill
Once you get the first row of bricks done, put down a bead of landscape block adhesive and lay the second row (you may need to cut bricks with a chisel or saw to fill in the last one on a row). When you reach your desired height, slash open the bags of dirt inside with a knife and empty them in place. You will probably need to tamp down at the edges.
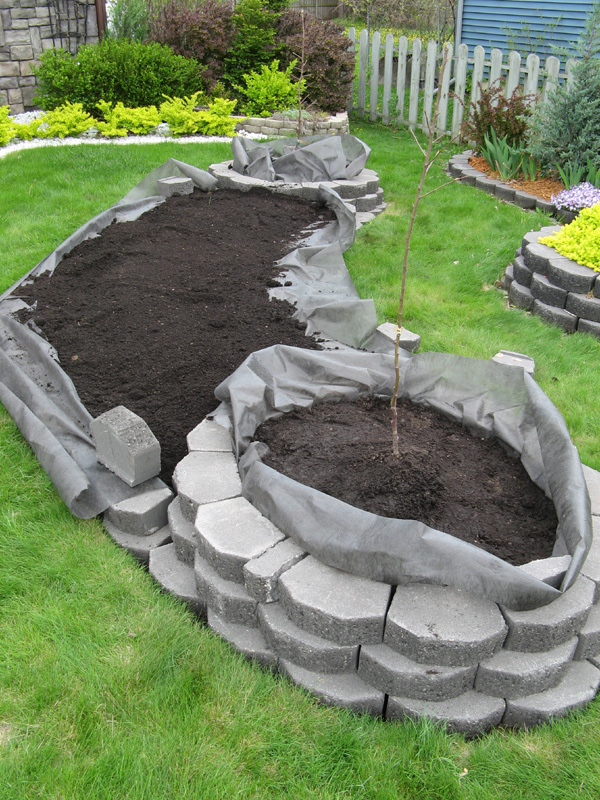
Step 6: Staple the Fabric
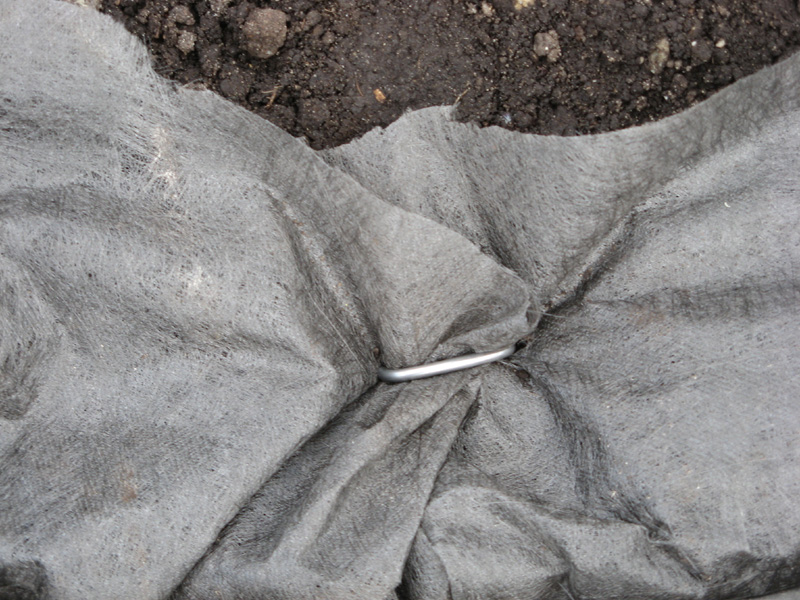
Fold your landscape fabric in towards the center of the bed, trim off any excess beyond a 6 inch swath around the edges of your bricks. Then secure it to the soil using landscape fabric staples. Your soil is now secure and shouldn’t run out between the cracks in the bricks (too badly anyways).
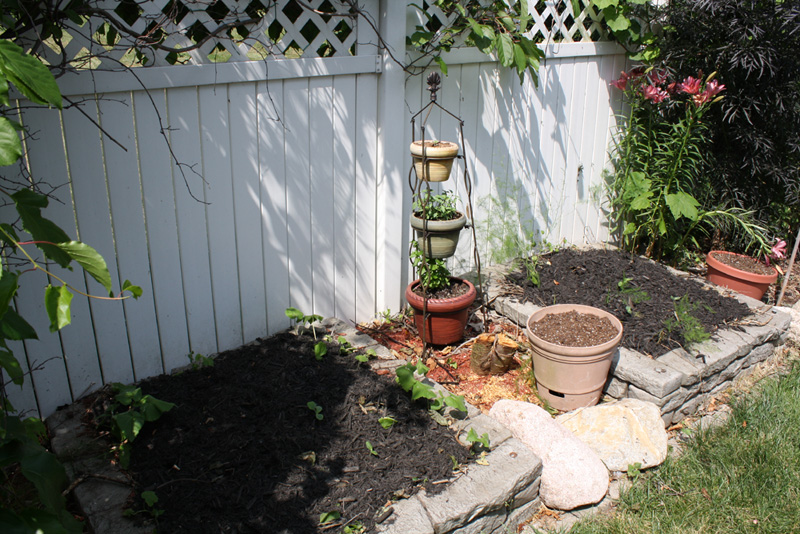
Step 7: Mulch, Plant, and Enjoy
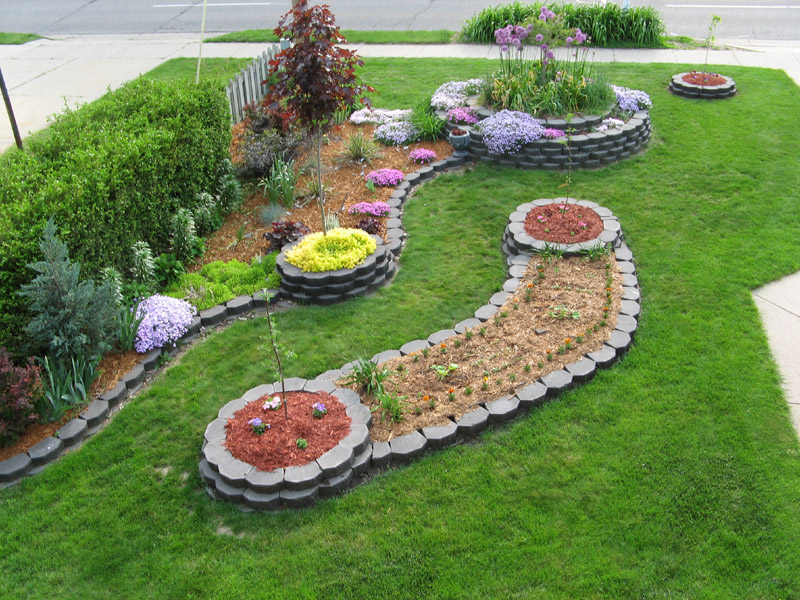
Finally you just need to mulch and plant your new raised retaining wall brick bed. You can do different designs and multiple tiers using the same principles outlined above, you’ll see I did two tiers with the example for this blog post. If there are gaps between the front of your bricks and the lawn you can fill it with any leftover soil, or leave them be and they’ll fill in eventually by themselves. You should expect some settling over time on the bed contents as the grass way underneath rots, so feel free to really mound up that mulch.
You may find this video and this article helpful with completing this project.
Do Not Buy a Plastic Greenhouse
February 25th, 2012In 2010 I blogged about a new little greenhouse I had bought covered in plastic. I bought it at Lowes and was pretty happy with it, it allowed me to start seeds early outdoors (I have problems indoors due to a lack of a south facing window, kids, and cats).
I gave it a pretty good recommendation, I hereby rescind that. In 2011 during the summer, one year old, I noticed the plastic had started to fail at the top. I even kept it in the shade most of the time. By now the plastic is all but gone on top, so much for holding in heat and moisture eh.
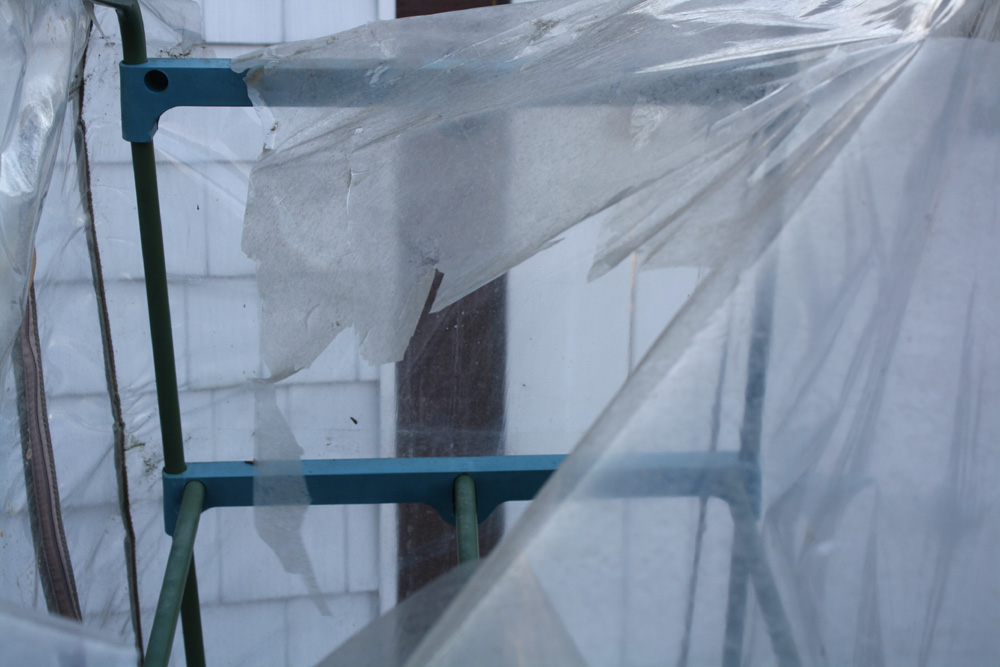
You know how we’re told that plastic takes decades to rot in a landfill? Maybe so, buried and deprived of light and oxygen, but exposed it sure degrades pretty fast.
So now all I have is a flimsy top heavy stand with flimsy trays, perhaps still useful, but not very.
Plexiglass might be strong enough for a greenhouse, but that is probably the only plastic I would ever consider for such an application again, I’m afraid in the future I won’t waste my money on things not made of actual glass. Glass doesn’t have to be expensive either, sure, new stuff could be, but you can often find old windows on Craigslist or elsewhere, they can be repurposed into small green houses or cold frames. Not just windows either, old storm doors, sliding doors, shower doors. Reuse and recycle.
Trees Bent Over From Snow
February 10th, 2012Southern gardeners may not be familiar with this, but us Northerners know it well.
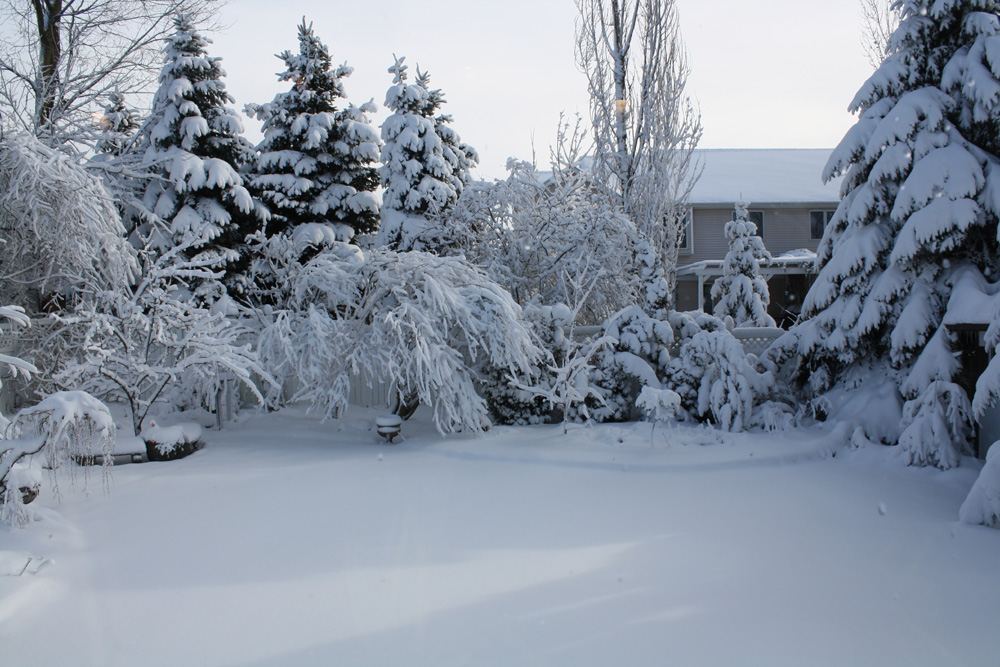
When you get a certain kind of snow, a wet snow, a heavy snow, a snow that is really a combination of snow and ice created at temperatures around the freezing point, it sticks to things. This wet snow probably brings down as much branches and trees in a year as a tornado. The snow and ice coats trees and branches weighing them down until they bend or they snap.
It normally happens to evergreens, with their foliage able to catch more snow, but it can happen to deciduous trees as well, as evidenced by the Rose of Sharons in the picture on the left (and in fact Paul James famously lost a bunch of oak trees on his property during such a storm), which are bent over double. To the right of them (in the center, far back) though are some arborvitaes, the scale-leaved evergreens like thujas or “red cedars“, these are normally double the height of the fence, and look how bowled over they are with the snow on top. Scale leaved evergreens are in my experience the most susceptible to this sort of storm, and can end up permanently damaged. I’m sure driving around you’ve seen such trees growing at odd angles like a mad giant went bonsai on them, blame the snow. This was in fact the worst such storm I’ve experienced since buying this property.
So, what can you do? If branches snap, nothing, cut them down if you can do so safely, but there is no saving the branch. Scale leaved evergreens tend to have pliable wood though and they tend to bend, but not break. However, those bends can become permanent. Whats more, now that they’re bent over they create a table for any future snowfalls to land on, sticky or not, and compound your problem.
The first thing you should do is go out and shake or brush the snow loose, and gently try to correct the branches, they won’t go back easily, they like their new position, but make the effort. They’ll probably be bent to an odd angle for the rest of the winter, but… but… in the Spring, when the sap starts flowing faster, the wood tends to rebound to the original position it was in, and with any luck, your tree will go back to normal. If it does not, you can help it. Many scale leaved evergreens have multiple leaders (trunks) and it are these leaders that split apart. You can tie them together (something soft and flexible, old pantyhose works) but remove the tie after a season. However if you’re just proactive during the winter and get the snow off them as soon as possible, making the bend as temporary as possible, they should eventually get back into roughly the same position.
Needle evergreens can also be damaged from such storms, in fact this storm did break a branch on one of my spruces. These trees tend to have harder wood though and so are less likely to bend (though, they do break instead). The biggest risk is that you let the snow accumulate more after future storms, so even if the drooping isn’t that bad, you should try to remove the snow from the branches you can reach as a preventative measure.
You can also try to brush it off any deciduous bushes or small trees you may have, but be careful, deciduous wood is very brittle in the winter and you could accidentally break something.
Why Butternut Squash Hurts Your Hands
October 12th, 2011Many a gardener will grow butternut squash, and eagerly watch the fruits develop, counting the days, hoping they’re not ruined by an early frost. Then harvest time, and the gardener can’t wait. They take the squash inside and immediately start cutting it up, about 5 minutes later they’re aghast and trying to figure out why their hands are red and peeling and constricted. Water doesn’t help, “What is going on?” they cry.
I was cutting up a butternut squash this morning and my hands got hurt again, just a little bit though, because I was careful to touch exposed flesh as little as possible. It got me wondering about the technical details of why it happened. I knew the broad strokes, as they were, but as a bit of a science geek I wanted to know more. Unfortunately after going on the Internet I found nothing but incorrect information, even Wikipedia had it wrong. You had one forum where some guys made a hearsay guess, and then people cite this as fact, and all over the Internet from forums, to blogs, to Yahoo answers, the incorrect information is repeated.
Suffice it to say, I decided someone needed to put the correct information on the Internet.
Before I tell you why your hands get wounded like they were dipped in acid when handling butternut squash, let me tell you what is NOT the cause.
That is not a residue, or glue, peeling off your skin. Many places attributed this to the sap drying over your skin like some sort of liquid latex, and then peeling off. Your skin is peeling, not a residue, that stuff cracking and falling off is skin. That is why underneath it gets pink, because it is new skin.
This is also not an allergic reaction or contact dermatitis, as so many people seem to think, because one guy found an article abstract that said that some people have an allergic reaction to butternut squash. This condition doesn’t happen to some people, it happens to everyone. It will even happen to different species, in fact a plant treated with the substance will react, and they’re not even in the same Kingdom as mammals.
Which is not to say that some people don’t get contact dermatitis from butternut squash, by all means, if you get a rash, or hives, or end up itchy, you might have that sort of a reaction. Peeling skin is not an allergic reaction.
What is actually happening is you’re getting a taste of the squash’s self defense mechanism. All squashes have this, including relatives like cucumbers and zucchini. In fact, most fruits have this to a greater or lesser degree, even things like apples.
Have you ever noticed how squashes will scab? If they’re wounded they will form a scab. This is one reason they can keep for so long. Have you ever noticed when harvesting a squash, or a zucchini, or a cucumber, the cut end will leak a liquid? That substance is what dries out the end of the stem, sealing it off.
Gardeners perhaps run into this problem more than most because we cook with fresh foods sometimes, right from the garden. Unfortunately in this case right from the garden isn’t best.
Many fruits (and remember, botanically, squash is a fruit) have this self defense mechanism where a sap is excreted when it is wounded to dry out the exposed flesh and seal it off to prevent further infection or damage. There are many animals or insects that have no qualms about eating under developed unripe fruit, the plants, however, want fruits to reach maturity so that it can, in the end, turn into the next generation. So this evolved as a defense mechanism. This astringent compound both results in an unpleasant flavor (unripeness) and it dries out the exposed flesh, creating a scab. So it both deters animals from taking a bite, and heals the bite should they give it a try. You’ll often see that on butternut squash, one bite mark, but no more, the animal learned. Of course animals have evolved too so some will have the gumption to still eat unripe fruits.
As the fruit ripens, this compound lessens. So this compound is less in fully ripe fruit. Some fruits, like butternut squash, are often picked early by gardeners, or the gardener does not realize that the fruit needs to ripen more after picking. This is often referred to as curing. A fully ripened and cured squash will not ooze sap when cut, only newly picked or unripe ones will. The one I cut up this morning was picked slightly under ripe (right before a frost scare that had me worried). I had let it sit for 2 weeks, and I would have let it sit for longer, a month at least, but I really wanted some risotto tonight.
So as you see, this drying agent is just the fruit’s way of self preservation. Without the ability to scab wounds, every scratch, dent, or bite mark would be an invitation to fungus and bacteria, just like on humans, so plants have evolved this ability to scab their wounds just like we have, and this substance that dries out and hardens plants, also dries out and hardens hands, resulting in a painful exfoliation process. To fix it you need to get the substance off your hands, so wash them thoroughly, and then you’ll need some heavy duty moisturizing lotion.
To avoid having this happen to you, make sure your squash are ripe and have had some time to cure and dry out a little bit before you use them, or wear gloves. If you grow your own squash you’ll know when they were harvested, but if you’re buying them this is more common in squash bought in the fall, than in the winter, for obvious reasons. Remember too that this is true for many fruits and vegetables, and you may notice it when peeling a fresh from the garden cucumber and the like, but winter squash are the king of the hill with this, and it is so much worse with them.
I am still interested in learning more about this substance, it is so strong I wonder if it has other uses. Being an astrigent, like calamine lotion, it could probably treat mosquito bites and poison ivy (which is an example of contact dermatitis).