
Bean Leef Beetle Damage
August 13th, 2008I can’t catch a break with my bean plants. Earlier in the year it was slugs, which I handily dispatched with a cold beer. This time however, I have bean leaf beetles, and the solution is not so simple.
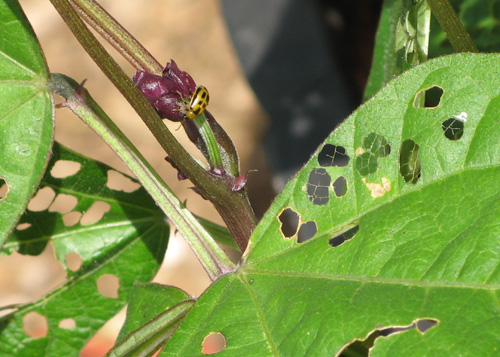
I know I have bean leaf beetles because instead of having large holes, I have many many smaller ones. I also know I have bean leaf beetles because in some areas there are brown spots instead of holes, as bean leaf beetles sometimes do not eat all the way through a leaf. Finally I know I have bean leaf beetles because they eat in the day and are easy to spot.
They come in many different colors, pale white, pale yellow, pale orange, bright red, brown, green. But they tend to have the same markings and the same body size, so you’ll know what you have. To an untrained non-gardener they may appear to be ladybugs, they are not. They are smaller and less round.
This things overwinter as adults and come out hungry in the Spring, so if you plant later in the year you may avoid the first wave, lucky you. If you do not avoid them though there aren’t many controls. I read that there is a tachinid parasite thing that is attracted to alfalfa that kills these suckers, but you can’t order it so the only way to get it is to plant alfalfa by your beans.
The following insecticides work on them, Asana XL, Di-Syston 15G, Orthene/Address 75S, Capture 2EC, Mustang 1.5EW, Sevin XLR, and other than those your only other option is really some sort of fine mesh netting, but then you have to worry about pollination and what is to stop the beetles from going under the net? I’ll be trying Sevin I think.
Man beans have a lot of pests don’t they?
Lunaria Annua ‘Money Plant’
August 4th, 2008 I got this plant courtesy of my grandfather, it is one of his favorites and always grew at his house in a large mass planting.
This is one interesting plant with many phases for you to enjoy.
It is a biennial, which means it lives for two years and then dies. The first year it grows around 6 inches or so high, it takes the snow without losing it’s green, and then the second year it rapidly shoots up to spring to as high as 3 or 4 feet high and has bright purple flowers. It flowers in early Spring when there is not very much else of height flowering like it does, more or less between tulips and irises. It then slowly forms seed pods which then flake away revealing shiny silver disks, which give it it’s many names.
My grandfather called them “silver dollars” the more common names though seem to be “Money Plant” or “Honesty.” Apparently the plant can make you money as well. My grandfather always insisted that you could take the dried stalks with the shiny seed pod remnants and sell them to florists for big bucks. I don’t know about that, I’ve never tried it, but I do like this plant.
It reseeds very very well, you can literally just toss the seeds on the soil and they’ll grow. I cut down mature plants and just shake the seeds off and where they land they will germinate, but it isn’t really invasive, if it sprouts somewhere you do not want it to it is very easy to control.
Since it is a biennial I recommend planting your seeds one year, holding some back, and sowing those the next, so you get staggered plantings so that eventually you’ll have some plants blooming every year.
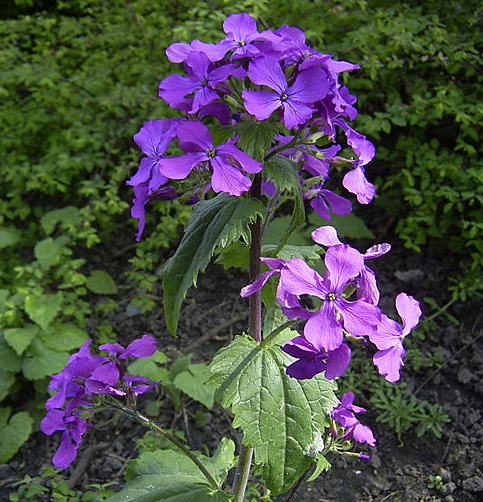 I’ve grown this plant in both full sun and part shade, even full shade, it doesn’t seem to care. I have noticed where it has grown in less than idea conditions (a seed germinates somewhere I didn’t mean for it to, but I let it grow anyways) it doesn’t grow as high or get as many blossoms, so it seems to really react well to good fertile soil, but that is about it.
I want to make an offer to blog readers, my seed pods are mostly ready about now, so if anyone mails me a self-addressed stamped envelope I will mail you back free seeds so you can get your own started. This offer is only good until the end of August though, and if like 100 people send me letters I may run out, but I’ll do my best to send everyone free seeds.
You can send your envelopes to
1730 Ichabod Ln
Chattanooga, TN 37405
How to Grow Raspberries
August 3rd, 2008I’ve blogged about raspberries many times before, which you’ll see in the “related posts” links at the bottom of this post. But I don’t know if I ever really went into depth as to how I grow them. In anycase, now is the time.
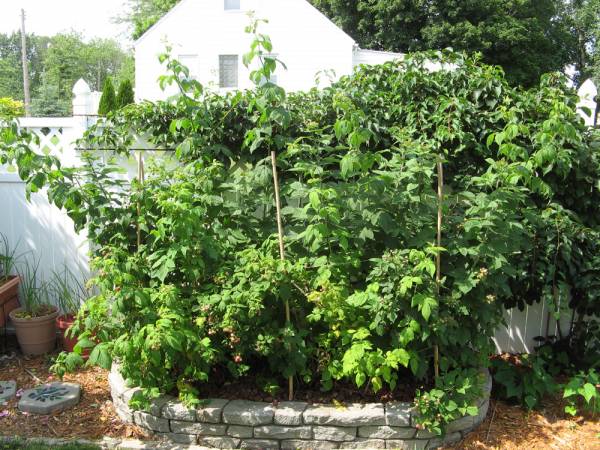 First, a little bragging. This picture was taken like the second week in July. I picked my first raspberry on July 5th and within a week I was harvesting a quarter pound a day or more from this 8’x4′ patch. What I want to show off though is the height. Look at those canes. That one big one in the middle has to be 8 feet tall atleast, and it has grown more since I took this picture. I’ll need a ladder to harvest.
Anyways, as you can see in my other blog posts linked to below, I grow my raspberries in a raised bed. This is because they spread with underground runners. This is both a good and a bad thing. They spread so rapidly that you can get a large planting in no time, and you can dig up the runners and give them to friends. On the other hand, they can take over and start growing in areas they do not belong. So, I put them in raised beds, now I’ve got pipe culverts buried slightly into the soil (click the link, those are the same exact plants, 2 years early, crazy huh? also, my hardy kiwi on the fence behind them has grown a lot as well), and I had those for a year, then I got the plastic faux rock raised bed stuff to put around them to make them look nicer (the culverts are still there, just hidden), and I backfilled with lava rock. This keeps them well enough contained so I don’t get runners going into nearby areas (though sometimes a fallen berry still germinates).
Many places I’ve seen say raspberries product only on new wood and to cut them back every year. This makes no sense to me, all mine produce on both new and old wood. One year old canes start producing in July, new growth canes start producing in August usually, that is for me here in Zone 5. If I cut them back every year I’d have to wait until August to get any berries, and would miss a whole month of .25 or .5 pounds per day of harvests.
Now, the 1 year old canes are slightly less productive their second year, but they still produce, and that is kinda crazy if you think about it. The volume of berries I’m getting now is so high.. and since it is all 1 year old canes it isn’t even peak yet.
Two year old canes always die for me, so ya, cut those back. You’ll be able to well in fall or very early spring which ones are dead and need removal.
Raspberries are expensive at the store because they do not ship well and so they’re one of the most money saving crops you can grow at home. They are relatively carefree, will take drought and poor soils fine. The berries are prone to rot in damp conditions though so they may not be appropriate for areas with heavy rainfall. Full sun is best, but part sun will work. The only pest I’ve ever noticed on them is japanese beetles, which are easy to control once you identify them as your problem. If they need water they’ll let you know with slightly droopy leaves, but that rarely happens thanks to their well established perennial bush root system. As for fertilizer, I started mine off with good soil, but I don’t fertilize them at all. The thorns also keep all but the most desperately hungry deer or rabbits away.
Raspberries are extremely healthy to eat, put them in cereal, smoothies, make sauces and jams and jellies and crisps and pies. I’m canning this year for the first time simply because of the volume of berries I have.
Raspberries are so healthy, so hardy, so easy, in fact that I think they should be grown in vacant lots in inner cities to provide a source of fresh fruit to needy families. Why not? The land is there. Stick them on road medians, anywhere, everywhere, feed America, one berry at the time. You can even make a tea out of the leaves.
So, maybe I’m a little crazy about them, but they are the best food crop I’ve ever grown.
Zucchini Plants Dying from Squash Vine Borer
August 3rd, 2008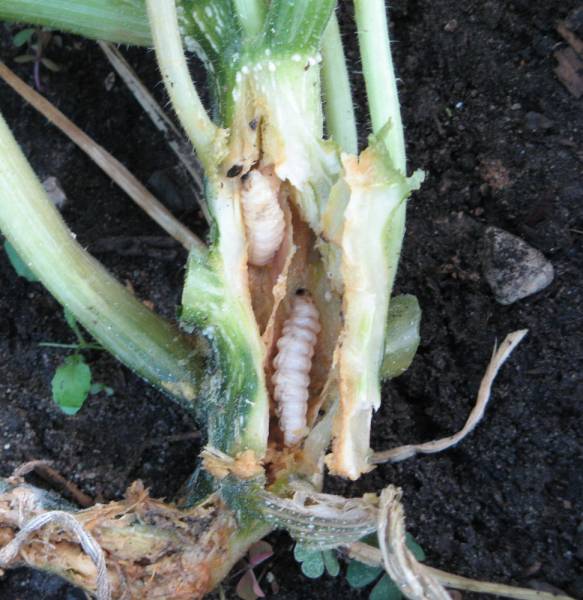 So, I tossed two of my zucchini plants in my compost tumbler yesterday, when pulling them up I didn’t need to uproot them, the squash borers had basically destroyed the main stem to the point that the top of the plant was hardly connected to the roots at all.
I knew it was squash borer damage, I had seen the tell tale signs of the orangish sawdusty wounds around the base of the vines, but I also knew it was too late by the time I noticed. But, this morning, I went out and did surgery on my remaining squash vines, and look what I found. You can cut the vine lengthwise, opening it up, and remove the borers manually, there will be small ones, the size of a couple grains of rice, and possibly big ones as you see. Ugly little things. They’re like big grubs with black heads. They burrow through your vine, killing it, then overwinter in the soil in a cocoon, to emerge in June as a giant fly-wasp-moth-thing and destroy your current crop.
So, after infestation, you can control it with the surgery as I explained, then immediately cover up the cut areas with a mound of dirt to protect it and hopefully encourage new rooting. You can also make sure leaf nodes further up on the vine root by putting mounds of dirt on them, this will mitigate the loss if the borers destroy the main vine. If you catch it early enough, when they’re still little orange or brown eggs on the vine OR have not yet made it inside, you can spray the vines with an insecticide and kill them. You can also go after the adults.
As I said the adults are giant fly moth things. They literally look like the biggest flies you have ever seen, or a type of wasp, with hairy legs, but they’re a type of moth (just with clear wings). They often have red or orange markings, but the ones around my house seem mostly black. They can be seen on or around the plants at various times in the day, especially evenings, and should be attacked and dispatched in your most ninja-esque fashion.

If your vines have been compromised, you can put them in a compost tumbler, but I would not put them in a compost bin or pile. In a tumbler you’ve got a more or less enclosed contraption that gets very hot in the inside AND is not open to the soil at the bottom. This should prevent any larvae from surviving. In a free form pile or bin where it is open, doesn’t get as warm (or turned as often & violently), they could probably survive to torment you next year. So if you do not have a tumbler, I would burn the vines, and as soon as possible after removing from the garden. You don’t want any of the larvae to escape and burrow into the soil.
These critters will attack all members of the squash family, so that is summer squash, hard winter squashes, pumpkins, etc. Apparently ‘Hubbard’ winter squash is the most susceptible, and butternut squash the least. One solution some gardeners do is to plant ‘Hubbard’ early in the season as bait, and then once it gets infected, pull it up and burn it. I’ve also read that wrapping nylon or another barrier around the stems can help as well. Personally, I think I will just spray with an insecticide. I try to do things organically and healthy and everything as much as I can, but I’m not broadcast spraying, I’m not spraying the parts I eat. I am only going to be spraying very specific spots on the vines. I’ll be using Sevin, others that work are apparently methoxychlor, rotenone, pyrethrum, and malathion.
Apparently their only natural pedator is wasps, which only get them as eggs or before they bore into the vines.
15% off at Park Seed
July 31st, 2008So a week ago Wayside Gardens announced a 15% off sale, this week it’s their sister company Park Seed.

Lasts the whole month of August apparently.
15% off all orders at Wayside Gardens
July 19th, 2008Got this coupon in the mail, for 15% off all orders. Code is AUG15, gotta click the link I think, and expires August 15.

Maybe order one of Waysides Sumbucus Nigra “Black Lace” which I’ve blogged about a few times. Really, a nice plant.
Also, $50 off $199, 50FALL08, expires 7/25
Escaped Asparagus
July 17th, 2008
I thought this was internesting. So we have this wetland preserve thing behind our house, it is encased on 4 sides by suburban sprawl, including major 4 or 5 lane streets, it is probably around 1 square mile altogether, with a walking path running through it. There is a lot of wildlife that call it home, including 3 or 4 deer.
Anyways, walking back there the other day, for the 300th time I’m sure, I noticed something… some tall feathery asparagus stalks coming up from the weeds. Then I noticed two more small patches back further and to the side.
I came back home and did a little research and turns out it isn’t uncommon for garden asparagus, and this was garden asparagus, to escape and populate areas of the wilds. True wild asparagus is not as tall as what this stuff was.
I found other sites that recommended trying to spot wild or escaped asparagus in the winter when everything has died back and the bright brown dead stalks are easier to spot. Then, mark the spots where it grows and in the Spring you can trek out there and get free asparagus. Even though I have actual asparagus in my garden I may consider doing that next Spring as free food is free food.
Asparagus is a perennial vegetable, one of the few, and it definitely shows the plant’s vigor and resiliency and evolutionary success to see it outcompeting the surrounding weeds and growing as high as the stuff in my garden. Those tender stalks are apparently stronger than they taste.
Updates: Garden Labels and Ditch Lilies by the Road
July 1st, 2008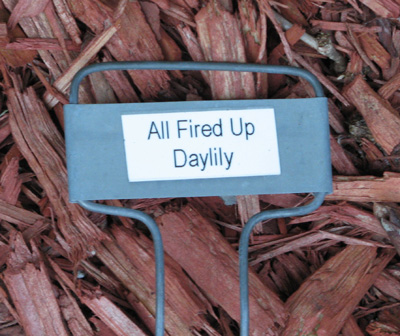
I’ve decided to give updates on two of my older posts. The first one is this old post on garden labels. It was one of the first posts I ever did.
The post is dated January 29th, 2006, the label in the image is at least already a year old, and it is now mid 2008. The label I photographed in my first post is the same label I took a picture of today for this post. It has been sitting outside next to a daylily since, I had to pull it up for the photo because my camera wouldn’t focus in full sun, but that isn’t where it has been. I believe I put the label in in 2004, which means it is over 4 years old. Not bad huh? And I don’t have nice southern California weather here in Michigan, we get snow, and rain, and sleet, and everything else.
I highly recommend the label printer mentioned in my original post for labels, they really stand the test of time and are cheaper than etching on copper or other long term solutions.
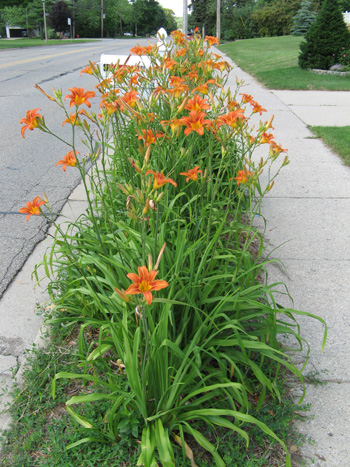
Second update is for my ditch lily project. In April of 2006 I planted some ditch lilies (hemerocallis fulva) in the strip of land between the sidewalk and the road where it was always weedy thanks to me sharing it with horticulturally challenged neighbors. I wanted something cheap, hardy, resilient, that would spread quickly. The ditch lilies have thrived and are doing quite well, as you can see in the picture. They’re really tall this year.
They look nice, and really give our property more curb appeal. Ditch lilies can be had for ridiculously cheap prices, if you know anyone who has any they’ll likely give you some for free, so I really recommend the approach. Since they spread by underground runners they’re inappropriate for mixed garden beds, but in a concrete defined space they’re perfect.
Mine still have a lot of filling in to do too, eventually they’ll cram it all from curb to sidewalk, you won’t even be able to see the ground for all the lilies and I’ll probably need to thin them just to prevent over competition (or be sure to just douse the area with blood & bone meal in Spring).
Ditch lilies take the cold, wind, snow, pollution, road salt, etc just fine, they really are tanks.
Grow Potatoes in a Trash Can
June 23rd, 2008
I recently blogged about growing your own food to save money and did not mention potatoes in that post because by a pure dollars per acre metric potatoes tend to not save you as much money at the market as other crops. However, what if you could grow potatoes without needing to sacrifice any garden space to do so? Suddenly, it makes more sense.
This is where the trash can comes in, there are many tips and tricks to growing potatoes, but they all seem to center on one rather unique characteristic of the potato plant. You see, potatoes aren’t technically roots, they’re swollen stems or tubers, they grow off the stem of the plant, technically speaking. So, generally what you do to grow them is you plant them and then, as they grow, you mound dirt, or compost, or straw, or all three up around the stem, constantly burying the stem and building a little hill around it. This will allow the stem to create more potatoes as it ends up being buried deeper at the end of the season than it could have ever been buried (and still grown) at the beginning of the season.
Now, lets say you don’t want to mess with a hill though, you don’t need too. One method I’ve seen is to use tires and rebar. Pound a rod of rebar into the ground and put 1 tire over it, fill with dirt and plant the potatoes, after they’ve grown, add a second tire, fill more dirt, rinse repeat as they gain height. Then to harvest take it all apart.
But I like the trashcan method better. You get a 32 gallon trash can, or use one of those giant black plastic containers trees come in from the nursery. Make sure there is good drainage, drilling copious amounts of holes if you need to, and fill the bottom bit with maybe 10 inches of soil, plant your spuds 4 or so inches deep. Then, as they grow throughout the year, continue to add more soil (potting mix, it is technically a pot), compost, or whatever. At the end of the season when you want to harvest simply dump the whole thing out onto a tarp and pick out the potatoes, no digging required.
Your trashcan does best in full sun, and if it is black plastic the added heat from that seems to help as well. It isn’t recommend to reuse the same soil every year because potatoes are so vulnerable to pests and diseases, so after harvest toss the soil into your garden or use it to plant something unrelated to the potato in it. Its like crop rotation, but in this case you’re rotating out the soil, not the location.
This is a great way to recycle/reuse old things as well. If you have a trash can that has been scraped on the cement so many times it has huge holes in the bottom… make it a potato planter. Those big tree pots from the nursery, potato planter. You get the idea.
As for what kind to plant? What kind do you like? I wanted to plant peruvian purple potatoes this year because of the added antioxidants and the fact that I can’t find them locally to eat (they taste the same, are just dark purple with the same type of antioxidants as blueberries), but I couldn’t find the seed potatoes. So I’m growing plain old yukon golds, if you’d like to learn more about the different types of spuds though and what they’re best for, try here at my not-so-actively-written cooking blog.
Sambucus nigra. “Black Lace” Elderberry Update
June 16th, 2008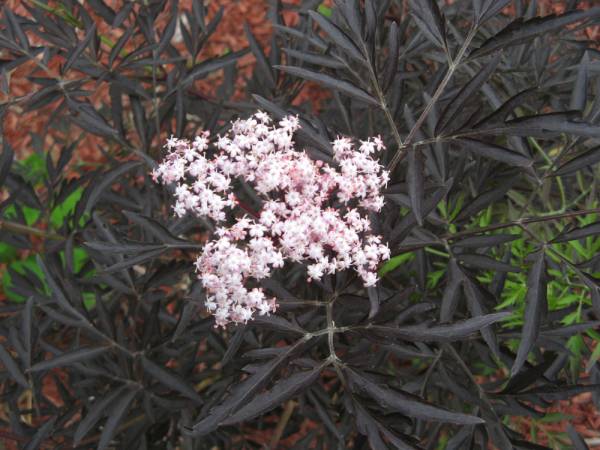
So here we are about 9 months after I first planted this bush and I thought I’d give an update, because really, I have so much more to say. I first blogged about Sambucus “Black Lace” when I first got it, so while I could talk about the colors whatnot, I couldn’t tell you much about my experience with the plant, but now, I can.
I am even more impressed with it and can recommend it even more fully than I did originally. First of all I had ordered some smaller ones from Wayside Gardens. When they (2) arrived one was barely alive, the other was just a stick with dead leaves. They looked like they hadn’t been watered for a month at least. I planted both and one made it, the other, stayed a stick. I called Wayside and they did send a free replacement. However, get this, I never dug up the stick, and this spring, it leafed out, alive, and well, and flowering currently if you can believe that.
So obviously this plant is extremely drought and neglect hardy, it was dead, dead, and 6 months later started growing again.
This plant is also very cold hardy, giving it no winter protection, us having a colder than average Winter and a way colder than average Spring here in zone 5, this was one of the first plants in my landscape to start leafing out, I’m talking probably about with the first tulips (which were late this year because of the cold), that early, and it never got damaged by any frosts or hard freezes subsequently.
Already it has put on probably 18-24 inches of new growth or more, and, it is flowering. The flowers are nice, clusters light pink that offset the black foliage well. And they’ll turn into berries of course, for my or the bird’s eating pleasure.
This plant has also done well for my mother in Zone 4.
All told, I gotta recommend this yet again, especially for northern gardeners trying to get that Japanese maple-like laceleaf foliage without all the fuss.