
Beer, Beans, and Slugs
June 16th, 2008
Due to the rising cost of food I’ve been adding a lot more edibles to my garden this year, and am growing some for the first time, including, bush green beans.
Having never grown green beans before I did not know what to make of damage that was all but killing my young sprouts. The leaves were all eaten, and the plants weren’t more than a few inches high. What could be doing it? Well, time to hit Google and do some investigating. It was not flea beetle damage, they make smaller holes and otherwise damage the leaves rather than wholesale eating them. It also was not bean leaf beetles, because, as near as I can tell, they also sometimes don’t eat holes, but rather strips off the leaf, so you get brown areas/spots rather than holes (though still, some holes). I also knew it was not japanese beetles, because they don’t feed at night, and I never saw them during the day, and quite frankly I think its too early in the year for them. Also, my beans growing nearby in containers were blessedly untouched, which made me think it was not any flying insect.
Going out at night with a flashlight, always a good diagnosis method, I immediately found the culprit, slugs, many of them. Evil, evil slugs. I should have known, had the damage been on a hosta I would have known it was slugs instantly, I guess I just didn’t realize that, like hostas, beans are also slug food.
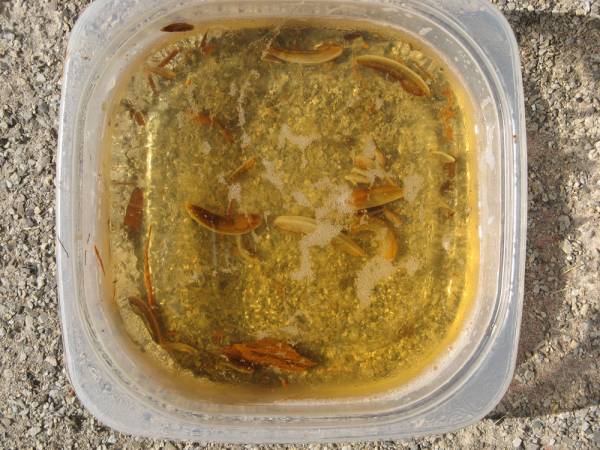
So what did I do? I ran inside and grabbed a beer, seriously, because beer is both heaven and hell to slugs. See, they like the smell, and so it attracts them for a swim, but any swim is their last as the beer also kills them. Wonderful, cheap, effective. Check out the included picture, look at all those slugs it caught in 1 night, and you can’t even see the tiny ones that got caught.
Now, the beans are doing better, and hopefully will recover.
To make a beer trap simply find a shallow dish, lid with raised sides, plate, etc, and poor beer in it, and leave it outside overnight. If you have slug problems, it really truly works.
Train Clematis up a Post
May 28th, 2008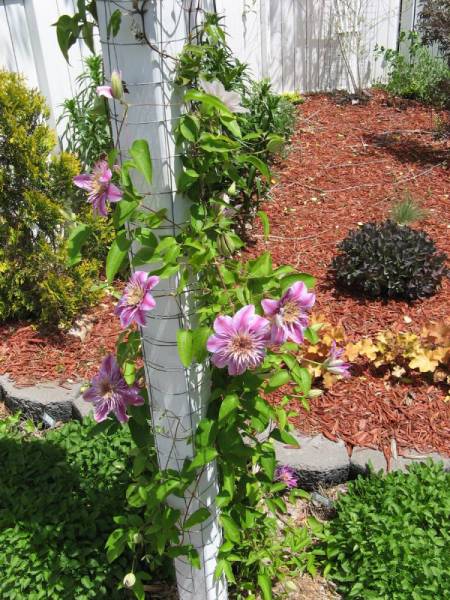 File this under “other things you can do with fencing other than actual fencing.” Like my trick for saving shrubs from the ravages of rabbits I like to use fencing to form little cages, trellises really, around posts.
Posts, poles, supports, columns, whatever you want to call them, we all have them, we all need them. They hold things up. In my case, a large bird house. Why not pretty them up a little bit and grow things on them?
Rather than buying an expensive (comparatively) trellis from the “trellis section” at the Home Depot, or going the more permanent option of pounding dozens of nails into the post to act as supports, you can simply get a trusty pair of tin snips and snip off a (for a 4×4 post) 18 inch or so section of fencing. You may need two 18 inch sections depending on the height of the fence and the post area you want to cover (stacking them on top of each other) then simply wrap it around the post and secure it with the loose wire ends created when you made your cuts. Voila, a cheapo trellis that will soon be invisible behind a mountain of flowers and foliage. Then, if you ever tire of it, you simply remove it, and the post is no worse for wear.
I do this with clematis, as you can see in the picture. The vine is simply planted at the base of the pole and climbs it mostly by itself, I only have to do a little guiding, and that is usually limited to just tucking wayward stems into a section of the wire frame. The vine you see in the picture is just 1 year old, so not yet at full coverage, plus, it is still May here in zone 5, we had frost last night (grrrrr), so the growth it has is really impressive considering. I expect it to achieve full coverage by the end of the season.
You can also do this with morning glory readily, as well as any other flowing vine that doesn’t get too woody or large. For instance, I wouldn’t do this with trumpet vine or wisteria, think smaller, those both get too big.
Grow your own food to save money
May 21st, 2008 Food prices are growing like pole beans, and many people are planting more edibles in their garden, or taking up gardening for the first time, in an effort to save money. So, I thought a blog post on the subject would be both timely and useful.
Oil & Ethanol
First, why are food prices going up? Two reasons, oil and ethanol. Oil prices reached $130 a barrel today on the back of demand from developing countries, weakening supply, and speculation. Everything that is transported by truck has mirrored oil in price increases. It costs more to transport the food from the farm to the market, it costs more to farm the food because tractors run on gas, and so the food goes up in price.
The second reason is a woefully misguided ethanol policy pushed on us by Democrats and most Republicans in Washington, and this is such an important issue I am going to talk about it a little. From President Bush to Hillary Clinton to Barack Obama, most politicians have caved to big agribusiness lobbying and supported corn ethanol mandates and subsidies. Only a few people such as Kay Bailey Hutchison (R-Texas) and of course John McCain have been vocal against it, going way back. McCain to the point of ceding the Iowa Primary to his competitors rather than pander to big agribusiness. Even if you disagree with his other policy positions, you have to give him props for being the only presidential hopeful from either party to go to Iowa and say that he doesn’t support corn ethanol subsidies and mandates.
The problem with corn based ethanol is that it is a waste of time, money, and increases food prices. Seriously. Consumer Reports did a comparison with one of those flex fuel cars that can take gasoline or E85 Ethanol. Since ethanol has less potential energy than gasoline they got fewer miles per gallon with it. To the point of about 30%. So, 10 gallons of gasoline will get you 30% farther than 10 gallons of E85. Or, with E85, you use 30% more fuel to go the same distance.
Then, corn is an extremely labor intensive and resource intensive crop to grow. With high fertilizer needs and complex machinery you only get about 1.3 gallons of ethanol for every 1 gallon of gas spent harvesting it. So combine the two issues together and you’ve got about 0 in fuel savings.
So we’re spending all this money on subsidies and having a government mandate that doesn’t actually result in better, cheaper, or cleaner fuel. But, what we are getting, is more demand for fertilizer, which increases the price of fertilizer, more demand for arable land, which increases the price of arable land, and more demand among the land for ethanol corn plantings, which increases the premium other plantings (ie food) need to achieve, and all of that results in higher food prices.
The really scary thing, none of this is recent news. I was reading articles on ethanol’s problems as a “solution” back in 05. I wish congress had read the same ones. Also, I don’t mean to say all ethanol, ethanol made from switchgrass for instance (which grows like a weed) gets something like 5-8 gallons for every gallon spent, much, much, better than 1.3 from corn, and yet we’ve got this corn mandate. Fishy? You bet.
So write your representatives in Washington and tell them to kick the corn ethanol habit.
So, what to plant?
In the meantime, back to gardening, so you want to plant food to save money, good idea, even people with small yards can plant enough to save a few hundred dollars a year at the grocery store, and with medium yards you can easily put that into 4 figures at current ridiculous prices (oh yes, this week I spent $2 for a single zucchini).
When evaluating what plants to grow for money savings you need to consider a few different issues. How easy is the plant to grow? How much does the food you get from the plant cost at the store? How well does the food product keep? How much of the food can your family eat? How much space do the plant needs? Do you get significantly better quality when growing it yourself? And finally, what grows best in your area?
How easy is the plant to grow?
Time is money, water is money, fertilizer is money. If you’re gardening as a hobby some of these things do not matter, but if you expect to save money by gardening they do, and so how easy a plant is to grow matters. This includes planting, harvesting, watering, fertilizing, soil requirements, etc.
How much does it cost at the store?
This should be obvious, you get better value growing more expensive things. If you have a 10 sq/ft plot and can grow two plants that will yield say 20 pounds total, then it is better to grow the plant that costs $3 per pound at the store than the plant that costs $2 per.
How well does the food keep?
Foods that go bad quickly require expedited shipping to reach the market, which is more expensive, so they tend to be priced at a premium at the store. On the other hand, if the food goes bad quickly it may be hard for your family to eat it all when the harvest comes due, so consider that when deciding how much of a food to plant.
How much can your family eat?
This ties into the previous one. There is no point planting an acre of eggplants if your family doesn’t eat them or can’t eat that many. When you buy a packet of seeds and there are 100 seeds in there, it doesn’t mean you need to plant all 100, plant 2 or 3 and save the rest for the next year, that way you’ll have the room to plant a larger variety of plants.
How much space do the plants need?
We don’t all have full fields in our backyards, when you’re limited on room veggies that can be planted densely will tend to provide a greater value than those that need more space.
Do you get better quality when growing at home?
Many plants are picked before fully ripe to be sent to the store, and so they never get as sweet as they can be. Or, some plants once picked instantly start converting sugars to starch, and so are never as sweet at the market as they are when just picked. This isn’t really a money saving issue, but can factor into your decision of what to plant.
What grows best in your area?
Hot peppers are expensive at the store, but I wouldn’t think of planting them up here in Michigan, they need hot weather to grow and we don’t have a lot of it. If I plant something that tolerates cooler temperatures I could get two, maybe even 3, harvests in a year. Many veggies you can harvest after 50 or 60 days, so if April and September are warm I could get 3 plantings in. Likewise, a plant that requires lots of water shouldn’t be planted in the southwest as you’ll be spending to water it throughout the year.
Some planting ideas
My favorite money saving plant is raspberries. Raspberries are expensive at the store because they do not keep or ship well. They produce for months and months all summer, and keep producing until October usually for me. My 4×8 mature raspberry patch probably makes me around $5 a day during the peak of the summer in free fruit. They are perennial bushes so you only need to plant them once and they will grow forever. They also spread like mad so if you want them to cover a larger area you can buy fewer plants originally. Berries are also extremely good for you, high in antioxidants and vitamins, fiber, etc. If you have too many, you can easily make jam and can them, once canned they’ll keep for a year. Raspberries handle drought, poor soils, do not need fertilizer, and produce tons of fruit. Blueberries have very particular growing requirements. Strawberries, because of their short stature, do not give you as much food per sq/ft. Raspberries are the superior berry for the home garden.
Another favorite of mine is asparagus. Asparagus is one of the very few perennial vegetables, plant it once and harvest it for decades, so it doesn’t require a lot of time commitment. It is also fairly expensive at the store, and it is one of those that is best when first picked, because once it is picked it starts converting sugars into starch and fiber. Corn is also best when first picked for the same reason. However corn does take more work, and space, and fertilizer, and so isn’t going to be a good choice for everyone (but if you have the room, maybe give it a try).
Any food you can get from a tree is going to end up being cheap in the long run, if you can be patient. $20 for a tree now and in 5 years you may start getting some food from it, in 10-20 years you’ll be feeding yourself and all your neighbors, but that is long term. Nuts of all types are of course expensive at the store, and most of the country can grow walnuts and pecans, but fruit too can be a good option. Dwarf apple, pear, or cherry trees can fit in even the smallest yards, and letting those fruits ripen on the tree makes them very sweet.
Leafy green veggies such as chard or mesclun mixes can be good to grow. They don’t keep well so they’re expensive at the store, they can be grown in cooler in weather, and they can be harvested repeatedly. When you want a salad, you go out and cut enough just for that salad, the leaves grow back, and the next time you want a salad, you have more to harvest.
Onions can be a great crop to grow for a few reasons. The big ones are now around $2 each at the store, whereas you can buy a bag of 100 onion sets for $2. So, plant them all, and you’ll make around $200, not bad. Onions, being bulbs, can handle cold weather, you can get them started early in the year, or plant them later. Onions, also because they’re bulbs can be planted close together, 4-6 inches apart. You can literally tuck them in any free nooks in your garden. You can also grow them in containers. Right now I’ve got 4 or 6 big pots full of onions because it is still too early to plant annuals or other tender plants in them, but I’ll be harvesting those onions in June at which point I will be able to plant something else in those places.
My final pick is hard squash, butternut or spaghetti. I used to hate squash, but all I knew of it was some horrid dishes passed at a relative’s thanksgiving. After learning different recipes, ways to prepare it, spices that compliment it, I like it. Squash does take a bit of room, but you can’t beat the storage. Keep it in a cool, dry, and dark place and hard squashes will keep for a year, I’ve even heard of longer than that. They’re also very healthy, high in beta carotene and fiber. So there is no worry about being stuck with a huge harvest you cannot eat, that one harvest can be eaten over the course of a year.
Succession Planting
My final tip to the home gardener looking to save money by growing their own food is to make use of succession planting. This means planting in stages, over the course of weeks, so that you’re also able to harvest in stages, over the course of weeks. By making sure all your food doesn’t need to be harvested at the same time you make it easier to ensure that you have time to eat it all when it is ready to be harvested.
Use Black Mulch to Brighten Up Shady Areas
May 12th, 2008
Mulch comes in many colors, people have long been using the ever present red mulch, and in fact I would venture it probably rivals plain mulch in volume. There are also golden mulches, that look like very fresh wood. Then there are more subdued brown mulches that look like slightly older wood.
The main advertised benefit of colored mulches is that they keep their color and so you don’t need to replace them as often. Personally, that doesn’t fly with me. I don’t lay down new mulch for coloring reasons, I do it to maintain a good thickness of 2-3 inches.
I do, however, use colored mulches sometimes in some places. I use them for their colors, as just another design element. You might plant a purple smokebush around some golden variegated hostas and it would look good with the foliage colors contrasting. You can achieve the same thing, and do more, by adding colored much into the area. So now you can contrast the plants against each other, and the mulch.
You can also contrast mulch with itself. My raised asparagus beds are covered in red mulch, and the ground level beds surrounding them are covered in gold mulch. It works.
This post though, this post is about black mulch, the post title I’m sure seems impossible. How could someone as dark as black brighten up a shady area? But what have I been discussing so far? Contrast. So, lets discuss contrast and shade.
Most flowering plants that do well in shady environments produce lackluster flowers, or atleast those that cannot compete with their sun loving cousins. In contrast (ahem), the foliage of plants that do well in shady areas tends to be spectacularly colorful with shades of golds and reds and blues, and of course greens.
However, foliage rarely rivals flowers for color, so make it pop, you need contrast. The most popular way to get contrast is to put clashing plants next to each other. A red-green plant looks crimson when planted next to a yellow-green plant (which itself ends up looking bright). Contrast helps to highlight the differences between the plants, making both look brighter and more vibrant.
So, since black is the ultimate contrast creator, adding black mulch to your shady areas might just brighten them up when paired with lighter colored plants.
Give it a try. I did, and as you can see in the picture (which by the way is Hosta ‘Great Expectations’ underneath my red laceleaf Japanese maple), I think it works.
My New Water Feature
May 6th, 2008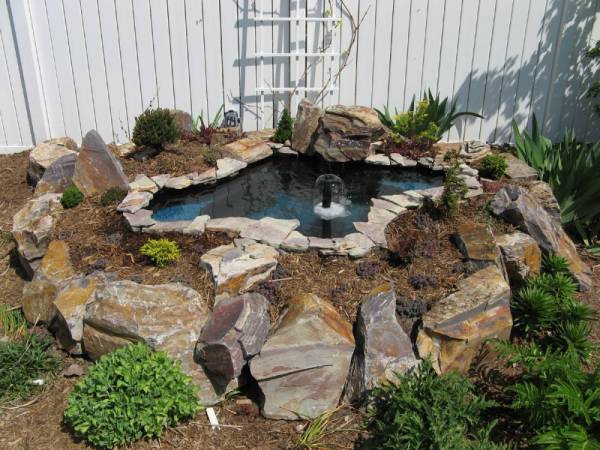 The largest garden bed on my property, my back side garden, has long be devoid of a focal point. When I was doing most of these gardens in the fall of 2004 I needed (wanted?) to create a very large bed to balance out the rest of the yard, but whereas I had plants and design schemes in my mind for my other beds, this one was to be experimental, where I put all the plants I wanted to grow but didn’t have room for elsewhere.
As such, I’ve changed this bed a lot, I’ve constantly moved things or dug up things, never quite being fully happy with it, but slowly, it is coming around.
The most recent change as the addition of my brand new water feature, and I couldn’t be more pleased with the results. I had previously had a little wishing well-like water “feature” in the back of the garden, and it was alright, the brick work was really well done on it, but it was way too small for the space, and it didn’t really add any character, it was too plain, it just didn’t work.
I decided to get rid of it, and in its place do something with stone that was larger. I decided to do a larger raised stone water feature. Raised, so I could show off the stone, and so it would be more of a focal point.
I tell you what, the second I put those beautiful Three Rivers Stone boulders down in the garden, it all changed. Just the mere addition of stone changed the looked of the garden, it was unbelievable. I’ve never experienced so drastic a visual change in a garden from a single addition. I was obviously missing stone before. The fact is, we garden, usually, to mimic nature, and there are stones in nature, and there are changes of elevation in nature, and this was a big flat garden area. I am now going to experiment with adding boulders to my other garden beds.
I was very much flying by the seat of my pants with this design, I had no plans to base it off of, just an idea in my head, and it turned out better than my wildest imaginations. I’ve had some luck in the past with my ideas coming off really well, but normally the first iteration needs work, not in this case, it looks amazing, way better than I had hoped, it cost less than I thought it would, and it helps the garden more than I thought it would.
I planted it with sedum ground covers in purple, blue, and red, and with dwarf evergreen accent plants. There are a couple waterlilies in the water, as well as a plant for the fish to nibble on, and yes, there are fish. 6 comet goldfish, which apparently can indeed live in there year round so long as it doesn’t freeze solid.
I’ve posted instructions on how to make such a water feature as well as more pictures of mine.
Three Rivers Stone and Stepables Sedum
April 28th, 2008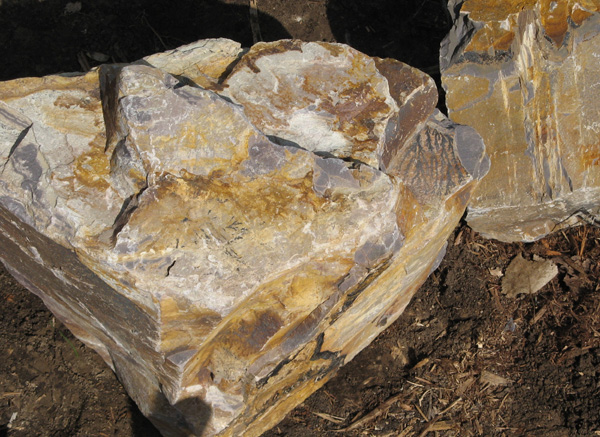 I want to share a couple recent purchases I made for my garden, specifically, for a water feature I am building that I should be able to share in a week or 10 days.
The first is this gorgeous rock called Three Rivers Stone. I was at the stone place and wanted some boulders 12-18 inches square and wanted something interesting. I was just going to get generic glacial boulders which are cheap, but then I saw these, and I fell in love. They’re just so cool. Apparently they’re from a place in Idaho and it is the only place in the world you get these stones (a type of very very very dense & heavy sandstone). I’m guessing it is near three rivers or what used to be three rivers. There are shades of true purple, gold, yellow, rust brown, and even streaks of black (oil? Dunno, I’m no geologist) in some. They have so much visual strength and character. I bought about 2500 pounds worth and paid $500, including delivery, which is cheaper than I thought it’d be. That volume gains me around 20 (or just under) linear feet of wall for my raised water garden.
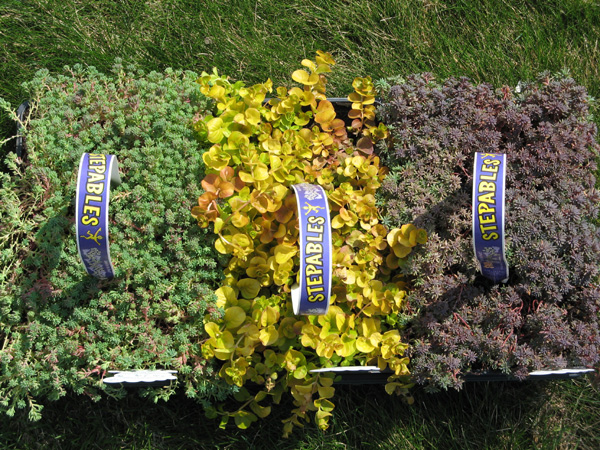 The second thing I bought were some “Stepables” ground covers. These were expensive, $45 a tray, but what can you do? “Stepables” is just a brand name for a company that sells ground covers that take foot traffic. I bought a tray that is 1/3rd blue sedum, 1/3rd golden moneywort (lysimachia aurea), and 1/3rd purple sedum. I know for a fact that all three plants are stupidly easily to propagate and had I had the option to buy them anywhere else, I would have, but I’d never even seen those types of sedum before, and I check out a lot of catalogs, ebay, and nursery websites. So, I bought them for the high price, but if you were to do the same I would recommend you do as I did and buy the minimum and then propagate them by yourself, they’re so easy.
I actually had a golden moneywort already (and had propagated it all over my yard), but I had bought it on ebay and I didn’t know what cultivar, if any, it was, and this stuff in the tray is more golden than mine, which is why I bought it originally (nice golden ground cover is good for contrasting foliage colors). So I figured I’d give this stuff a try and see how it compares to what I already had.
The sedum though, that stuff is for my water garden. Won’t that “Purple Form” sedum look great cascading down those three rivers stone boulders? I can’t wait.
To propagate either sedum or lysimachia get a tray like what you buy annuals in, recycle the ones you get from the nursery, fill it with soil. Then make a bunch of random small 3 inch or so cuttings from the plant you want to propagate, dip each in rooting hormone, stick it in the soil, keep it moist, and give it a few weeks. So easy. I’m propagating sedums constantly in the summer.
I’ll also be putting baby dwarf evergreens around the water garden, it is going to look great, stay tuned for pictures when it is done.
Better Gardening Through Science
April 17th, 2008I wrote a new article today, Better Gardening Through Science, check it out. It covers milky spore bacteria, mycorrhizal fungus, and water absorbing polymers. All essential tools for today’s modern gardener.
Selling Some Ditch Lilies
April 11th, 2008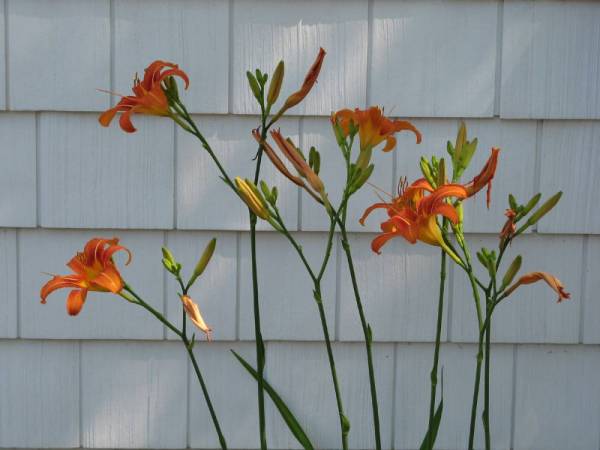 I’ve previously blogged about ditch lilies here, and now I’ve got quite a few extras and am selling them on ebay for cheap.
Ditch lilies, also called tiger lilies, or common orange daylilies, are a species form of daylily. Hemerocallis fulva. Each plant has pleasing lighter green grass like foliage and 3 foot high flower spikes that flower in early summer to late spring. These plants spread very quickly using underground runners (unlike normal daylilies). They are tank-hardy, they will take anything. Which is why as I explained in my previous blog post I am using them to fill up the space between the sidewalk and the road.
I would not recommend planting these in among other perennials as they can take over, but if you have a defined space you want to fill, ditch lilies are a great (and cheap) choice. You can also just always plant them in ditches or in the middle of your lawn and then keep them in bounds with a mower, no edging needed.
Perennial Lettuce?
April 8th, 2008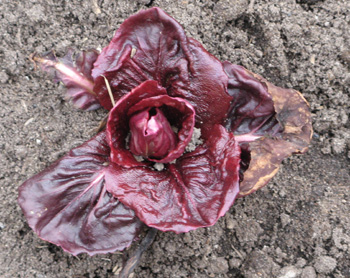 It has been so nice getting out and gardening this past week now that weather has finally warmed up. You do not realize how much joy, or the sense of peace, it gives you until you get to flip that switch from being stuck inside to being able to go out.
Anyways, in inspecting my raised veggie bed I noticed two of these little plants growing where I had planted a mesclun lettuce mix last year. Obviously this is some type of edible leafy green, though I do not know which. What I find really, really, really, odd though is that the raised bed was entirely barren of living plants (as it should be after a hard winter) except two of this type, both looking pretty good. Obviously it had gotten frost bit at one point, but all told, I’m impressed.
I always thought all leafy greens were annuals, or otherwise would not survive a cold Michigan winter. And yet… there is the picture. I transplanted it as well as I was adding a whole new layer of compost to the bed, and so I can attest it has a fairly well developed root ball, ie it isn’t a recent sprout. It has to have been living atleast 3 or 4 months.
So, what do I have? And why is it doing so well? Does anyone know? It was a seed mix and I don’t recall seeing many/any of these plants back last fall and summer when I was harvesting, but it may have been hidden down below. Also, it could be that a few seeds of something got tossed in with the rest of the mix. I’m really quite curious. If indeed there is a type of lettuce that can handle extreme temperatures and still look this good I might just plant more of it.
Naturalizing Crocus in the Lawn
April 7th, 2008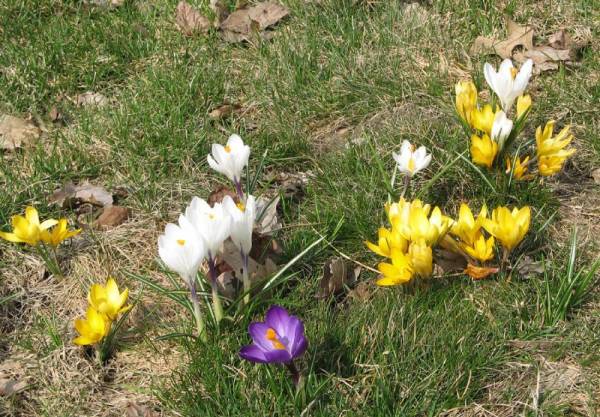 Finally Flowers. Michigan had an abysmally cold February and March and all the bulbs and other plants were delayed, I heard that even one state to the South things were on schedule, but up here this is the latest start I remember in recent time.
But finally, things are waking up, and up first of course, are crocuses. So I get to see the results of the in-lawn plantings I did last fall.
Planting crocus in your lawn is a great way to plant more flowers without having to make more garden beds. The bulbs sit below your sod, the crocus foliage looks like grass, and by the time you need to mow, the flowers are done and it doesn’t hurt them.
You can naturalize your entire lawn, something I’d highly recommend if you’re putting in new sod or seeding for the first time after construction. You may need to shop around to find a distributor willing to sell you thousands of bulbs in bulk for relatively little cash but I think it’d be worth it. You would have, every Spring, a carpet of blossoms where your lawn should be. People will stop to take pictures, it would be beautiful.
For those of us with established lawns though, such a thing is possible, just much much much more work as we have to remove and then replace the sod.
What I did was just two small areas totaling probably 10 square feet together. I used an edging spade to cut the grass into squares of about 12 inches and then used a flat shovel to scoop them up in one piece. I then laid the crocus bulbs (technically corms) down on the exposed dirt, replaced the sod, and tamped down. It was a good deal of work, my sod was compacted and tough to dig, but I’m glad I did it. You’ll want to plant densely for a more powerful affect, so err on the side of too many bulbs rather than too few.
You will notice in the picture some dying grass, that is to be expected, the edges where you cut the sod will brown, but that should respond and fill in within a month or two in the Spring and of course be gone entirely in future years.
Probably when I buy a new house or otherwise have the opportunity to plant BEFORE sod is laid or seed is sown, I will plant thousands of crocus bulbs for huge swaths of color. For now though, I’ll enjoy what I’ve got.