
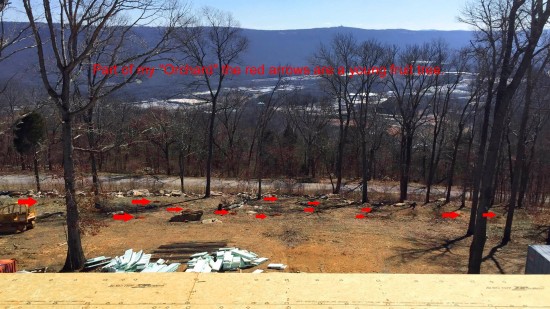
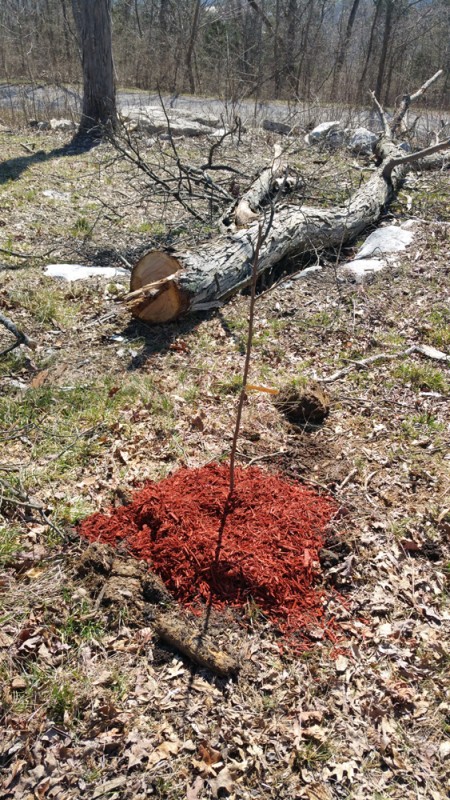
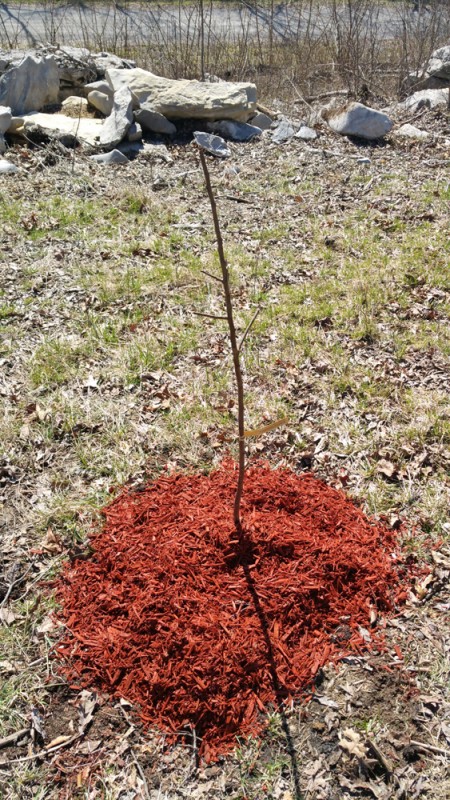
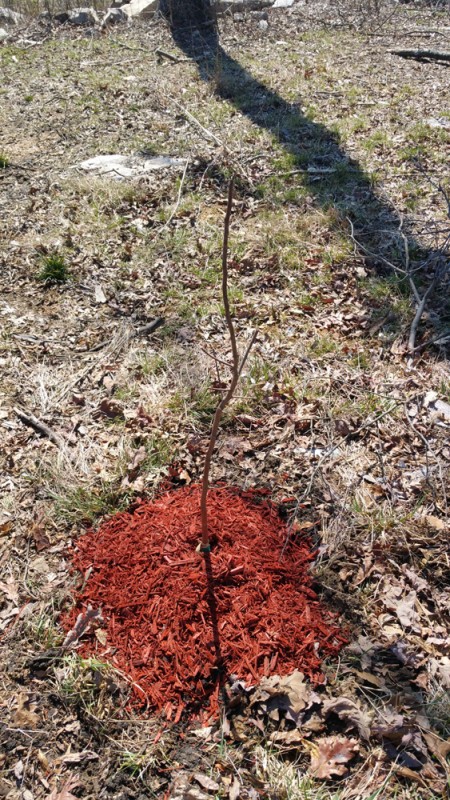
Part of my orchard, the red arrows indicate a newly planted fruit tree.
There is this old German fairy tale where a pair of spoiled children take their parent’s hard work for granted, not appreciating what is provided for them, until a monster known as the Hugelkultur attacks their cottage on night and eats their parents, leaving the children to survive on their own.
Just kidding. It is a German word, it means “hill culture,” and in practice is a method of gardening where you bury wood and then plant on top of it.
Things like “lasagna gardening” (where you build up a raised bed by alternating layers of compost, twigs & debris, newspaper and cardboard, and soil) are a variation on this, but true hugelkultur is pretty extreme, not just laying in sticks and twigs and garden debris with soil as you build a raise bed, hugelkultur could best be describes as covering up a firewood pile with soil, so you have a mound, or a swale, or a terrace. You put whole logs down, piling them on top of each other in a long triangular shape, then cover with soil. You have this sort of mound garden. Why do this at all? The wood both increases drainage and water retention, buried wood is capable of holding water like a sponge, it becomes a buried reservoir of water for your plants, and as it decomposes it increases organic matter and microbial activity in the soil and creates air pockets. It is also a decent method in any area where a raised bed is a good idea, namely areas where the ground is too rocky, the soil too shallow, or the soil just of too poor quality to do a proper garden bed. So rather than dig a bed into the ground, you build a bed on top of ground.
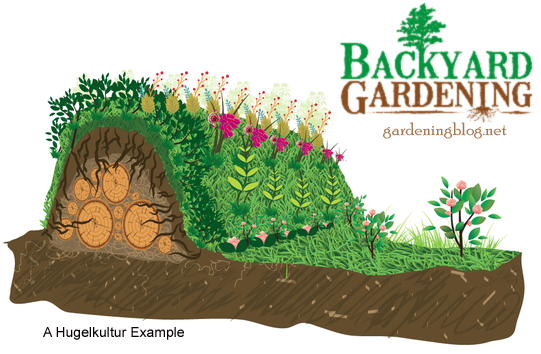
Hugelkultur beds don’t have to be huge piles, they can also be built flat. You could layer logs and other wood at the bottom of a flat bed, like a raft of wood, then pile soil on top. That works too. As the wood decomposes it will of course shrink and so you need to account for that.
When I was tilling my new garden I made what you might call accidental hugelkultur. Originally my land was all forest, and I had trees felled and stumps ground, all that wood debris ended up mixed in the soil, all the roots ended up decaying in the soil. Then, when I tilled, I chopped up some roots pretty good as well. It isn’t strict proper hugelkultur where a more or less solid layer of wood is deep under the soil, however there is a lot of buried decaying wood in my garden and I will likely get a benefit from it over time.
Are there downsides with doing this? Yes. For one, if you use fresh wood, it will lock up significant amounts of nitrogen, adding some nitrogen to the pile in the form of blood meal or green manure would surely help. Already partially or mostly decayed wood (ideal) is better for this reason. Also the aforementioned shrinkage may annoy you over time, but I sort of doubt it’d be a big deal. OF course these sorts of beds cannot really be tilled (as I said above, I have some wood in my garden, but it was small pieces, not logs, and I have a heavy duty tiller than can break 4 or 5 inch roots. Burying a layer of mulch under a new bed would work the same and still allow tilling, but overall I would say this is best for areas that will be permanently planted, and not worked year after year).
One potential upside though is you could get some mushrooms. If you start with fresh logs not yet infiltrated with fungi you could inoculate the logs with edible fungi plugs or spores and then, over time, be able to harvest those mushrooms.
The overall point I want to make with this post is this. If you’re building a new raised garden bed, and you have some wood debris, not only is it okay for you to bury it at the bottom of the bed, it is actually beneficial in the long run to your soil.
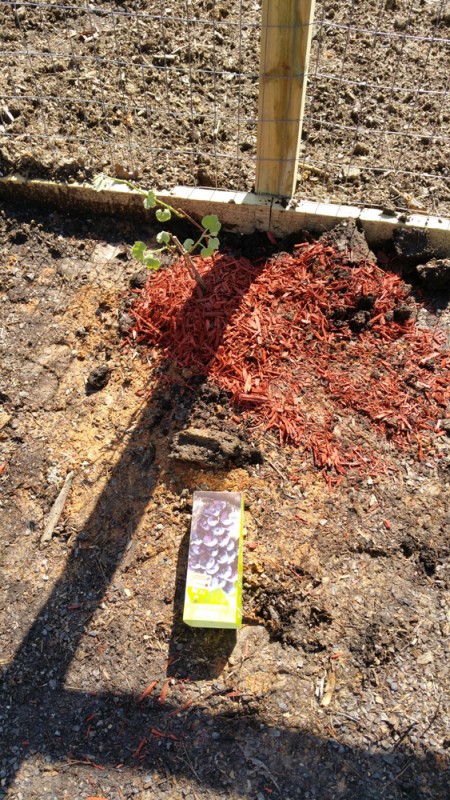
My dirt is spread, my fence is up, I tilled in one brief window of no rain, and now after even more rain, and some nice warm weather, I have started to plant.
This weekend I planted 5 apple trees in my “orchard,” and two mulberry trees in my chicken run. The mulberry trees are permanent residents, but I also planted some hostas, blackberries, kiwi, grapes, and ferns in the chicken run. I won’t be having chickens this year as I am not living up there yet and able to take care of them while our house is being built, so my chicken run is my holding area for plants I need to eventually plant elsewhere once all the construction is done. I will eventually be planting tons of daylilies and hostas and other perennials in there that I currently have in pots.
I planted a combination permanent bed of about 80 strawberries and 60 asparagus at one end of my vegetable garden. I planted 8 blueberries and about 20 more strawberries among them along another edge of my vegetable garden. Normally I do not like to mix permanent plantings with seasonal plantings, and my veggie garden will be mostly seasonal plantings. However, with the deer pressure, I really need to fence in my strawberries, asparagus, and blueberries, and I have this big fenced garden (5000 sq/ft) so I’m using it. I’m putting them by the edges though so they don’t interfere with future tillings.
I’ve not done this yet, but I’m told strawberries make good companion plantings for asparagus, and decent for blueberries. Truthfully I was only going to be planting them with the asparagus but I had more strawberries than asparagus. Asparagus are of course tall and thin and willowy, they don’t case a lot of shade, and strawberries are short and spreading, able to fill in all the vacant spaces around the asparagus (which are planted fairly widely spaced). Blueberries are much the same except eventually the bushes will fill in more and the strawberries may diminish, as far as acidity goes strawberries like acid too, though not as much as blueberries, so they can both enjoy the same soil.
Finally I planted my first annual vegetables in my garden, about 300 onion sets, which at the close spacing you give onions, actually took up very little space than you’d think with a number like 300. After my pittance of a vegetable garden I had before I’m starting to experience the luxury of space I have now. 300 onions. Likewise, I recently put in my seed order for my gardening, $250, just for seeds. Admittedly I won’t use all these seeds this season, many will carry over for future years, but man, that is a lot of seeds. It should produce in the end thousands of dollars worth of produce, I will just have to figure out how to harvest and store it all.
Some more pictures of what I planted:
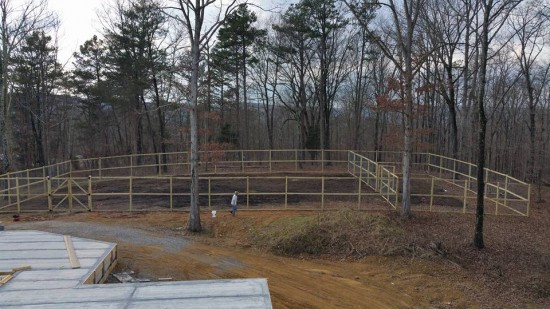
My new garden fence is done, and I am excited.
I now have over 5,000 sq/ft of dedicated fenced gardening space, and an over 1,000 sq/ft chicken run. I will be planting it in two weeks.
Yes, two weeks. I even saw a daffodil blooming yesterday, I’m going to like living in the south.
I don’t know if I’ll have time to till it, I have a new tractor and a new tiller attachment, but the ground is wet and you shouldn’t till when it is wet, but I’ll have to plant some things, soon. I’m thinking I may plant at the edges leaving me still able to till the middle.

Right away I plan to plant some mulberries in the chicken run. Mulberries provide really good mast (mast is natural forage food) for chickens, and most bird species really love them. As the trees grow they will also provide shade and cover from aerial predators like hawks.
I designed the layout, as you see, with the entrance to the chicken run being through the garden. This is for two reasons, one, it is an extra layer of security, at the chicken gate, two it allows me to let the chickens into the garden when I want at various points in the growing season to help with weeding, composting, tilling, and fertilizing. There is a great synergy between animal husbandry and gardening, and I want to put it to work. I will allow the chickens in in the Spring and Fall to fertilizer and turn over the garden, and I may let them in at certain times during the growing season to patrol for pests and add fertilizer (I will have to monitor their behavior though if they start scratching at or eating plants I do not want them to). I can also put up small fence sections, almost like a portal kennel or baby play area, if there is a patch I need to clean up. For instance with the aid of portable fencing I could allow them to patrol the corn rows once the corn gets tall, looking for bugs, fertilizing, and eating weeds. Once the spinach bolts in the summer I could put them in just that section of the garden to clean up the spent plants. Not only do I save on labor, but I get bug killing, fertilizing, and soil turning all together.
In a couple weeks I have a bunch of trees and perennials coming. I will need to plant asparagus, strawberries, and blueberries in my garden. I wouldn’t normally want to put all these in the garden, but with the deer pressure I fear I will have to. Maybe in later years I might be able to keep some out, I would ideally prefer planting perennial crops elsewhere apart from annual ones. I’ll plant them around the sides so I can still till the center area.
Since I will not be living there yet, I am going to wait on getting my chickens, and I will use the chicken side of things to plant the many, many, flowers I took from my old garden that are currently still in pots or trays. I’ll have a veritable daylily farm, and then, I guess in the Spring of 2017 I should end up with hundreds of daylily divisions I can use in my ornamental beds once construction is complete.
I’m just excited to be on the cusp of gardening again.
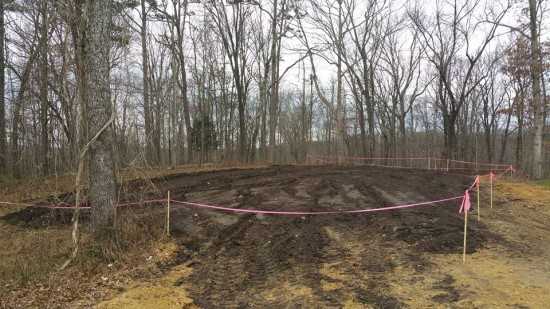
The major earth work (backfilling the foundation) around my new house under construction is finally done so I have had the opportunity to lay out my garden.
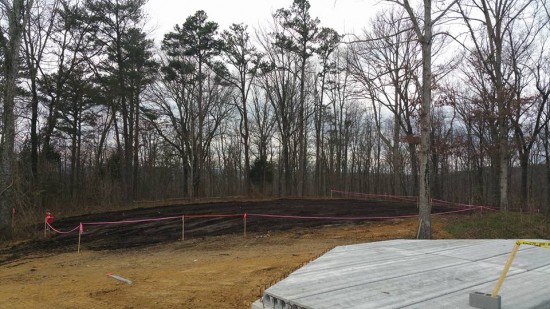
This area still had its normal natural forest top soil, but then a portion had been used for fill dirt storage, so there is probably a remnant layer of that, and then I had trucked in 40 yards of sifted blended compost to go on top. This compost product was quite expensive (about 30 bucks a yard, similar product in Michigan was $18) but guaranteed to be weed free. Overall compost and top soil I find to be much more expensive down here in Tennessee than it was up in Michigan, I think perhaps the natural top soil available down here, with so few low lying areas, just is not that much. Supply and demand and all of that. The top soil they do have is also a different color (this dark black compost aside) and tends to be light brown, the color of Michigan fill dirt. There is probably a post there in comparing the dirt on a more scientific level and figuring out why the color is different.
At my old home I had about 100 sq/ft of garden space dedicated for vegetables, I would grab possibly another 100 sq/ft from the ornamental beds here or there or by using containers, but overall, not a lot of space.
This new garden I laid out is 54×125, over 6000 sq/ft. The dirt alone was over $1000, the deer proof fence is looking to be much more than that, but man I will have a lot of room. My son keeps asking “Can we plant corn?” Yes, we will have enough room to plant corn. 1000 sq/ft I’m actually going to partition off and use for chickens. I want to have my chicken run directly attached to my garden so I can use them for cleanup and weed control. During the main growing season I can keep them out, but in the fall and spring let them in to scratch the soil up, find weed seeds or bugs, or tear apart old plants.
My overall goal has always been to grow as much of my own food as possible, this size will allow me to accomplish that. This plot will be dedicated entirely to vegetables, I may put a couple berries in there, I may not, I haven’t fully decided. But I have more room on my property for other beds. I will of course have large ornamental gardens, probably at least 5000 sq/ft of those, but I already have a place dedicated to fruit trees (I will end up with 20 mixed varieties of apples, pears, plums, apricots, and peaches). I have pecan trees as well. I have spots picked out for berries (raspberries, strawberries, blueberries), grapes (hopefully enough to make some wine), and kiwi. The fencing will likely be the hardest thing, as I’m sure the deer will get into everything that isn’t fenced. I will also be growing some venison.
I have certain goals for my garden. To provide my family with vegetables during the growing season on a daily basis is one. Another is to produce enough to provide say 50 quarts of tomato sauce a year (italian once a week). Perhaps 50 butternut squashes (risotto once a week). I would like to be able to produce a year’s supply of salsa verde which I think might be 50 pints. I would like to be able to produce spinach and kale almost year round to add to dishes, or have extra to freeze to get through the couple months where they won’t grow down here. Then of course I will have to can, freeze, or dry to preserve the inevitable excesses. I would also like to have to buy as little chicken feed as possible (and later, hog feed).
I think the size I have will allow me to do this, I can’t wait to get started. One thing I need is a heavy duty tiller to blend these layers of soil together and fluff it up. I could also possibly rent one, but ideally I’m hoping to get my own.
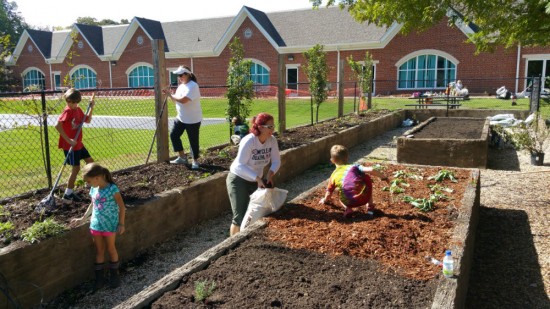
A, well, I guess a month ago now, maybe more, my kid’s school had a garden work day. When I got the email asking for volunteers my ears perked up. Volunteers you say? To plant and help layout a garden you say? I was there in a heart beat…. and I sort of monopolized the thing, I was the most experienced gardener there and I get so excited about such things it is hard for me not to.
So this was the “early childhood playground” which is just used by 3-5 year olds. Some years ago before my kids attended here, but not that long ago, they put in this nice garden section with nice concrete raised beds, but then it appears to have been neglected. Some people have planted some things, but not really with much of a plan or without enough upkeep.
There were also some raised flower beds up near the school just outside the playground.
The issue was, what to plant, where to plant it, and when to plant it. But first we had to clean out the existing beds.
The flower beds near the school were mostly empty, except one was overgrown with mint I had that mint dug up and saved but otherwise cleaned out. We then planted that mint in and around the actual playground in areas where it would be contained and not overgrown. This is a great idea for a variety of reasons. Mint is hardy and grows most places, it needs little upkeep, and of course the kids can eat it. Of course they’re told which plant is mint.
One of the raised garden beds had some cabbage and some green onions planted, but then also four apple trees and several grape vines. Grape vines, are, quite frankly, a horrible idea for a school garden. Grapes grow like mad, need constant labor and training (in the summer when school is not in session) and ripen generally also in the summer. They’re just a big mess. We tore all the grape vines out.
We kept the apple trees. Two yellow delicious and two “babe” apples. The “Babe” ones I would not recommend, tons of suckers, it must be a feature of the cultivar. I couldn’t tell it was an apple at first, I was all “This looks like an apple, but why is it a bush?” the suckers were so thick. But they’re apples, and I AM a fan of apples in a school garden (dwarf trees are best). They provide beautiful flowers in Spring, when school is in session, and apples in Fall, when schools are in session, with very little maintenance needed during summer break (generally none, you won’t be spraying in a playground anyways).
The other side had some blackberries, blueberries and a very odd bushes that didn’t look healthy and I couldn’t identify them. We tore them out. The blackberries were thornless, we kept them but I have mixed feelings about it because of the ripening time. There are some summer camps at the school though. Same with the blueberries.
The entrance to this garden section had an arch someone had started training what I’m pretty sure is a hardy kiwi up, this we kept and against is what I think is a great vine for a school garden. Hardy kiwi is a great vibrant vine that needs little maintenance (some pruning, basically, once it gets big), nice pretty glossy leaves, and fruit that ripens in fall that children can eat out of hand like grapes.
We transplanted the green onions and cabbage to the middle garden beds. I told them if we got lucky maybe they would be able to harvest the cabbage, and so far we’ve been lucky, no frost yet, two weeks after the average first frost date. I also planted some kale, and brought some herbs to donate. Spearmint, rosemary, thyme, and I planted some biennial parsley seeds. The herbs are perennial so they’ll be back year after year in what is now the herb section. I told them they might be able to get a radish crop in with the short time frame, but otherwise the goal was just cleaning up the beds for Spring planting next year.
The beds near the school were planted with donated flowers, volunteers were asked to bring divisions out of their yards to plant… alas I was the only one who did so, everyone else went out and bought flowers. Which is fine… but it means they probably don’t garden much at home, which makes me sad. Gardening is so much fun, everyone should do it, am I right? But the goal here was to plant flowers by the sidewalk where all could enjoy them, while keeping the veggies and other edibles within the playground fencing to limit animal browsing.
Overall I’m please with the progress we made on the garden, and I’m happy the school has a garden. I really, really, really enjoy gardening with my kids, I like being able to show them where food comes from and there is nothing quite so gratifying as watching your children eat a carrot or a leaf of kale right out of the garden… on their own volition. But of course, not everyone has a garden blogger daddy, so it’ll be nice for other children to get a similar appreciation.
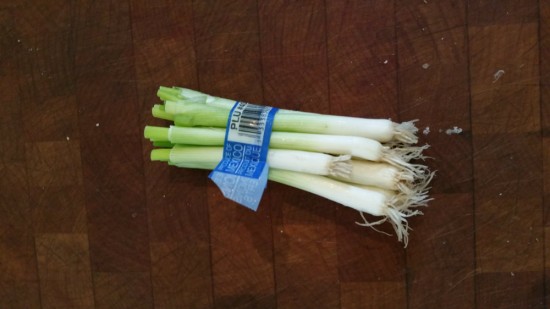
Store Bought Green Onions, Perfect for Planting
Finally, I also brought some green onions to plant… because I had cooked with them in the past week so I had some. Normally I wouldn’t have these, because when I have a garden I just cut off the tops of green onions, and never dig up the whole plant. But because I am between gardens right now having just moved there were grocery store green onions, which always come with the bottoms, which most people throw away, and others compost, but what should you do with these? Plant them. Plant them and in about two weeks you’ll have more green onions to harvest, it is that quick that they regenerate. What an easy way to build up your onion patch huh? Are you not doing this yet? And they’re small, they need mere square inches of space each, so you can cram then in anywhere. Put some in your eggs in the morning, in soups and stews, in mashed potatoes, so many meals can have green onions added, you can’t go wrong with adding more to your garden.
In many places, probably even older blog posts here, you will find advice on composting that say do not do meat, or meat and dairy, or meat and dairy and bread.
I followed this advice for awhile, but I’ve stopped, there isn’t really any good reason not to compost these things.
First of all, composting is really hard to mess up. All it is is managed decay of organic material, and guess what? Stuff rots with or without your help. Meat rots, cheese rots, even twinkies will rot (eventually). So why the concerns?
Well some people claim that meat can harbor diseases. Yes, possibly, you’re right. Uncooked meat can, which is why we cook it. Of course other things can harbor diseases too, like organic fertilizer (manure) often used in gardening that has been linked to e coli outbreaks. So how would you avoid this? Don’t spray raw meat on your lettuce. Compost it well, long term, or mix it in with the soil, don’t use it as a top dressing. Simple enough.
Meat… composted it makes great fertilizer
Others claim that meat can attract more pests than just rotting vegetation, and worse pests. They are right, though they often forget that regular old rotting apples will attract plenty of vermin, there are certain other pests that are attracted to meat, maggots and the like. If you have chickens though that can be a good thing, chickens love maggots. Generally though, I agree, compost can attract pests. If you have a fully enclosed compost tumbler, like the one I have (see link), you’re pretty safe, that model can even stand up to a small bear. Otherwise, again, you can bury it, either directly into the garden or deep into your compost pile.
We buy fish meal as a garden fertilizer, blood meal, bone meal, what do you think these things are? Dead animals are in fact some of the best fertilizers you’ll find, especially aquatic animals, especially ocean aquatic animals (all those minerals!). If you burn or roast your bones first you can make the phosphorous inside more available, otherwise I see no reason not to toss any and all food scraps into your composter.
Some are also concerned about salt in cooked food, but really, its not a big deal. Several studies show a little salt would actually improve our soils, and if you were eating the food the salt level is probably not high enough to hurt the plants or the composting microbes. Don’t dump a whole bag of salt into it and you’ll be fine.
Yes, fats and animal products do produce far worse odors when decomposing, you can try to mitigate that by adding more dry browns, but that is just a fact of life as different bacteria tend to eat those products. Still, I don’t think that is a strong enough reason not to compost those products, considering all the nutrients in them.
I now compost almost everything that comes out of my kitchen or fridge, though I might end up feeding some scraps to the animals once I get some livestock. As I see it, why waste good potential fertilizer? I’ve even composted some whole dead animals. Dead birds I’ve found lying around generally (or in one case, one that hit the car). Some people I know will compost roadkill, I can see that, or I can see just burying it by a tree you want to get some nitrogen too). Kinda gross, but that is the circle of life. What is the weirdest thing you’ve composted?
I have moved, previously I lived in town with no deer problems, now… I live in town with no deer problems. However I have property where I’m building a house up in a relatively rural area, and there are deer.
Because I am such a gardening fanatic I have been planting fruit trees up there, hoping to hurry the day when I can get my first harvest. However, the deer kept eating the leaves. Deer love the leaves off new fruit trees, they’re nutritious, a delicacy. Some of the trees survived the frequent defoliations, others did not.
Now, despite living in town recently, I am familiar with deer, very familiar, as I grew up out in the woods and my parents still live there and I have helped them deal with their garden issues. One thing that worked for them was the motion activated sprinkler…when they remembered to turn it on, and it would only cover a small 20×20 or so garden.
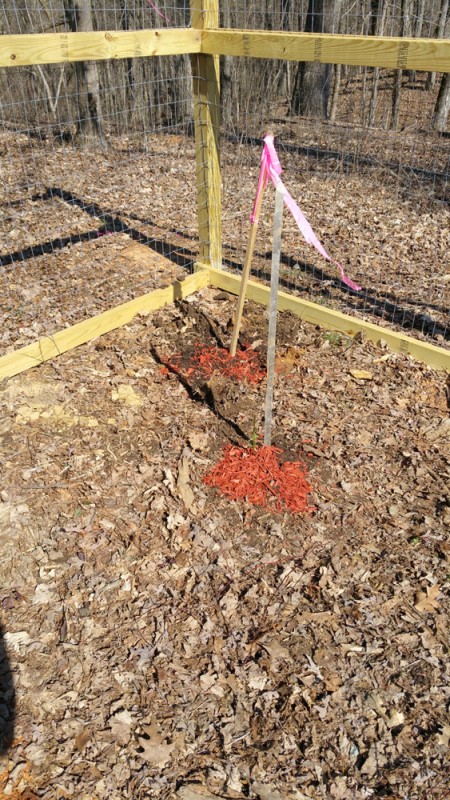
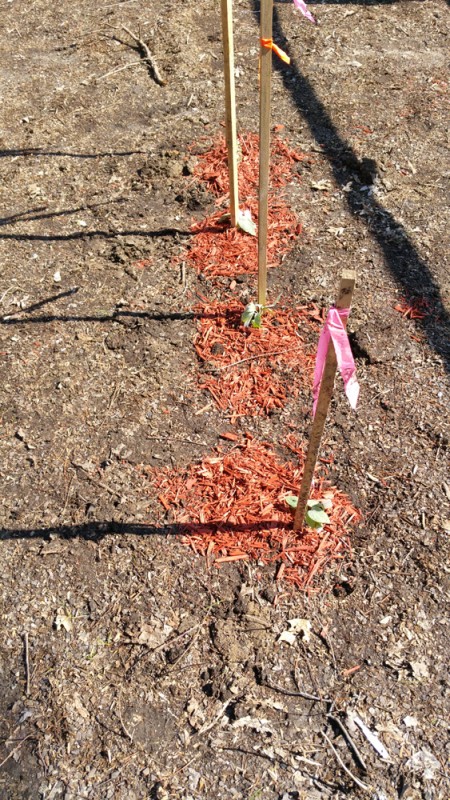
The only really surefire way to stop deer is a fence, and despite it being ugly I’ve really had no choice but to fence in my trees. This isn’t permanent, you just need to do this until the tree gets larger and established and has branches above deer browsing height.
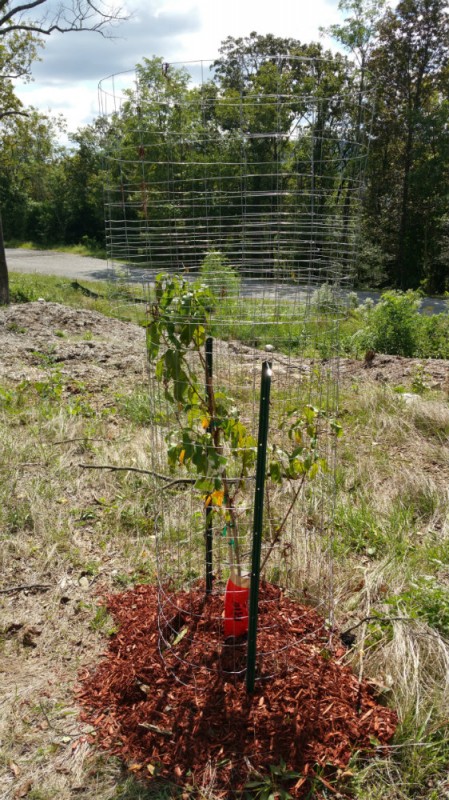
Deer Cage Protecting Tree
The good news is, this is really easy, all you need is some fencing, bought inexpensively at a big box store, some zip ties, bolt cutters, and some stakes. If you can find 8 foot fencing you’re all set, if not, you’ll need to get a couple and zip tie them together. I needed to do the latter. So I got a 5 foot fence and a 2 and a half foot fence.
Simply unspool the fence until you’ve got a segment that has a diameter of at least 4 feet, snip it off the fence roll, put it around your tree that needs protection, and ziptie it together. If you need more height make a matching segment of another fence and ziptie it on top. You then need to stake it to the ground, you can use the green fence stakes, rebar, bamboo, just something you can drive into the ground, then ziptie the fencing to that as well. You now have a deer proof cage around your tree. Rinse, repeat.
In the end it is not an attractive look, (you can get green fencing to try to make it blend in a little bit), but it is not permanent, after a few years the trees will be large enough to not be killable by a munching deer anymore.
For the math less inclined, you need approximately 12 linear feet of fencing to make a circle with a diameter of 4 feet (and really, the wider you can make it the better). So a 100 ft roll will do 8 trees.
When the trees do outgrow the need for fencing, the fencing is not garbage, you can repurpose it to protect new trees, build a garden trellis, or probably one of a hundred other uses.
If I say “Troy Bilt” what do you think of? Power tools right? I know I immediately think of chipper shredders, but that is not all they make. They have recently expanded into hand tools for gardening, and lucky me they sent me some free ones to review.
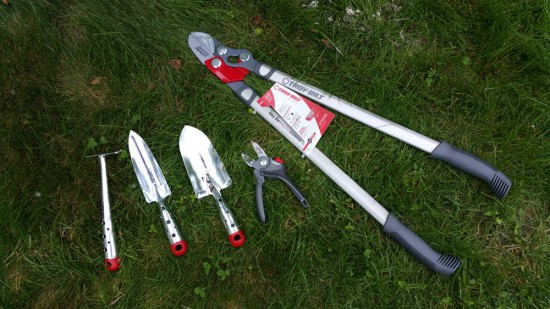
I definitely like the trowel. I can’t count how many trowels I have bent or broken because of a lack of strength in the handle. This is one piece of steel, with a tubular handle, which provides excellent strength without additional weight. I’m always using towels perhaps to dig in too touch soil than I should, this one is the first I’ve had that could stand up to that.
Most trowels have the handle part attached to the shovel part with a welded or bolted on bar, this is not strong, even if it might have the same amount of weight or metal as Troy Bilt’s design. Think about a piece of wood, a 1×4, if you lay it flat and try to bend it, you can easily do so, but instead put it on it’s side and try to bend it, much harder, because in one direction you’re bending a depth of nominally 1″, in the other direction you’re bending a depth of nominally 4″. By making their handle a essentially a pipe, even if the same amount of metal is involved, you go from bending a third of an inch to an inch and a half, on any axis. Its physics, and it works, and it is an improvement.
In total I got two trowels and a little hand rake using this one piece design with a tubular handle, I’m sure all three will last near forever.
I also received some hand pruners, and these too I really like. They are very strudy, the metal tang of the handle goes all the way through so you do not feel as though they will break, they’re sharp, they cut well, and they just feel substantial in your hands. My favorite feature is the thumb button though to lock and unlock them. Too however hand pruners put the lock between the two sides of the grip, this is poor design, as you cannot access the lock one handed, you either need to shift your grip or use your off hand to lock them. You may not think that is a big deal but if you’re walking around doing a lot of pruning, being able to fetch, unlock, prune, lock, stow your pruners all one handed is a big help. It keeps your other hand free to hold what you’re trying to cut.
Finally I got some loppers, which like the pruners feature this super hard high carbon steel blade. Like the other products, there are very plastic parts, they work very well, they feel substantial, the movement is precise, and they have the appearance of lasting a long time.
Am I thankful for getting free merchandise? Of course, always, but I’m only honest to a fault and wouldn’t endorse something if it wasn’t good. These tools legitimately are good. They might not be the cheapest out there (though neither are they that expensive) but nothing is so cheap as a tool you have to replace every year.
For Father’s Day I took the family to the tree store here, probably for the last time, since we’re moving next month. In Chattanooga, where we are moving, I’m sure there are nurseries with a large variety of stock, but I haven’t found them yet, and I didn’t want to risk moving there and not having access to a few key trees I definitely wanted in my landscape, so, I bought them now.
The first I absolutely had to have is pinus contorta ‘Taylor’s Sunburst.’ I’ve blogged about this tree several times before, it is one of my favorites. It is a lodgepole pine that grows slowly and that has candles (the new spring growth) of bright banana yellow, constrasting with the green mature needles. I also, just generally, like the overall growth habit of lodgepole pines vs. something like the eastern white pine. I knew I could buy this tree online, but it’d be a small sample not very tall at all, if I wanted one big enough to make a statement I would have to find it from a nursery, and the ones I called in Chattanooga had never heard of it.

Cedrus deodara ‘Karl Fuchs’ and Pinus contorta ‘Taylor’s Sunburst’
The second is cedrus deodara ‘Karl Fuchs’ which is this nice stately true cedar tree. Cedrus atlantica is sold all over the south, often in weeping form, and they’re beautiful and I want one of those. But cedrus deodara grows upright and straight with sparse very architectural sort of limbs, almost like a work of sculpture. Unlike most evergreens it never really “fills in” with needles, the branches are wide spaces without a lot of secondary or tertiary branches that the shape of the growth of the tree is very evident and able to be appreciated (though, maybe you have to be a tree nerd to do so). I had again called places and they didn’t have it, but the new house I’m building will have a circular drive right in the front, and as a center piece of that circular garden I’ve known for awhile I wanted this tree. It will be quite striking when it fills in, and I plan to put multiple colored shrubs (red and golden barberries) around the base of it, so it will be a little multicolor circular garden featuring yellow, red, and blue foliage (but no green!)
Then I also wanted metasequoia glyptostroboides ‘Gold Rush’ also known as dawn redwood, or dinosaur tree. Once thought to be extinct, a few were found growing in a valley in China not that long ago. Gold Rush is a cultivar with bright golden foliage. Similar to bald cypress these trees get really complex and beautiful trunks, one of my favorite features. Overall I am very partial to deciduous conifers like this (conifer trees that lose their needles each winter), bald cypress, larch, etc. I guess I just like short needle conifers as they all tend to have short feathery needles. Again I phoned and emailed nurseries, it looks like the species metasequoia are available, but not ‘gold rush’ and I wanted ‘gold rush’ so I bought two. ‘Gold rush’ does not grow as large as the species variety, but that bright golden foliage that doesn’t fade in the sun is hard to beat. People love large trees with bright foliage in the fall, this one gets it all growing season long.

Two Metasequoia ‘Gold Rush’
I also came home with two trees I did not expect to buy. The first is a standard form hinoki cypress. I don’t know why, but hinoki cypress always appeals to me more than other chamaecyparis or related arborvitaes, the orientation or twist of the foliage I think. In anycase, I saw a very very nice topiary hinoki cypress that I think had to have been grafted, where they got this big old tree, and grafted tufts of dwarf hinoki on it, then cut off the rest, it was gorgeous, but pricey and I was running out of room regardless. I also saw a very nice “top and flop” double graft with the upright dwarf hinoki grafted on top and a weeping gold variety of chamaecyparis or something similar grafted below. This again I did not buy, running short on room. I did settle on a cheaper and smaller standard form hinoki cypress just an impulse buy.
Finally I picked up Abies koreana ‘Kahout’s Icebreaker.’ This is a very new plant discovered as a sport in a nursery in Germany and is only a handful of years old. It was also the American Conifer Society conifer of the year in 2014. So it is a Korean Fir, dwarf, slow growing, that has these sort of curled in needles, the needles are green on top, but typical growth habit has the needles turned in so only their silver blue undersides are shown, in little curled tips like, I just keep thinking of rabbit feet. In my picture you can see the old green lower growth from the host plant (it is a graft) left on to feed it, that I can prune off now. It was small, and inexpensive, my daughter named it “Elsa.”
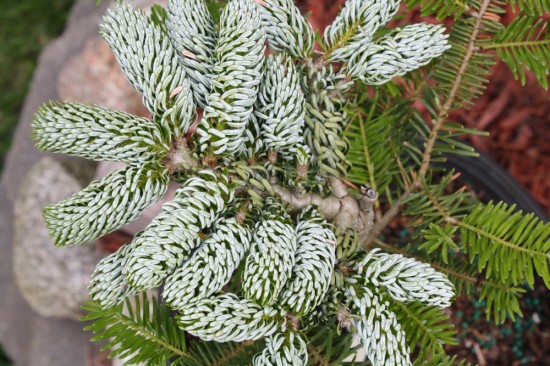
Abies koreana ‘Kahouts Icebreaker’
We completely filled the truck on the way home, and though I wish I could have bought more (it is a huge nursery, the biggest in the midwest I’m told, and I’d love to just be able to say “one of everything please”), I wouldn’t have had any room.
Step 43 of my preparation to move to another state was digging and dividing my ornamental grass today. But even if I weren’t moving it was past time to do this.
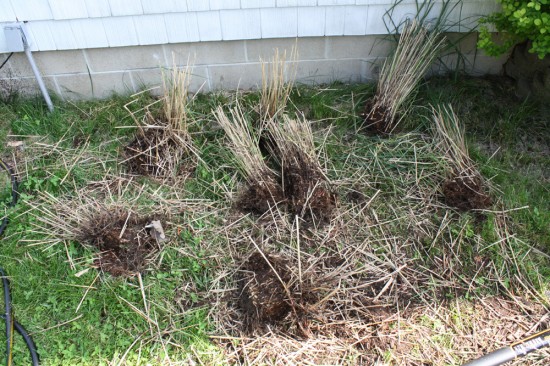
Miscanthus, the sort of grass I have (miscanthus sinesis ‘Morning Light’) also called maiden grass, grows from a rhizome and as it gets older it gets spreading out, with the older rhizome stopping to produce, and you get this sort of doughnut shape or bald spot. Irises, another rhizome plant, will do this same thing. Plant a single iris in a large area and eventually you get this circle with a barren area in the middle.

Miscanthus ornamental grass with a dead center, in need of division.
This thing was wicked hard to dig and cut into. Miscanthus rhizomes are hard, basically wood, so it was like cutting into wood with my shovel. It did not go well. But eventually I got a big clump of it dug. The rest I left there, it’ll fill back in with time.

Miscanthus Clump
So now I had this big clump and I had to cut it into smaller more manageable clumps. The shovel wasn’t happening, I got out my new axe. I would highly, highly recommend the axe. Also for the first top of getting that clump out of the ground. Of course, a full size sharp axe, be careful with that. Put the clump on the ground, stand back from it, and chop down, letting the axe head go into the soil. Never swing an axe in such a way that you could miss, or swing all the way through something, and hit your legs or feet. That would be bad.
Divided Miscanthus Clumps
I chopped the clump up into 4 inch or so pieces to put into 6 inch pots. A few bigger chunks I tossed into bigger pots I had. Normally I would probably want all bigger pots, but this is the size I bought a whole case of for moving plants. I ended up getting about 8 divisions, discarding the inner barren parts of the clump. This is a pretty good haul, potted up and growing miscanthus like this will be at least $10, probably more like $25 at the garden center. So I just saved myself at least $80 on the plant cost of my future garden, and considering I’m going for a fraction of an acre to 20 acres, I will have a lot of plants to purchase.
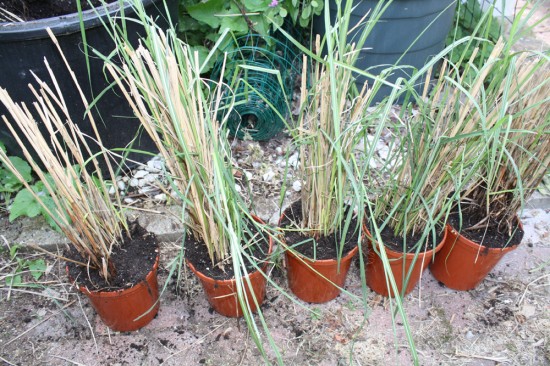
Divided Miscanthus Potted Up