
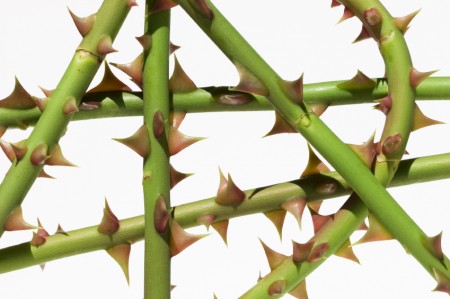
A moderately thorny rose, they get thornier.
Your landscape can be beautiful, your landscape can feed you, but your landscape can also protect you. Much like a well trained dog can be both a friend and a security system, your yard and garden can serve double duty too.
First Do No Harm
The first step to deterring burglars and other miscreants with your landscaping is to make sure you’re not doing anything to encourage them. Large shrubs or bushes that hide your windows or doors, allowing a burglar to work on them out of view, are a big no-no.
You should also keep a well maintained yard, believe it or not, a well maintained yard is a deterrent, criminals see a well maintained yard and think that you obviously take pride in ownership and are more likely to have well constructed locks or other security devices.
Fencing your yard is also a good idea, however make sure you’re not giving any bad guys a boost. So you have a 6 ft fence surrounding your back yard, do you have a grill, trash can, or raised planter right by the fence providing the would be interloper a leg up? If so, move it. Otherwise you’re doing the equivalent of leaving a ladder propped up against your house under a window (also, never leave ladders out, that is just asking for trouble).
So clean your yard, don’t give thiefs concealment, and don’t leave any tools out they might be able to use to climb in or over your defenses.
When you’re running from a bear…
Old story, when running from a bear, you don’t have to be faster than the bear, you just have to be faster than the other people you’re with. There is absolutely nothing your landscaping alone can do if a person is determined to break into your house, your goal is to make your house less attractive as a crime of opportunity than your neighbor.
The best way to do this, is with thorns. Now above I said you don’t want high bushes up near your windows and doors, and that is true, but lower bushes, especially thorny ones, are a good idea. You can build a hedge 5 or so feet off the walls of your house or your windows, not tall enough to hide the windows, but tall enough that you cannot step over it. You can also plant low bushes right up against your house near your windows, just keep them pruned so they don’t get too high, and really plant them right up against the house so there is no room to wiggle between the thorns and the siding.
A moderately thorny rose, they get thornier.
Roses are an excellent choice, with pruning they stay open and won’t hide anything, their canes get decently thick and are not easily bent out of the way, and the thorns can be really, really, wicked. Some rose varieties are bread to have minimal thorns, but there are some varieties that are covered in huge thorns, to the point where you can’t even see the canes.
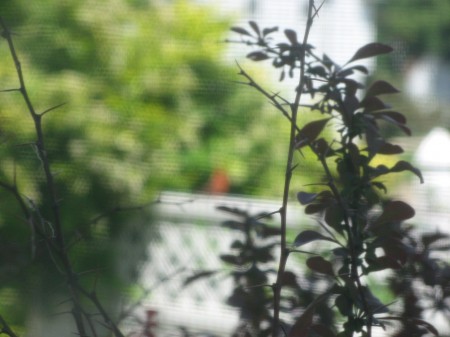
View out of my window showing the profile of some barberry thorns.
A plant I like and have blogged about before is barberry. I actually use both barberry and roses in my landscape for security purposes. Barberry is not as stiff as a rose would be, but it grows very very very bushy, and the thorns, while not as strong, do definitely hurt. They’re not as visible though, so might not deter someone until they are felt. If you could grow a barberry hedge around and under your windows, no burglar is going to want to wade through it to try to pry that window open. The plants are also very attractive.
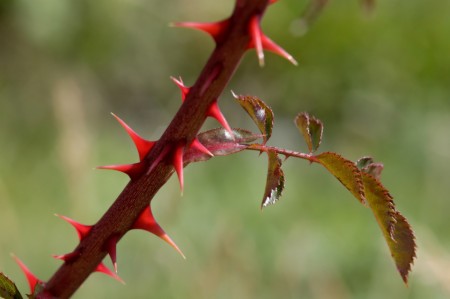
Early season blackberry thorns.
Blackberry or boysenberry thorns I find to be particularly insidious, way stronger than raspberry thorns. Of course there are thornless varieties, so make sure you aren’t buy them, they also need supports so they don’t grow too low to the ground. But with these you can have your security and eat it too. Because they spread rapidly if there is say a short strip of land between your house and a walkway, that is actually a really good place to grow such bramble berries because they’re kept contained by your house on one side and the walkway on the other.
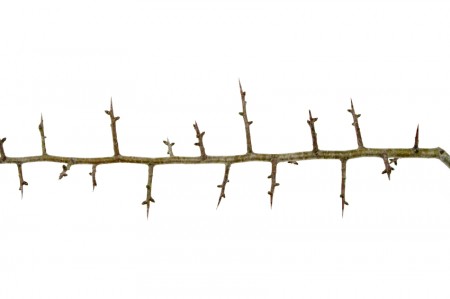
The super long thorns of the hawthorn shrub.
There are many woody shrubs or small trees that have wicked thorns, usually “thorn” is in the name. Such as blackthorn (Europe, originally), spiny hackberry (Texas), and my favorite, Hawthorn (Crataegus), native all over in the northern hemisphere, with hard sharp thorns up to 4 inches long. In Old English “haw” meant hedge, so you can see this plant has been used for protection for a long time. It can grow as a shrub or small tree, and can be pruned into a hedge (wear leather, please). It is also largely edible, the fruits and leaves can both be eaten (maybe that’s why the tree evolved such elaborate defenses). Hawthorn is one of those plants you could use as a very effective living fence if you have the time to let to grow and the time to maintain the pruning.
Self-watering planters are a boon to many gardeners and have taken the gardening industry by storm in a variety of forms. Either for people who lack the room to garden in the ground, or people who lack the time for regular watering, they work great. But, how do they work, and could you make one yourself?
Do you remember the word capillary action from school? Or perhaps just wicking? This is why if you dip a piece of paper in water, the water will climb the paper. It also works with soil, and this principle is behind self-watering containers.
Essentially you have two containers in one, the lower container is a water reservoir holding potentially gallons of water, the upper container holds your soil, and it has to specifically be potting mix, regular old dirt doesn’t wick water nearly as well (nor is it good for containers anyways, always use potting mix in containers). There is a mesh connection between the two allowing some soil to get wet. Eventually your plant’s roots will reach the water, but until then the soil will wick moisture up to them. Depending on the size of your reservoir (which also needs an overflow hole so as to not get too wet) you could go weeks without watering. You can also hook a series of containers up to a rain barrel for automatic watering. A container garden that takes care of itself. To add water to the reservoir there is often a pipe or a hole for easy access. You don’t pour water through the soil to reach it, you have direct access to the reservoir.
There are however some downsides to self watering containers. Some plants do not like perpetually damp soil, the soil in a self watering pot will never completely dry out and so those plants may not be happy. Also, depending on how it is designed, there can be an issue with providing mosquitoes an ideal breeding ground (you really need to find one with some sort of cap over the reservoir access and overflow opening). When using a self watering container you directly water the roots, not the foliage so you lose out on opportunities for foliar feeding, however by keeping the leaves dry you also reduce the risk of fungal infections.
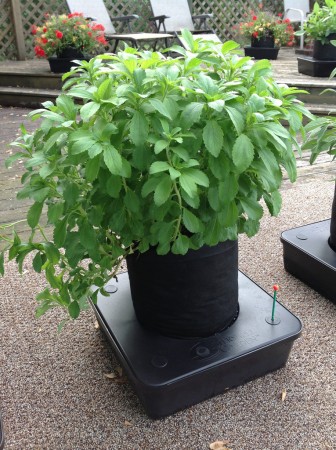
Octopot Self Watering Container
There are many types of self watering containers you can buy, but most work on this same concept. One I have is slightly different though. The Octopot uses a special bag made out of wicking fiber. I think this is a superior construction because it pulls water from the reservoir all the way up the sides of the soil, resulting in better moisture coverage in my opinion. With caps over all the ports it also is no friend to mosquitoes and includes a little water level indicator so you can easily see if it needs more water or not. One downside of it is that it is nearly impossible to move when full of water, 6 gallons plus soil is quite heavy, so either pick a spot and stick to it, or put it on a little plant dolly (little square with 4 caster wheels on it, so you can roll your containers around).
The Octopot is obviously utilitarian in appearance and so lends itself more to functional, ie edible, gardening, than ornamentals. However there are some very attractive self watering containers out there as well if you wanted something more presentable for the front walk that you could put flowers in.
You can also make your own. You simply need two plastic containers of roughly equal size. Recycling is best so think of what you use frequently. Do you get those big plastic pails of kitty litter? Ice melt salt? Do you have old 5 gallon buckets from Home Depot lying around? all could be used, though wash them out good if they were used to store yucky things. If you know someone in the food industry you may have access to old used vats of food grade plastic that once held salad dressing or something, that’d be great, you just need two of the same size that can be nested inside each other.
The bottom one you cut a hole in the side 4-6 inches up to act as an overflow, the top one you cut a hole in the bottom and line it with some sort of perforated material, then another hole in which you insert a pipe that leads to the top above the rim. Then you simply fill with soil. It won’t have the fancier features of the Octopot, but it’d get the job done. Here is a photo tutorial on building large ones out of plastic storage containers.
It is November, you’ve likely already put your garden away, or you will soon. I’ve personally been procrastinating. Outside maybe the frost has already gotten your herbs, maybe not, maybe you live in Florida and it never will, most of us though have to say goodbye at some point to your fresh herbs from the garden, but that is okay, because you can continue reaping the bounty in the winter if you simply dry your herbs.

Drying Herbs
Not all herbs take well to drying, basil loses much of its flavor, though it still has some flavor, it isn’t very good. Tarragon ends up practically tasteless when dried. However, some herbs do quite well being dried. Rosemary, thyme, oregano, and sage all dry quite well, though why anyone would want sage is another matter (its yucky!).
Anyone who has bought herbs at the store knows how expensive they are, fresh or dry, and at this time of year why sacrifice that large rosemary shrub you planted in the Spring to the gods of Winter? Cut it down, it is going to die anyway (if you’re north of zone 7) and dry it, you’ll have all the rosemary you need. Your thyme and oregano may make it through the winter, but not without damage, so cut liberally from them too, and bring it all inside.
Drying herbs is the easiest thing in the world. You can use a fancy food dehydrator, I have one and it is great for making apple chips, or beet chips, or kale chips, or drying out hot peppers for making powder seasonings, but it isn’t necessary. If you’ve ever dried flowers before you know how to dry herbs. Just pick a warm spot out of direct sunlight and out of the way, bundle your herbs up with some twice, and hang them upside down. Give it a few weeks, when they’re brittle, they’re done.
You can leave them as is, picking off the leaves or needles as needed, or you can pluck the stems now and store them loose in canisters or jars. The volatile oils in the plants that give them their flavors will degrade eventually, you’ll help slow that process down by keeping them out of direct sunlight, in a sealed container, but one with some extra air in it (glass jars are better than plastic bags). Then enjoy them to flavor your cooking until your garden is growing again next summer, it is hard to beat something so cheap and easy.
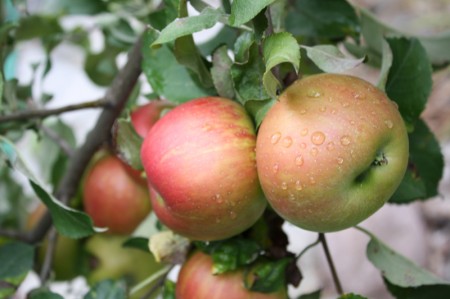
This is prime time for apple harvesting, the earliest varieties would have been ready in August, the majority in September, and even then some into October, and the latest in November. I was really excited this year to get the first good apple harvest from my apple trees. They should have been big enough to produce last year, but an inopportune cold snap decimated my apple trees in the spring, getting down to below 20 when the flowers had just opened, the entire state of Michigan lost something like 98% of the apple harvest.
I have a mere two producing apple trees, a honeycrisp, which I’ve since harvested, and a yellow delicious, which I will harvest next week. If I had to recommend only one tree, I would recommend the honeycrisp, it is an excellent apple, produces well, and is good is pretty much all apple applications from pies to cider. But I tell you what, even 1 semidwarf apple tree can produce a lot of apples. Even without spraying any chemicals, even with squirrels and whatever else stealing a few, you’ll get a lot of apples. So what do you do?
The first important issue when harvesting apples is deciding when. You need to know what apple type you have, and then you can use the Internet to figure out when it ripens in your area. Commercial growers will actually pull apples and test them for sugar content, you can try taste testing or just go by historic averages. Of course, if you don’t know the variety you have, you’ll have to do taste testing. Color is not a reliable indicator of ripeness, many apples will change color long after they’re ripe, or be ripe regardless of color. Color on many apples is most influenced by sun exposure, which has more to do with where the apple sits on the branch, not ripeness.
Assuming you’re harvesting at the right time the second big issue is, who cares about funky, damaged, or spotted fruit? Did you think every apple you grew would be round and shiny and perfect like the supermarket ones? Well, for one, those are usually sprayed for insects, and you probably didn’t do that. Even if organic gardening isn’t your thing, no one likes sitting down underneath a tree and spraying a chemical upwards, even something organic like neem oil is going to fall back down in your face and whatnot, plus, good luck reaching the top branches for good coverage. No, accept the fact that your apple tree will produce some funky apples. Maybe some will have even fallen and been damaged.
The fact is, all tree produce funky apples, they’re just sorted at the orchard. The best apples are packed individually, are big and beautiful, and sold to you for $4 per pound. Lesser quality ones are bagged and sold that way, even lesser quality ones are turned into things like apple pie filling, and then the worst are either apple sauce or apple cider. Then whatever is left is turned into compost or bacon (courtesy of pigs). So on your tree you’ll likely have a few big shiny apples that are excellent for eating out of hand, but you’ll also have some misshapen, spotted, runty, or damaged ones, but don’t throw them out! When life gives you funky apples, make apple sauce.
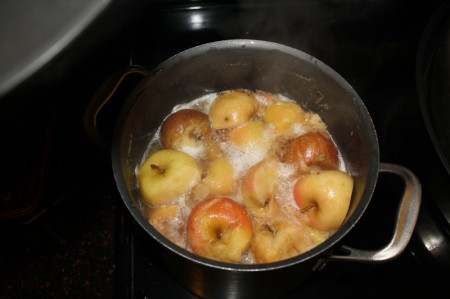
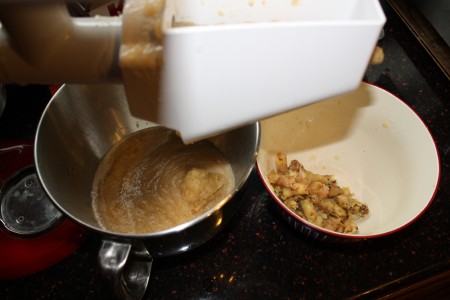
If you’ve never made apple sauce before it is really easy, especially if you have a KitchenAid Stand Mixer. If you have a mixer you just cut off any damaged parts from the apples, minor insect damage can be kept, but any large gashes or bruises or anything that shows rot on it should be cut off, yes, a half rotted apple is half a usable apple, then toss it all, cores, stems, and peels, whole apples, into a big big stock pot, and cook it until the apples are mush. Then you run it through the food mill attachment attached to your stand mixer (if you don’t have the food mill attachment, you can buy it here. It is probably one of the greatest devices ever invented, it makes making applesauce, tomato sauce, and lots of other things a cinch). This attachment perfectly can take a whole apple and spit sauce out one end and core/seed/peel/stem out the other. It is magical, wonderful, and saves hours of work.
If you do not have a mixer (or other sort of manual or automatic food mill) then you need to peel, core, and chop every apple prior to cooking it in the pot. This can take hours, and what is more is I think you end up with lower quality sauce. When you cook the whole apple you extra a lot of the goodness from the peels and cores, like additional pectin (which makes the sauce thicker and improves mouth feel), and nutrients in the peel. I really cannot recommend the Kitchenaid route enough, it is like magic!
Once you have your sauce taste it and see if you want to add anything. You can add sugar, but it isn’t necessary for preservation. You can also add spices like cinnamon or nutmeg. Then make sure you keep it heated and simply can it using a pressure or boiling water bath canner. You’ll want to process it for 15 minutes, leave at least a half inch of headspace in each jar, and make sure you keep the sauce hot for packing it in the jars, yes, if it bubbles, and gets on your skin, it is like napalm, but it needs to be hot for loading. If you do not know how to can food I talk about it a little in this post and there are many Internet resources that explain it as well.
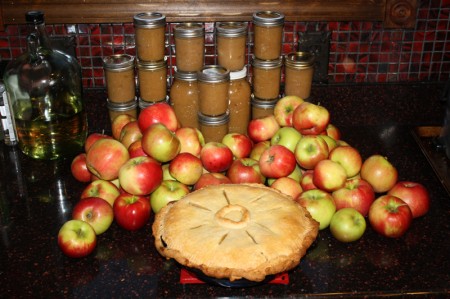
I don’t know if it is merely psychological bias, but I think the sauce I made from my honeycrisp apples was just about the best I ever had, unsweetened even. Could it have been the added pectin from cooking whole apples? Maybe. The fact that I used a premium apple like honeycrisp? Perhaps. I just know, it is delicious, and good thing, because I have around 24 pints of it now. I also know exactly what is in it, and exactly what was on the apples (nothing but rain and sunshine).
I also made 1 pie and filled both crisper drawers in the fridge to the top with apples to eat out of hand, plus the ones that never made it to the fridge. All of this from 1 tree which I paid $20 for and planted a few years ago. Around here, nice big honeycrisp apples are $3 or $4 a pound at the grocery store (more expensive than any other apple type). So the first 5 big apples I ate made back my investment on the tree, and the rest is profit. In my not so humble opinion, every yard in the country should have an apple tree, and if you don’t much care about the variety you can get them for less. Troll garden centers in the fall when things go on clearance. I’ve found a tree for as little as $6 before.
I planted grape vines along my fence I don’t even know how many years ago, but I’ve never really gotten grapes from them, every year, before they ripen, the birds eat them. I have a seedless concord grape vine and a green seedless table grape of a variety I do not recall, but I never got grapes from them. It was an endless source of frustration.
Granted I also don’t prune them as well as I should for true grape production as you’d find in a vineyard. My garden is a little too crowded for the spacing required for that, or the access I’d need to walk over and prune them, so production isn’t as high as it could be, but I still never got any grapes.
This year I vowed to do something about that though. In my research I saw that some vineyards would use bird netting over the entire vine, and I really didn’t have the space for that (the vine is along my fence, and I also have trees, shrubs, and other plantings brushing up my fence in spots, so wrapping the whole fence in netting would be very difficult). Plus I thought that smushing all the leaves and whatnot together would limit overall plant vigor and could induce fungal issues.
I hit upon the idea of getting mesh/net bags and putting each grape bundle, while it was still immature, in a bag to protect it. This was fairly tedious, it took a couple hours, and it wouldn’t work for a very large scale grower, but it worked for me. So this year, finally, I got grapes. Not much, but some. I need to do better with pruning next year to try to increase production.
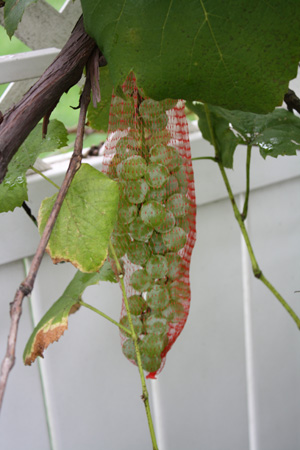
I ended up buying three different types of bags. I was originally searching for green mesh net bags, like the sort of nylon mesh you’d buy maybe onions or oranges wrapped in, that is usually red though, and I could find lots of red, but I wanted it to blend into the landscape more and so I searched for green. I did eventually find some simple ones like that on eBay from the UK and had them shipped in. I could find of course, single count mesh bags in green, purple, or any color I wanted, but when I needed 100 I needed something cheap and in bulk. These were the net style nylon bags with no drawstring or closing mechanism, so they weren’t entirely idea, they were also larger than the average cluster of grapes by quite a bit. I also bounght some drawstring ones from Alibaba Express. This is sorta like an eBay site for Chinese manufacturers, all told it was a very safe transaction, the money was held in escrow until my goods arrived so I was assured of not being ripped off. I would recommend it. These bags, with drawstrings, were really easy to put up on the vines, and at 34 cents each they were affordable. Finally I got some red polypropylene net bags on eBay as well. Red didn’t blend into the background, but it made it easier to find and harvest the grapes afterwards, they were also really cheap, 2.3 cents each. What I ended up doing is using the green bags on the outside of my fence where the neighbors could see them, and the red bags on the inside where only I could see them.
It isn’t a perfect system, and I still want to tour some vineyards sometime to see how the big boys keep the birds away, but I got grapes for the first time this year, and that makes me happy.
Spinach and beets are two of my favorite crops to grow in my relatively limited vegetable gardening space, but this year they just got infested with spinach leaf miners (probably because I have too little room to rotate crops and I grow them every year). I ended up getting very little spinach harvest, I hate those little things.
Leaf miner damage can often be confused for other problems. It can resemble to the uninitiated perhaps slug damage, or even a fungal infection. It is not these things. The key identifier of leaf miner damage is that the leaf is eaten on the inside, but the outside is fine, so you end up with a white wilty area on the leaf. You can also verify it by inspecting the bottom of the leaves and looking for little white eggs, usually in clusters of two or three.
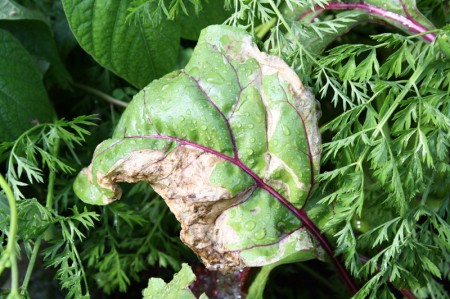
Leaf Miner Damage on Beets
The leaf miner is a species of insect, with the adult form like a small fly. They lay eggs on the undersides of certain species of plant (each species of insect has a preferred species of plant), the eggs hatch, the hatchling burrows into the leaf and then mines the inside of the leaf for food, leaving behind poop (the little black specs you then see inside the leaf) and not much else. For a leaf crop like spinach or chard, this obviously hurts. It even hurts for beets because we can eat those leaves too (and I do) and obviously losing leaves reduces plant vigor.
When full the larva, now like little grubs, tunnel out, drop into the soil, tunnel down, pupate, and emerge later as adult flies.
Controlling these pests is difficult. You can spray with neem oil, but it hardly works, and you have to get on the underside of the leaves, which is difficult. The main problem is the critter lives inside your plant, so topical sprays will no work unless you get it at that point of hatching. You can inspect all your plants to remove eggs before they hatch, but good luck with that. You can use floating row covers, but they need to be small enough to stop the small flies and they don’t help when the flies are emerging from soil at the plant’s base. It is almost the perfect pest, living inside your plant and then the soil directly underneath it.
The best controls are crop rotation and, if you have the time, daily inspections of your crop. When you spot the first signs of leaf miner damage, remove the leaf, and put it in a sealed garbage container (do not compost it, or the fly might just live). If you can, miraculously, cull an entire generation of leaf miners prior to them fully developing inside the leaves you might just save the harvest, but any leaf you remove will reduce the future population of the critters.
They overwinter in the soil, so intense cultivation in late fall and early spring may disrupt them there as well.
Spinach and beets/chard are related so they eat both plants, but they prefer spinach, and indeed this particular species in my garden is known as the spinach leaf miner. The interesting thing is, to me, that my beets seem to recover after I pull my spinach once it bolts in summer, the flies don’t seem to do as well with only beets to eat. Next year I plan to just not grow spinach, I will still grow beets. I will cultivate heavily in fall and spring, and I will try to be diligent about checking the leaves earlier for the first generation of these pests, and maybe reduce their population.
There is something about a primordial forest, it looks old, it looks ancient, it piques my interest. The aesthetic of the old is greatly appealing to me, I think this is one of the reasons I like bonsai, which are small trees, but often so very old, and full of the character of age.
The age of a plant, that can be interpreted in two ways really. There is how old the plant is, and how old the species or family is. Either through a lifetime being exposed to media, be it TV, books, or theme park rides, or through some inherent sense, we recognize old plants, old as in evolutionarily old, as in a dinosaur may have chowed on its ancestors. Us humans, despite the Flintstones, never lived side by side with the dinosaurs, but some plants did.
In many ways these plants, while still existing today, aren’t common, or aren’t common where we live, or together, and so they seem exotic (some people of course are lucky enough to live in areas where they are still common). Putting them together in your yard, or a corner of your yard, or wherever you have room, can evoke a feeling in those viewing your garden. They might not be able to put their finger on it, but you may have them niggling their brain for an afternoon wondering what it was that intrigues them about those plants, until maybe a light bulb goes off and they simply think they might have seen a velociraptor in your bushes.
So this blog will be a profile of prehistoric plants that, even when young, are quite old, and may make your garden feel exotic, and a home to large reptiles.
Gymnosperms & Angiosperms
Remember science class? Broadly speaking a gymnosperm is a plant that does not flower, they’re largely wind pollinated, often conifers, angiosperms are the ones that flower. Why is this important? Flowering plants are relatively young, for most of the dino times they didn’t exist. So most of the plants on my list here will be gymnosperms.
Metasequoia
Called the Dawn Redwood, it is related to the giant sequoias, coastal redwoods, and bald cypresses of our time, the deciduous conifers. Deciduous conifers are perhaps my favorite group of trees, they’re just so much more interesting than evergreen conifers (the pines and spruces), or at least, I think so. I also really like true cedars (cedrus family) and larches (larix) as being similar. The true cedars I think also lend some exotic feeling to North American or European gardens because they’re native to other parts of the world, such as the Himalayas. Perhaps a Colorado Blue Spruce would look exotic in Nepal, but Cedrus Deodora looks exotic here.
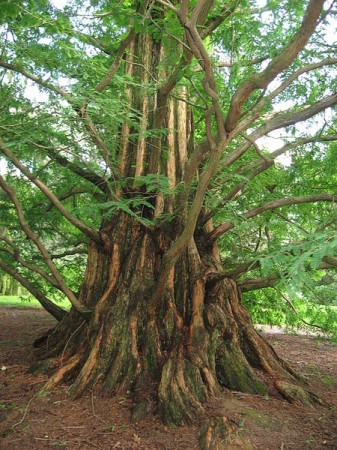
Metasequoia was thought to be extinct until a living specimen was found in China in the 1940s, it has since taken off in the landscape trade though remains rare in the wild. I particularly like it, as well as bald cypress and other sequoias or redwoods, for the interesting trucks they develop over time, which makes them look so very old.
Any Dinosaur garden should include one or some of these trees, you can feel free to sub in from the list of relatives above, and cedars and larches also make interesting counterpoints (and are smaller trees generally). Both the cedars and larches also come in interesting weeping forms that can be twisted and trained into evocative shapes that lend well to this style of garden.
Ginkgo
Gingko biloba is also often called a living fossil. This tree is famous of course as a herbal supplement purported to aid memory and concentration, but it is also anciently old species, relatively unchanged from fossils 270 million years old. It is also related to no other modern tree or plant, it is a true unique specimen, and yes, dinosaurs ate it.
It is speculated that the tree would be fully extinct were it not preserved in cultivated by Chinese monks for over a thousand years, the stability of the old Chinese dynasties has provided us modern gardeners a real treat.
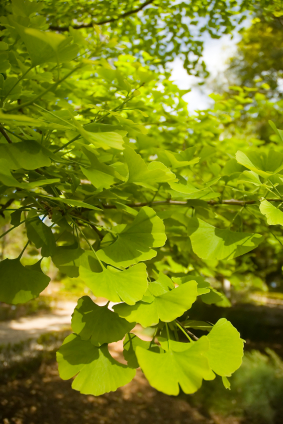
The trees can live for thousands of years, grow to over a hundred feet, have interesting unique trunks and leaves, tolerate pollution and compacted soil and all told make excellent urban shade trees. It is hardy in USDA zones 3-8, which covers more or less all temperate regions. As such you can grow it practically anywhere that isn’t Northern Alberta or Southern Florida.
Gingko trees are either male or female, and you need one of each sex to get usable seeds, which are nuts, though the trees do not flower, which I find interesting, essentially it is a tree with a fruit, but no flower. Instead the male produces a pollen cone and the female just produces ovules at the end of a stalk. The inner portion of the nuts are edible and are used in Asian cuisine, the outer portion has a horrible smell (and so many people plant exclusively male plants, to avoid the stinking nuts).
Cycads
Gingko does not have any living relatives, but the closest plant relative, if you had to name one, would be the cycad. Cycads, like Gingko and Ferns (below) have motile sperm (aka they can swim), a unique characteristic in the plant kingdom, perhaps a trait carried from a common ancestor plants and animals share from the dawn of time. I find that interesting anyways.
Cycads are commonly known as sago palms usually. There is a true sago palm, but what most people call a sago palm is actually a cycad. While they resemble palms of today and so get confused with them, they’re a much older species, 280 million years old to be exact.
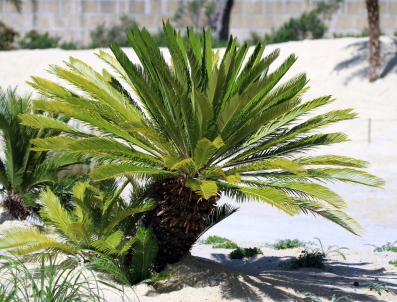
Cycads grow like palms, without branches, with the long pinnate (feather-like) leaves growing directly out from the trunk in like a rosette, though they’re typically shorter than palm trees. They grow slowly, and live a very very long time. Seeds can be poisonous, so watch out for those.
They are typically thought of as tropical plants, and they are, but there are some cultivars with marked hardiness, especially if you can achieve a microclimate somewhere in your yard. If you live in zone 7 you can at least experiment with owning a cycad, and if you live in zone 6 and can push it with a microclimate or provide some winter protection you might do well. Even if the leaves get zapped they usually will grow back.
Cycads in my opinion are one of the plants that really bring home the prehistoric aesthetic, especially if you can pair them with some conifers like metasequoia that I mentioned above. The combination of a plant style most commonly associated with colder areas, with a “palm” most commonly associated with the tropics, really can make your garden look exotic.
Ferns
So we’ve talked trees, and then many cycads are small enough to be considered shrubs, but what about the rest, the low growing filler plants? Well, ferns are what you want. I’m sure we all know what ferns are, they’re the shade loving (usually) plants with fronds that reproduce with spores or underground runners (no seeds, no flowers). They’re 360 million years old, though species you might currently plant date only to the cretaceous.
So if you have a lot of shade from your metasequoia and gingko trees, plant ferns underneath to complete the effect, a variety of ferns ideally, mix it up to make it look natural.
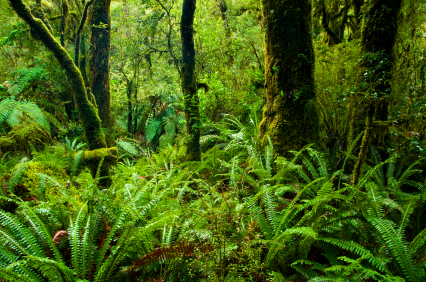
Most ferns also start off as a fiddlehead in early Spring, meaning the little green shoot comes out of the soil and resembles the top of a fiddle with the fronds all curled up. This part is edible like asparagus. You harvest the head at this stage, cook it, and eat it. It is highly seasonal though, for obvious reasons, once the fronds unfurl it is no longer a fiddlehead. The best for eating are ostrich ferns, but you can also eat lady ferns or bracken ferns (the one most commonly found in the wild in forests). All ferns need to be cooked prior to eating though to destroy a mild toxin they otherwise have. They were an important food for native peoples and are making a bit of a comeback on the farmer’s market scene now. I love it when we can eat portions of an otherwise ornamental garden.
Paw Paws
The one plant I will mention that is an angiosperm, that flowers, is the Paw Paw Asimina triloba. I do not know how old the species is, but it is quite old. It evolved before bees existed, and so has putrid flowers. You may have heard of the corpse flower, a flower that stinks like a rotting corpse because it is pollinated by carrion flies? Same sort of deal (though less pungent, I personally cannot detect any scent on the ones I grow). The paw paw is pollinated by beetles or flies, and you absolutely require two different trees for successful pollination (and pollination is hard to achieve, you may need to do it by hand).
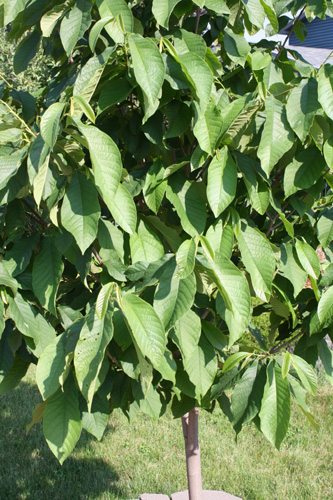
It is a relatively short relatively slow growing tree, native to North America, but what is most cool about it is that it looks like a fish out of water in that it has large simple ovoid leaves like you’d see in a rain forest, but it grows as far north as Canada. It definitely looks exotic, and the fruits, big green, somewhat oblong shaped, also look exotic, and they are delicious, if you can achieve successful pollination.
If not, it is a very attractive tree, with large elongated leaves unlike anything else you’ll see in a temperate climate anywhere in the world (as far as I know). It has no pest or disease issues either, and all told is remarkably well adapted. Because it doesn’t get very big it makes a great tree for a small yard. Which is good considering you need two for proper pollination.
Dinosaurs may not have eaten it, I’m not sure really, but when Dinosaurs roamed the Earth was warmer than it was now, and to provide that sort of prehistoric feeling much of it means creating a tropical feeling, and the paw paw looks tropical. Plus, it is delicious.
I previously blogged about this plant in 2009 and it just looks so good this year I wanted to blog about it again. This will be a picture heavy post.
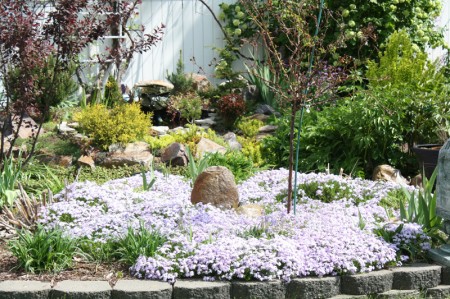
Creeping Phlox Emerald Blue, Back Garden
Creeping phlox, also called carpet phlox, phlox sublata is a great typically evergreen groundcover native to the eastern US. It spreads, yet is easy to control, seems to tolerate a variety of soils and drought, and puts on a really showy display of flowers in the Spring. I originally had bought and had used ice plant as a ground cover for most of the locations where I now use phlox, and while the ice plant did flower for a longer period (nigh all summer), it eventually petered out and died (soil or climate, it was only marginally hardy here in Michigan). Phlox so far has performed much better.
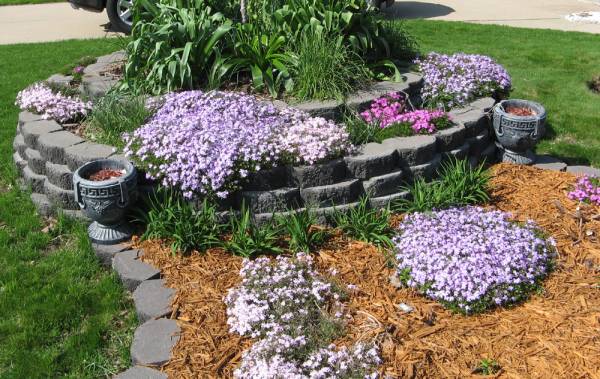
My favorite way to use it, as is self evident is having it cascade down rock or brick walls, over your raised beds, making them seem as if they’re a cauldron bubbling over.

Creeping Phlox Overflowing
I have not, however, had equal success with all cultivars or varieties of creeping phlox. I originally planted three: Emerald Pink, Emerald Blue, and Candy Stripe (white with red stripes). Emerald Pink holds its own, flowers nicely, and spreads moderately. Emerald Blue by far grows the best, flowers the most, spreads the most (though still controllable) and all told is the healthiest of the lot. Candy Stripe is a severe disappointment, it constantly exhibits signs of drought stress, barely grows, barely spreads, and in many locations has just failed. In some places I’ve planted these three side by side and the blue has ended up taking over while the candy stripe fades away. If you’re looking to purchase a phlox, do not get Candy Stripe.
A good example of this can be found by comparing my picture from my 2009 post, with one I took just today, around 4 years later.
As you can see in 2009, on the lower tier, I had Candy Stripe on the left at the front, in the middle I had Emerald Blue, and at the right edge I had Emerald Pink. On the upper tier I had some more Candy Stripe way on the left side of the circle, then Emerald Blue, then Candy Stripe, then Emerald Pink, then Emerald Blue again. Now look at 2013:
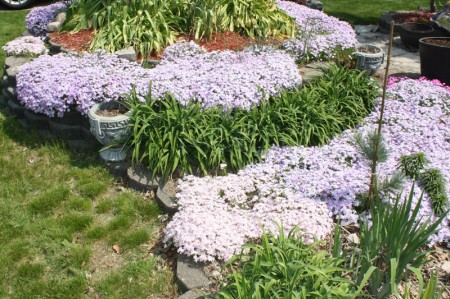
Creeping Phlox 2013
I didn’t do anything, just let the plants grow, and grow Emerald Blue did. You can see it has just taken over, the Pink is holding its own, but Candy Stripe has been left in the dust. Also notice the lilies poking up from within the phlox. Isn’t that neat? It is a ground cover but it isn’t going to smother other plants, so it can freely climb over them.

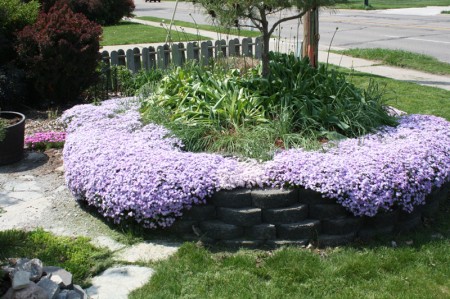
Candy Stripe Creeping Phlox, in the middle, grows poorly compared to the variety on the sides.
In the above picture, and again in the below one, you can see just how poorly the Candy Stripe grows. They were all originally planted at the same size, in both these pictures the Candy Stripe is centered and has barely grown, whereas the Emerald Blue has taken off.
Candy Strip,e in the middle, grows much less vigorously.
I’ve only had two problems with this plant. One winter I had some die back, well one problem, possibly two causes. It was a very cold winter and some of the tips exposed drooping down off the bricks got zapped, I’m not sure if it was the cold though, rodents had also been chewing on stems further up the plant and that may have done it. The plant is normally evergreen though, so it became obvious when it got all brown that something had happened. It quickly recovered though, as you can tell.

Emerald Blue and Emerald Pink Creeping Phlox
All told, I still highly recommend this plant.

Creeping Phlox Emerald Blue, Competing with Sedum groundcover
I’m being quite literal, the title of this blog post is “set your garden on fire” and I literally mean that. Burn it down. Why? Well, let me explain….
In the vegetable garden weeds are horrible, no one likes weeds, they compete with our crops. Also, unless you’re practicing no-till, you’re going to turn the soil every Spring to loosen it up and aerate it, giving plant roots an easier time of things. Unfortunately this soil turning brings new weed seeds to the surface, and you might particularly be susceptible because you bought a bag of questionable compost at some point that was just full of weed seeds. What you need to do is stop those weed seeds from sprouting. You could use a natural or synthetic pre-emergency herbicide, but that will also stop your vegetable seeds from growing. You can deal with the seeds after they emerge, but that can be a losing battle, so what is a good gardener to do?
Option 1 is solarization, this refers to cooking your soil with sunlight. You simply put a layer of clear plastic or glass over your garden (raised beds work best) and let the sunlight soak in. Ideally the air space in between the plastic/glass and the dirt will rise to a high temperature, high enough to kill weed seeds on the surface (while also warming the soil). This works, if you have the plastic/glass, want to mess with securing it, and get adequate sunlight early in the growing season.
Option 2 is setting your garden on fire. Different method, same result, you cook the top inch or so of soil, killing any dormant weed seeds that you just turned up. If you use raised beds and are worried about the wooden sides, don’t be, the soil will keep them cool enough. Fire has the additional added benefit of potentially adding nutrients to the soil, as well as bio-char. Bio-char is a fancy word for essentially natural charcoal or carbon, as we all know from the use of activated charcoal filters charcoal bonds to other chemicals, like say nitrogen and phosphorous, holding such minerals in the soil. It is theorized the use of charcoal to create the soil called terra preta is what allowed the indigenous people of the Amazon to grow food in what is otherwise a wet desert, thousands of years later the soil is still fertile.

I’ve touched on this topic before in my fertilizer from the ocean post where I mention taking the used activated charcoal from aquarium filters (now blissfully bonded to nitrogen) as a soil amendment. There are lots of bio-char advocates out there who would have you build hardwood fires in your garden every year and till the resulting charcoal into the soil, and indeed you can do that, though it is more work than I have in mind.
Of course, there are some minor PH issues with ashes, but it is a small amount and I’m not wholly concerned with it, and it can be corrected easily if you discover a problem.
So, what I did this weekend is first amend my soil. Last fall I emptied out my compost tumblers (link is the model I have), and put that in the garden, so I didn’t add more compost this Spring, instead I added fish bone meal (also mentioned in my fertilizer from the sea post) and azomite, which is a mineral amendment. I would have also added some nitrogen fertilizer in the form of blood meal or fish emulsion, but I didn’t have any. I then work it into the soil and turned the soil over to looser it up, and raked it smooth. Next step was to put down a layer of corrugated cardboard, on top of this I tossed a bunch of wrinkled newspaper, some various dry sticks, twigs, and leaves lying around, and on top of it all I poured about a gallon of used vegetable oil from my deep fryer (the oil helps it to burn longer/better).
You can’t really light this well with a match, the cardboard is in direct contact with soil and needs more than that it get it really going. I used a propane torch which I got for Christmas, and it is an excellent gardening tool. Imagine, weeding with fire instead of chemicals? I wanted it specifically for this garden prep application but it is a multitasker. This sucker gets hot and sounds like a jet engine. In addition to lighting the top of the pile, I was able to direct the flame underneath the layer of cardboard, superheating the air between the cardboard and the soil and creating combustion, that really got it going, and probably 95% of the flammable materials burned up. So I consider it quite successful.
Now, this did not produce a lot of charcoal, so the bio-char value is limited, but I wasn’t going to re-till the soil (thus bringing up more weed seeds) to work any big pieces of charcoal in, otherwise I would have added more large wood pieces. I do put charcoal I produce in my fireplaces etc into my composters. If you want to experiment more with charcoal and bio-char, the best way is to collect a bucket of it, then pee into the bucket. This way, you’re pre-seasoning the charcoal with nitrogen, rather than have it pull it from the garden once you add it to the garden.
I’ll update this post if I notice a reduction of weeds this season, but I think it was successful, it got really really hot.
When I was done and it was cool I planted carrots, lettuce, kale, beets, and spinach. Gardening has begun (hopefully).
I used this to prep my vegetable garden, but it also works to clean out an ornamental garden if you take over one that has been neglected, gone to weeds, and you just want a blank slate.
PS. It goes without saying, fire is dangerous, be careful, keep a hose handy, possibly wet down the areas around your garden, don’t do this in dry conditions, and check to see if you need any sort of permit.
One of the tasks a gardener must do yearly, or more often, is clean up the garden. In the ornamental garden you’ll have old dead perennials that must be cut down and dealt with to make room for the new season’s growth.
In the past I’ve used a lawnmower for this, it can be hard getting it up into the bed, and it is an indiscriminate shredder, and it does go low to the ground sometimes impacting green foliage, but in the fall, before the snow blankets everything, it is a decent tool. It also finely chops up everything into mulch onto the bed itself.
In Spring I do not like it as much, simply because some things might already be growing. Also, I’m not sure it is good for the lawnmower itself to be attacking somewhat woody perennials.
Right now, in my hard, almost nothing is happening. We’ve had such a cold Spring nothing really has started yet except crocuses, this time last year all the flowering trees had already flowered (and then had the flowers zapped by a frost) this year, nothing… which is good in the end I think, I’d rather have things flower late than flower early and be killed (I didn’t get a single pear last year 🙁 ).
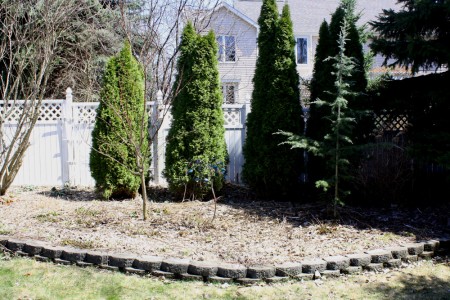
So, not much gardening to do, not much to blog about, but I did last weekend when it finally wasn’t either snowing or raining clean up my back ornamental garden. There were lots of remnants of daisies and daylilies and lilies and rudbeckia and others that needed trimming, I didn’t use my lawn mower though, I brought out my favorite weed chopping tool.
I call it a weed whacker, that is not the technical name for it though, I guess. The manufacturer calls it a serrated grass whip. To me it is such an invaluable tool, my parents had one growing up and we used it all the time to clear brush, but I couldn’t find it at any local gardening stores and had to get it at Amazon.
It easily shreds anything left standing, and is great for cutting down remnants of the garden in either Fall or Spring. You can even cut down old ornamental grasses with it. Definitely a tool that should be in every gardener’s shed. With the remnants, depending on length, once cut you can let them lie as they fall, to become mulch for the garden, or carry them off for composting if perhaps there is too much or the pieces are too large (such as the case with ornamental grass).