
Pruning a Pear Tree
April 6th, 2007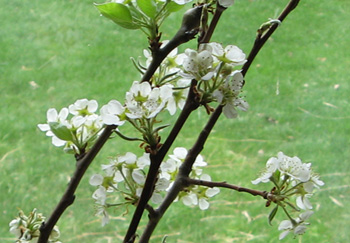 Last week when I was doing my spring gardening tasks one of the things I did was prune my pear tree. I figured this would be a fine time to review how you are supposed to prune trees.
First of all you are supposed to prune deciduous trees in very early Spring when their buds begin to swell but before the buds break. Then you’ll want to overall create a pleasing form with your tree and either emphasize a central leader (most pear trees use a central leader), or a series of 4 main scaffold branches coming off a short trunk.
You’ll want to prune away dead wood. Any branches that are crossing each other. Branches that grow down, or straight up. Branches that grow out of the main trunk at too wide of an angle, or too narrow of an angle. Finally you’ll want to remove interior growth to promote good airflow. All of thise you do for the tree’s health. Branches too close to the trunk can trap moisture and promote rot, branches too wide of an angle from the trunk can end up weak. Branches that rub together or touch can wound the bark and invite infection. Airflow prevents fungal diseases, etc.
Then, if what you’re pruning is a flowering tree or shrub, you can take the branches inside, put them in water, and you’ll get some interior flowers in as little as a few days, what you see in the picture are prunings from my pear tree in a jar of water in one of my windows.
Mixed Feelings
April 6th, 2007I have mixed feelings about the weather right now. We had a very warm end of March and it got everything off to a great start, 3 weeks earlier than last year, and now we have this really horrible cold snap with lows around 20, wind chills in the single digits and highs in the 30s.
I covered up my hydrangeas, my little lilac, and my roses that had already started leafing out, but that is all I could do. The cold has roiled in and wilted my tulips, which had not started to bloom yet, some alliums, some daylilies, and god knows what it is doing to tree buds.
This really sucks, I hope the tulips can start over and bloom still, even if it’ll be late April. You’d think, being a spring bulb, they’d be hardier than this, they’ve really been weakened by the cold.
However, in every cloud there is a silver lining. The cold has assuredly killed all the mosquitos that hatched last week, probably before they could breed, so we should have another light-mosquito year.
My Big Pot Broke
April 1st, 2007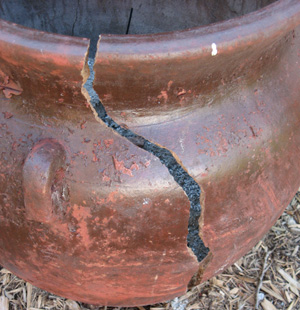 I have a thing for large urn-like containers. Small containers are alright, but I vastly prefer large ones as they create more of a statement in the garden. The only times I really like small ones if when they’re clustered around a large one.
Anyways, late last summer I bought 2 large clay pots from Lowes, one made in Italy (I thought they both were) the other apparently made in Mexico. Since it was late summer I did not plant anything in them or fill them, I just placed them in the garden. Come winter I covered them up in place with vinyl grill covers. Being around 200 pounds (I’m guessing… okay maybe 150) they aren’t exactly mobile. But I figured that protected from moisture they would be okay. I also figured that they were outside all summer at Lowes in the rain, and that they wouldn’t sell something that wouldn’t do well in a Michigan winter so they must be durable double-fired pots.
Well, last week I took the covers off and the one made in Italy was fine, the one made in Mexico had a big ole crack in it and was flaking apart in other places. It completely fell apart when I tried to move it, and examining it it was flaking apart like a mud brick, almost as if it hadn’t even been fired fully once, yet alone twice.
The pot was around $130 and I had never even gotten anything planted in it so I was pretty bummed. However the price tag on the lower section of the pot actually survived (proof it was adequately protected from moisture) so I loaded up all the shard and took them to Lowes for a return. They gave me store credit (all I really wanted, spent it the same day) no questions asked. I literally brought a cart full of pot shards to the return desk of something I had bought around 9 months previous and they gave me store credit.
People often talk badly about so-called “big box” retailers like Lowes, but honestly, that kind of customer service is hard to find and we’ve consistently gotten it at Lowes. We’ve spent tens of thousands of dollars there redoing our house & yard and in the course of that we’ve had quite a few returns, and a few odd returns like the broken pot that most other stores would not take back, but Lowes has always taken them back without a problem.
So couple the good service with low prices and good selection and we shop there regularly. (for the record, I do prefer Lowes to Home Depot, all the price checks I’ve done put Lowes ahead).
Spring Gardening Tasks
March 30th, 2007 We’ve had an interesting Spring for sure. Winter was mild until February when it got really cold, and the cold lasted up until early March and then it was like a switch was flipped and instead it got really warm. What does this all mean?
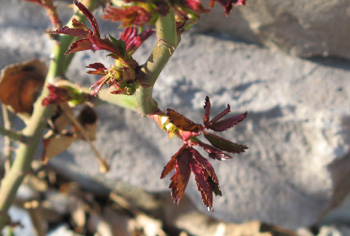
Well, for me, everything is early. Last year I posted that I got my first blooms on April 6th. This year I got them March 18th. I already have a rose (pictured) and a lilac leafing out… and it is still March… in Michigan. My daylilies have already started growing, some are a decent ways along, so I know those will be blooming early this year as well. In fact the only hardy perennial I have that isn’t yet growing are my hostas & astilbes, but probably only because they’re planted in the shade.
This has also allowed me to get out earlier (Though not as much the last few weeks as I would have liked because while it has been warm, it has always been rainy) and do some Spring gardening tasks, which I plan to sum up in this post.
The first task was merely to walk around and inspect things for Winter damage. I didn’t notice much however my blueberry bushes had been eaten by the rabbits. I’m used to the rabbits eating deciduous shrubs and small trees, but they only seem to like certain kinds. So I now put metal fencing around my hydrangeas, bamboo, hardy kiwi, small trees, thornless roses, and trumpet vine. Other bushes I have such as barberries the rabbits have never eaten before and so I do not protect. This was true last winter when my blueberries were new, but in this, their second winter, the rabbits went to town. So I’ve ordered replacements and next winter I’ll have to protect them as well.
The next big thing I did was deal with all the debris left over from last year’s growing season. I cut down all the woody stems from my flowering perennials, I cut back my 3 buddleia to a large degree, and otherwise did some pruning and ended up with a huge pile of woody materials.
So, I got a small chipper for my birthday in early March and I put it to good use on my brush pile. This thing is perfect for my needs. It handles branches up to an inch and a half thick, which is fine for me. I have a small yard and I live in a city, I don’t need to regularly shred big branches. But I do often have smaller branches from prunings or storm damage and of course all the woody leftovers from last year. I could toss these things directly in a compost pile, but they compost slow and get all tangled and make the pile hard to turn. This thing really turns what would be trash into treasure.
So I shredded it all and ended up with about 15 gallons worth of woody chips, which I then fed into my new composter. It hasn’t yet been 2 weeks for checking on the results, but a few days after I loaded up the composter I opened it up and steam literally came out. It was definitely heated up.
My new shredder also does leaves, but not very well. However I do have one of these leaf mulchers that works exceedingly well so I don’t mind, I wanted the shredder for the wood chipping alone. I realize of course that this setup, composter + 2 machines to process yard waste is rather expensive at around $600, but you really can produce a lot of good compost with this setup and it’ll save you money in fertilizer.
I ordered a bunch of plants during the Winter months when I was craving some gardening action, and I realized that I lacked a place to put them. So I’m adding yet another bed (or really expanding one) by about probably 250 sq/ft in the front yard. So I got started laying out the outline of that, maybe this weekend I will start digging.
One thing I still need to do is get my vegetables started, I have the seeds but haven’t made any starts yet. I also need to prep the raised bed I plant them in.
I have a couple other things I’ve done but I want to make them separate blog posts so that is all for now.
Attack of the Red Squirrel!
March 25th, 2007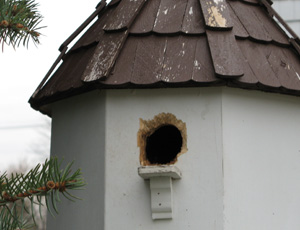 We have had a red squirrel named Rudy take up residence in our backyard. My wife really likes him, he has been active all winter and she enjoys watching his frenetic search for food. These squirrels are small, maybe halfway between a chipmunk and a normal squirrel, are very active, and are very rare where we live in Southern Michigan. As far as I know in fact they aren’t supposed to live here, and yet this one does. So taken all together I see him as a good thing.
However… I was out enjoying the beautiful (finally) weather on Thursday and noticed some damage to our birdhouses that wasn’t there on Wednesday. Then I remembered my wife said that she saw Rudy tearing nesting materials out of the birdhouses.
Well, we have these large 4 unit bird houses dotting our property and Rudy, in the course of one day, gnawed at all 8 openings of two of them (the two closest to trees). He made the most progress in the opening pictured and it was from there that he stole the nesting materials.
I did a little research and learned from this article that red squirrels are known to raid birdhouses for food, both in the form of eggs and baby birds.
I have mixed feelings about this. Mostly I am annoyed at the damage to the houses that I must now repair, but also I like Rudy but I don’t like the idea of Rudy eating up baby birds. On the other hand its the circle of life and all that, and after I get the newest ones up this spring we’re going to have like 41 “units” of birdhouses on our 1/4 acre so we have a lot of birds. I’m sure this time his raid was just for the nesting supplies (lazy bugger) because the birds aren’t breeding yet, and last fall when there were babies he left them alone. So I do not know what provoked this attack.
Park’s & Wayside Coupons
February 25th, 2007Wayside: ONANDON (free daylily ‘On and On’ with any order.
Parks: RAINBOW (free daylily “Rainbow Candy” with a $15 order.
Park’s Trees: PKTREES (free shipping on $100+)
Happy Shopping, no idea when they expire.
Buying for Bloom Power
February 15th, 2007We just got dumped on with a big load of snow, so this is a perfect time to talk about flowers.
Seriously though, it is mid-February and the gardening catalogues have started to arrive in full force. I know I am starting to think about what new plants I’ll buy this year, and I’m sure I’m not the only one, so I thought now would be a good time to blog about plant selections.
When I first started gardening I was most interested in large exotic flowers or those with complex blooms, like irises. However, irises only bloom for a few short weeks, at that, and that just isn’t enough. Now I’ve transitioned into preferring plants that can bloom over long periods of time, or even plants I get just for their ornamental foliage, which is something that doesn’t fade.
So, here are some of my picks for flowers with long lasting blooms.
‘Happy Returns’ daylily, or any of the “Returns” daylilies, bloom like crazy. ‘Stella de Oro’ is a good choice as well. I’ve seen both of these plants bloom as late as November here in Michigan (got luckily with no early frosts). I especially like the “Returns” daylilies because of their smaller stature, which makes them excellent as a border. Really, I can’t think of a better border of a bed or path than one lined with a row on repeat blooming daylilies. I’ve done this in my back garden.
Of larger daylilies, those with larger or more complex blooms, the best rebloomer I’ve had so far is a new variety called “Blue Ridge Shepherd Boy.” I’ve only had this plant for 1 year, but it rebloomed like crazy for me this first year, more than any other tet daylily variety I have (and I have dozens and dozens).
Rudbeckia, known as “Black Eyed Susan” are as simple of a flower form as you can get, it is a yellow daisy. However they can bloom for a long period of time, and my favorite variety, ‘Marmalade‘, blooms for at least 6 weeks longer than common rudbeckia you typically see planted. ‘Marmalade’ rudbeckia blooms are also about 4x larger than normal. The only downside with this plant is that it can get top heavy and sometimes needs support, especially after a heavy storm.
‘Endless Summer’ hydrangea I’ve blogged about before, but I love it for sheer bloom length. Literally, all summer long. Once bloomed the flowers do not even fade away, they just deepen to a darker red and stay that way until frost.
I’m also a big fan of the common hardy purple iceplant, delosperma cooperii, as it blooms from late May until frost for me.
My final pick is any type of tulip. I know what you’re thinking, tulips don’t bloom for very long. Ahh… yes… but they can be planted underneath other plants. So you plant your tulips underneath a layer of Rudbeckia and you get early Spring blooms without actually using up any garden space.
Of course many annuals or tender perennials will bloom nonstop all summer, but then you have to either dig them up and store them and hope they don’t rot, or plant them again in the Spring. I know I, and I think most gardeners, prefer plants we can leave in the ground for a few years. So among those perennials, the above are my favorites for long lasting blooms. Do you have any recommendations that’d fit the bill?
Endless Summer Hydrangea
November 11th, 2006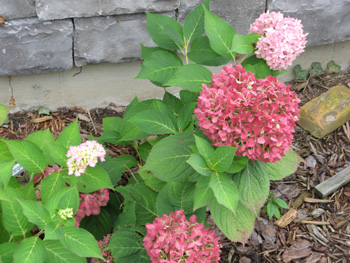 I really like big mop head hydrangeas. They’re hard to beat for pure vibrancy and size of blooms.
One of the problems with these though is that they’re just barely hardy here where I live, and further north they are not hardy at all, at least not enough to bear blooms.
See, the problem is that most mop head hydrangeas bloom on old wood, last years growth, and while their roots can survive the cold weather here, the stems usually do not. So the plant comes back year after year with nice rich foliage but never blooms.
Until now anyways. One of the most popular new introductions of any species in the past few years has been a new hydrangea called Endless Summer. This mop head hydrangea has a very long bloom season, it reblooms, and it can bloom on both old and new wood. Take this all together and it means that this will bloom for you no matter where you live.
The blooms on Endless Summer will be pink normally, but can be a true blue in acidic soil. They can also be as large as a foot across. After the blooms fade they still stay a rich burgundy color as you can see in the picture.
Hydrangeas do best in shade or light sun, the further north you live the more sun you can get away with, and if you can get away with sun I recommend doing so. Like other plants sunlight will encourage growth and blooms in hydrangeas. Hydrangeas have very high moisture requirements, especially when exposed to sun or heat. This is partially why people often plant them in the shade. The good news it that it is really easy to read hydrangeas, if they aren’t getting enough water their leaves start to wilt almost instantly, so you have a very obvious cue on when to act. I also do not recommend planting them in a container, they really need a permanent spot in the ground.
In the winter you can leave it be, but for extra protection try surrounding it with a wireframe cage filled with hardwood leaves lightly packed. Also, be careful, in the winter and early spring the stems are extremely fragile and may seem dead, but they aren’t (not always anyways). They’re just dormant. If there is no new growth on the stems by June, then you can assume the stems died. However even when the stem dies the root lives on and your plant is still alive. So, if you’re not seeing buds by June, follow the stems all the way to the ground and prune them off where you see buds start (often near the ground in leaf litter there will be buds on stems that are dead further up), or, if no buds at all, just prune them a few inches from the ground. But do not fear, undoubtedly already new stems are emerging from the soil. The lesson to be learned here is that where you live the hydrangea top growth is not hardy, and you need to offer it winter protection. Try a leaf cage.
The only thing I can think of to improve on this variety of hydrangea would be leaf variegation, it scores a 11 out of 10 in every other category. If you don’t have one yet, get one, you can find them at most garden centers (including Lowes or Home Depot) as well as online (though you tend to get significantly smaller ones when ordering online).
An Easy Raised Bed
October 10th, 2006 One problem with growing raspberries is that they tend to spread. Previously my solution for keeping them inboundes was to dig a trench on either side of my patch and line it with aluminum roof flashing & concrete. This was an okay solution but wasn’t perfect.
Then I had an epiphany.
Small sections of culvert pipe like you see pictured are often sold for firepits. I got 2 at Tractor Supply, buried them 6-8 inches in the soil (a foot would have been better, but it wasn’t the easiest place to dig), and filled them with soil. They aren’t going to go anywhere filled like that, but for added stability I could drive rebar stakes around the inside edges. They are also deep enough that the raspberry runners aren’t going to go underneath them.
You can also do a similar thing with old tires, the larger the better. Though if you stack 2 or more tires for added height you absolutely need to put in rebar stakes.
So now my raspberry patch is all cleaned up and nicely contained.
Flowers Falling Over
September 27th, 2006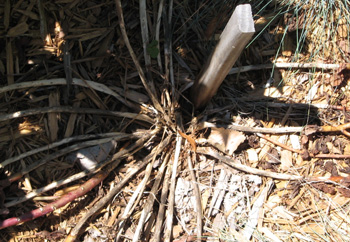 I’ve had a problem with many of my sedum (or is it sedums?) this year in which they fall over. In the picture to the right you’ll notice the stems all lying flat on the ground.
I’ve researched this issue and found it to be farely common with a variety of possible culprits. This is also not a problem limited to stonecrop, but many many many types of flowers.
If this problem is happening to you, here are the possible reasons why:
1. The cultivar you are growing may have been bred for bloom size at the expense of stem strength. Once those big flowers form, it droops. Of course some plants, like peonies, almost always droop anyways, but if you know other cultivars of this type of plant do not droop, then it could be breeding.
2. Your soil is too rich. Believe it or not having soil that is too rich can cause flowers to droop. The reason is that they grow taller and with larger flowers than normal and their stem just doesn’t get the strength to catch up. This can also happen if you get too much water, really anything that spurs above average growth.
3. Another problem caused by over watering is rot or various diseases. The base of stems are close to the ground, where it is often wet. If the stems rot then nothing will be supporting the flowers and they’ll fall over. Various fungal or bacterial problems can afflict stems as well. Be sure to examine your plants for signs of disease.
4. Abnormal wind and rain or snow can cause stem weakness. For many plants once the stem is bent it will never regain it’s upright stature.
5. The plant is planted too shallow, the roots do not provide adequate anchoring.
For me I believe my problem is caused by #2. I know these cultivars do not normally droop. I also know that Sedum are adapted for harsh conditions with poor soil and little water and while I do not provide them with any extra water during the growing season all my garden beds were made with very rich soil. I the future I will be sure to avoid fertilizing those portions of the garden and possibly provide supports.