
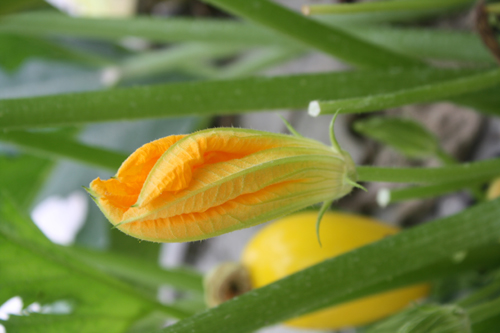
Female squash blossom
I’ve blogged about kale a lot here, I really like it as a crop. It is a super food, incredibly healthy, and easily tucked into many many dishes. It is also easy to grow, and easy to harvest all summer long just a few leaves at a time. It also lasts through some serious cold weather, down into the 20s at least. Maybe, when I move south to Chattanooga, I’ll be able to grow it all year round (in my future greenhouse at least) but here in Michigan I can’t. So, in the cold winter months, if I want to eat it I need to store it somehow, and for kale I think the best method for storing is freezing.
As an example of what happens to kale when it is frozen you can look out into your frozen garden and see it brown and shriveled and not very delicious looking. That will happen too in your freezer if you don’t follow the correct steps. You cannot simply toss kale in your freezer and have it last, some small prep work is involved.
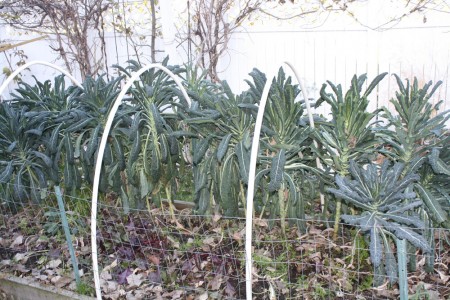
So, in perhaps October or November, after you’ve had some frosts but it hasn’t gotten deep into the 20s yet and the kale is still green, harvest what is remaining and process it for storage.
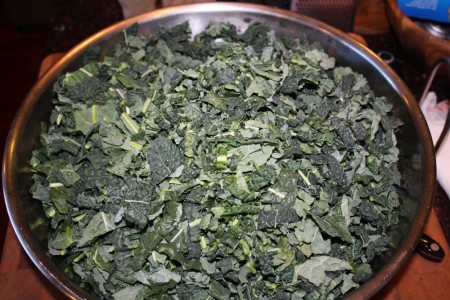
First of all you should process the kale to be in the form of which you want to use. In my case that is chopped up. Once it is frozen if you want to chop it up it is much more difficult, and messy, for rather obvious reasons. If you pre-chop it you can just go from the freezer bag to the fire (crock pot, saute pan, stock pot, etc), which is much easier when you’re actually cooking.
The next step is to blanch it. Plants contain enzymes that break them down, they are what turn plant materials brown in your winter garden, which is not what you want to happen in your freezer. Blanching, putting the plant material in boiling water briefly, deactivates these enzymes and allows the kale to stay fresh and green in storage. Most vegetables need to be blanched before storing, no matter what your storing method, be it canning, freezing, or dehydrating.
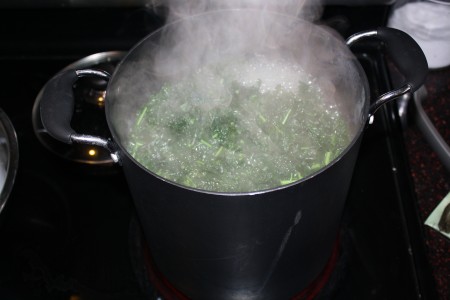
To blanch kale bring a large pot of water to a boil and put the chopped kale in in batches for 3 minutes each. Then, because you don’t want to keep cooking the plant, remove it (a handled “spider” strainer is the perfect tool for this, you should own one) and put it in a bowl of ice water to stop the cooking process.
Continue processing your chopped kale like this until it has all had a turn in the boiling water. The next step will be to remove as much of the moisture as possible from the kale. Put the blanched kale in a strainer suspended over a bowl, I then like to put a second smaller strainer inside the first and weight it down, to press as much water as possible out of the kale. You can also get hands-on with this task and literally grab hand fulls of kale and squeeze them like a sponge to get the water out. There is no set threshold for how much water to remove, but in the future when you’re cooking you want to be adding kale to your soups, not water, and the more water left in the kale the more ice crystals will form which could shred any remaining texture.
Once the kale is sufficiently drained you should portion it into meal sized portions. You should know approximately how much you add to soup or stir fry or sloppy joes or taco meat when you make these meals, and put that much in a bag. Typically somewhere between 1 and 2 cups. Squeeze as much air out of the zip top bag as you can, and seal it shut. I then like to put these smaller bags in a larger one that I then label and at this point you can toss it in the freezer.

The kale will last many months in the freezer, at least until your crop comes in again early next summer, assuming you do not eat it all first.
I really like summer because growing so many foods and herbs myself it is easy to tuck small amounts of them here and there into dishes I cook, providing added nutrition to my family, and using preservation methods like this there is no reason why such practices cannot continue in the winter when my garden is covered with snow.
I recently reorganized my pantry to make more room for canned goods. This left me with an issue in regards to my winter squash.
I can put up, maybe 30 a year in the fall with my current small city lot. I was putty them on shelves but they take up a lot of shelf space, and I would lose a few to rot. Also, as I eat them, the shelf space empties out, but I can’t put anything long term there, and organized it, because the space the squash use is variable and changes constantly. I couldn’t put in a can rack, I’d have to expand it as I ate the squash and then remove it entirely next fall and find someone else for the goods. It wasn’t very efficient.
I think I hit upon an ideal solution for storing this vegetable. Nylon mesh bags hung from rafters in my basement. I merely put eye bolts through my rafters, then filled up a nylon mesh bag (used to store athletic equipment in my case) and hung it from the eye bolt with a carabiner.
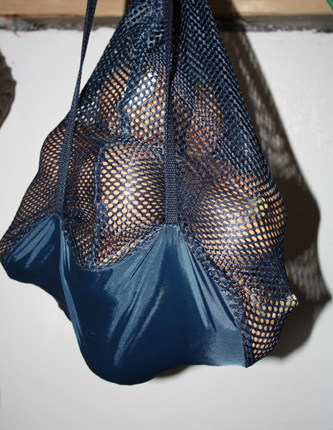
Great airflow around it, easy to take up or put down as I need more space and the bag (which I hope one day are bags as I get more land to grow more) folds up to almost nothing for storage when not in use, and it doesn’t take up any shelf space. I bought a bag to use, if you had really strong produce bags you might be able to use them but 10 or so squash weigh a lot, and you wouldn’t want it to break and fall. They make small nylon mesh bags, and ones big enough to hold like 10 basketballs. I went with a medium size one, I didn’t want too big because of the weight issue.
In a perfect world I’d put up around 52 squash a year, so I can make risotto once per week, perhaps 104 when my kids get older and eat more. I think this bag system would more than easily handle it, of course I don’t have the land to grow that much yet, but when I do I’ll have more house to hang them up in as well. It would probably work for sweet potatoes too. Basements typically are also slightly cooler so they will aid in preservation and properly stored you can see winter squash last a full year. For curing they could be hunt up elsewhere in a warmer area such as a southern window, outdoors, in a greenhouse, by a fireplace, etc. for a couple weeks before being transitioned to a basement for long term storage.
More true tales of government run amok.
As a proponent of gardening, gardening in your yard, and yes, even in your front yard I’ve mentioned numerous times on this blog how I think front yard farming is the thing to do. I won’t write long on the topic yet again, but rather merely summarize. Lawns use a lot of water, lawns use a lot of fertilizer, lawns produce no edible food, and you have to mow your lawn. A garden, on the other hand, uses less water, less fertilizer, give honey bees something to eat, and it gives us something to eat too.
But cities run by big government bureaucrats nationwide have idiotic ordinances requiring you to plant a lawn. The silly thing is these stooges would profess to care about the environment and all the rest, ask them if we should do something about global warming (erm climate change, right?) they’d say yes. Ask if carbon footprints are bad they’d say yes. They probably drive priuses and have no qualms promoting their municipal recycling programs – and yet they’ll be lawn nazis. These are the types of people I like to avoid in real life, people who don’t bother learning the science or facts of anything and instead just blindly join causes or ideals and are too dense to realize two of their “beliefs” are at odds with each other.
This happened in 2011 in Detroit as I blogged about here. Now it is happening in Orlando (and it has surely happened all over the country).
From the Daily Caller (worth the read), a couple that own a sustainability consulting business planted a garden in their front yard. They use it to educate their neighbors, the public, kids, etc on sustainability. Everyone nearby loves it, except the city, which has threatened a $500 a day fine.
I learned of the link via The Institute for Justice, who are pretty much my favorite people. They’re a public interest law firm that champions the rights of the little guy over government run amok. People like food truck owners, street vendors, scores and scores of small businesses, immigrants trying to make it, or just private citizens trying to do good things (like gardening perhaps) and running afoul of the law. They took the famous Kelo vs. New London case to the Supreme Court, and lost (in the worst decision in decades in my opinion) the battle, but won the war, when people nationwide were so outraged that I think 49 states passed constitutional amendments making the practice the Supreme Court okayed illegal. I don’t know if they plan to get involved in this case, but I hope the couple involved gets good free legal help from someone like IJ who will kick some butt for the right to garden your own land.
In this case the couple, Jason and Jennifer Helvenston, have started an awareness campaign and ask this:
We are asking residents in Orlando and across the country to join our campaign to “Plant a Seed, Change a Law.” E-mail [email protected], and we will send you a free packet of seeds and a small sign for your front yard that says “Patriot Garden.” Then send us a picture of your front-yard Patriot Garden. Help us tell the City of Orlando and local governments everywhere: Hands off our food!

They also have a website about the issue, visit Patriot-Gardens.com.
Say it with me now “Gardening is not a crime.” Though perhaps I should thank the idiotic government in Orlando for giving me something to blog about when my garden is covered in snow.
I love my hardy kiwi vine. Well, no, I take that back. I have a love/hate relationship with my hardy kiwi vine.
I love the fruit it produces. Hardy kiwis produce little smooth-skin grape sized fruit you eat skin and all, they’re more nutritious than the fuzzy-skinned kiwis you find most often in grocery stores that we’re all familiar with, they’re delicious, and can easily be preserved in the form of jam. I make a nice strawberry/kiwi jam that is actually my favorite jam for buttered toast.
I hate the vine’s poor resistance to late Spring frosts. Every other year I get no kiwi because a late Spring frost zapped all the fruit producing buds.

When I bought my vines, way back in 2004, it was not as popular a plant as it has become, it was not as widely available, and I quite frankly had no idea there was a better variety out there. Later I learned there was a better variety out there, called “Michigan State” hybridized at Michigan State University, which is a mere mile from my house. One of my biggest gardening regrets is not tracking down this variety when I planted my kiwi vines. It would surely be more perfectly suited to my weather. How often can you buy some cultivar developed for so precisely your climate? Of course it wasn’t widely available for sale back then, but that is besides the point.
Why not just buy it now? Well, I’m moving in 2015, it is known, and I wouldn’t be here to see the vine fruit. Plus, I’m out of room.
You however, you can buy it. For the very first time that I know of this plant is available from a major national distributor, Burpee. They have the Michigan State Kiwi in their new for 2013 collection. New plants typically sell out, so if you were interested I would order soon.
I do highly recommend hardy kiwis for backyard plantings. They grow well, are attractive to look at, have no pest or disease problems as far as I know (and mine have never been hit by anything), and give you nice tasty fruit in the fall. The only problem is the frost hardiness, which this cultivar deals with. A win all around. I will be planting it again at my new house when I move in 2015.
The best time to prune most deciduous trees is in winter, this is true for a variety of reasons, it is easier to see the branches when the leaves are gone, the cuts can heal better, there is lower insect and disease levels so there is a lower risk of infection. However the biggest reason is that you’re saving the tree’s energy.
Deciduous trees store their energy, their food, in sap, which during the warm months is up among the limbs and leaves feeding new growth. When temperatures drop the trees send the sap down into their roots for winter storage. This is how we can get maple syrup from tapping trees, during transitional weather the sap goes down into the roots at night when it gets cold, and then flows up into the tree during warmer days, and it is this flow that maple syrup producers intercept.
So when you prune a deciduous tree during active growing time you’re taking not only the limb, but all the sap stored within it, and that stresses the tree more, like a human losing blood, the tree is anemic for lack of a better word.

By waiting until winter when all the sap is stored in the roots you don’t impact the trees health nearly as much, and when spring comes and the tree sends the sap back up and finds it has fewer limbs to feed, that sap will go to fuel an extra large burst of new spring growth.
I recently pruned my bald cypress, the very best time to prune is late winter but I did it now because I was worried I would forget. Bald cypress, remember, despite being a conifer, is deciduous, one of the few (lovely) deciduous conifers. I’m limbing it up to provide more sunlight to the strawberries I have planted beneath it, but also to show off the trunk, which is one of the most attractive features of the tree as it ages. By pruning it now, I’m making sure I’m providing it all the fuel it needs to get bigger (taller, thicker trunk) come spring, which is my ultimate goal.
Evergreen trees are different, if you want to maintain the shape of the tree pruning needs to be done specifically to the new growth in mid summer, but if you’re doing more severe pruning, such as limbing up, that can be done in winter as well. Fruiting trees have special considerations for maximizing fruit production, though generally also are best pruned in winter, the same with flowering trees.
Butternut squash is absolutely my favorite crop to grow. I use it to make risotto, which is awesome, and spaetzle, which is awesome, and butternut squash soup, which is pretty good too. It is a superfood, very healthy for you, full of antioxidants and fiber… and best of all for a gardener it has a shelf left measured in months, as in more than 6. No need to eat it twice a day for 3 weeks when the harvest comes in, it’ll sit good on your pantry shelf until the asparagus is up the following year.

I’ve had problems in the past dealing with powdery mildew on my plants, as in every year. It doesn’t stop me from getting yield, but it certainly reduces my yield, and that really annoys me.
This year I planted two PMR (powdery mildew resistant) varieties for the first time. I purchased two varieties from Johnny’s Select Seeds, PMR Metro, and PMR JWS 6823. I planted them in various areas of my yard, along with some standard waltham butternut.
I did not have nearly as much powdery mildew this year and in years previous, though all plants still eventually became infected. I think a lot of it was from the drought, fungal infections do not spread very well in dry environments, but once we did finally get some rain I did get infections.
Normally the mildew progresses very quickly, killing leaves before the plant can replace them. On the PMR varieties this was not the case, they got infected, but it progressed very slowly, both along the plant and on individual leaves. Normally when a leaf is infected it’d go from fine to almost completely covered in the course of a day. With these new varieties it had problems conquering the entire leaf surface and I was more likely to see isolated spots.
Of the two I planted, JWS 6823 performed better and would be the one I recommend.
I’ve tried other things in the past to control powdery mildew. Neem oil is supposed to help, and I continue to try it, but I don’t exactly run controlled experiments and it doesn’t seem to work for me. I’ve tried organic antifungal sprays (sulfur based) and they seem like they might work, a little bit, but the fungus conquers all eventually.
I of course try to remove old plant growth in the fall, but that is hard. My growing season is so short in Michigan I often do not have the opportunity to pull the plants prior to the first frost (because squash are still maturing), and once they have been frosted the plants are so falling apart it is impossible to remove them without shedding leaf material and spores, and I cringe when I see the spores come off the plants onto the soil, but it is unavoidable.
I could practice crop rotation and stop planting the squash in the same place year after year, but I simply do not have enough room anywhere else in my yard to plant them.
Sometimes, early on, once I see infected leaves, I’ll prune them and trash them to try to head it off, and that can work, but not reliably, because often the fungus will be under leaves where I can’t see.
I think systemic fungicides would be the best control, but I’m not sure of any that are to be used on squash or other food crops.
But I did definitely notice a benefit from using these PMR varieties, and I will be planting JWS 6823 next year.
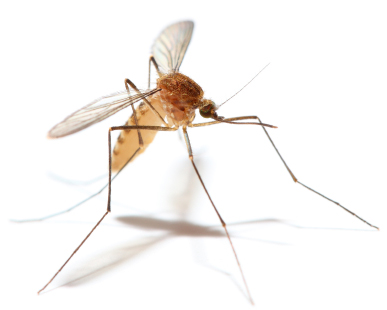
With West Nile virus in the news I’m sure I’m not the only one thinking about mosquito control. Even though where I personally live we’ve had a significant drought and the lowest bug summer I can remember, there has still be one West Nile case in my county and with little kids I do worry, I’m sure other parents are in the same boat. Parent is latin for worrier.
There are two ways you can go about this problem, stop them from breeding and living in your yard, or killing them once they inhabit your yard.
Stopping Mosquito Breeding
Most, but not all, mosquitoes need stagnant water to breed, and most mosquitoes stay around where they were born, so the easiest way to keep them out of your yard is to make it an unattractive for them to breed there. The easiest way to do this is after it rains, or after you use sprinklers and hoses, and thoroughly go around your property and empty any container containing water, but you do have to be thorough. Mosquitoes like water that sits for 4 or 5 days, but they can breed in as little as a tablespoon of water, as little as a bottle cap full, so you must be very thorough.
Places often forgotten about are the insides of old tires, all the various nooks and crevices in children’s toys, and gutters. If your gutters are not clean and water sits in them over time, that is prime mosquito territory. So clean your gutters, or use gutter guards.
What about places you keep water on purpose? Keep your pool and hot tub chlorinated and they will be fine. Your bird bath needs to have water changed regularly, you can also place agitators in your bird bath to keep the mosquitoes at bay. Your ponds or water features need to be well stocked with fish, and the fish will deal with the mosquitoes. If they aren’t, you need to add something that will kill them, such as mosquito dunks which are this bacteria that kills mosquito larvae in water, but doesn’t harm anything else, a good product. If you have a rain barrel make sure it is fitted with a secure mesh opening that prevents any bug entrance, and you can also use the mosquito dunks in it as well.
So remove the water you do not want, and maintain the water you do want, and you should be okay. But what if you get mosquitoes anyways?
How to control mosquitoes in your yard
Lets talk about bats, man. Bats eat mosquitoes. Of course, we humans dislike bats for a variety of reasons, fears of disease which are often unfounded, dracula mythology, being creeped out by nocturnal flying mammals, whatever. I’m not asking that you invite bats into your home, by all means, make sure your attic is secure, but providing them habitat in the form of a bat house somewhere on your property might not be a bad idea. Sure, there is no guarantee they will eat in your yard and not your neighbors, will eat mosquitoes instead of other bugs, but more bats should, in the grand scheme, equal less mosquitoes. Also, you can collect the droppings from underneath to fertilize your garden.
If bats aren’t your thing, how about birds? Attract birds that eat mosquitoes to your yard. The most well known bird that does this is the purple martin, but the popular marketing associated with the purple martin houses you see for sale appears to be incorrect. Martins do eat mosquitoes, but not an overly large amount of them. There are however other birds such as swallows and chickadees that will eat flying insects as well. So make your yard bird friendly.
Topically this reminds me well of snakes. Many people hate snakes and shudder to think of snakes being in their garden, but snakes will not eat your plants, dig holes, pull up bulbs, eat roots, destructively tunnel, etc. Rodents do all those things, and snakes eat rodents. So, like bats, snakes are a creature with a bad reputation that actually help your garden.
Moving on, there is a mechanical control you can use. The famous mosquito magnet does indeed work. Mosquitoes are attracted to CO2 and the devices uses propane and an attractant to generate CO2 and then pull the mosquitoes into a trap. It works, it can be effective for small areas, but it is expensive, both to buy and to keep running.
Light attracting bug traps or zappers do not work for mosquitoes, mosquitoes are not attracted to light. Those things will kill lots of other bugs (few of which are harmful to humans) but they are not effective against mosquitoes.
Finally, you can go the insecticide route. The best product for that is a fogger. Foggers come in many different types and they spray a cloud of insecticide, easily filling up an area. I’ve seen someone fog (with a cordless one) an area half the size of a football field in about 5 minutes. The fog disperses, leaving dead insects everywhere. These will kill indiscriminately, any bug flying around, not just mosquitoes. I’m all for saving wild life and using organic products, but I’m also all for not having a loved one die from West Nile virus. When you absolutely have to kill every mother biting mosquito in the room, accept no substitutes. Foggers kill so well that you can actually use your outdoor space after using one, for days even, it will have killed so many bugs you’ll only have to use it again when new bugs move in.
I’ve been lucky (cursed?) with the lack of rain this year, and we don’t have many mosquitoes now, but if you live in one of the areas where there is an outbreak maybe one of the above options will help you.
First time growers of the cucurbit family, which includes all those plants mentioned in the title, as well as other melons and gourds, often run into problems when the plant does not set fruit, one solution to this is through hand pollination.
Flowers on these plants are either male or female. The plants almost always produce male flowers first or more often, because it takes less energy to produce a male blossom than a female one, female ones usually come second, once the plant has grown larger and stored more energy. So often a new gardener will be alarmed that at first their plant is producing all these flowers, but never any fruit, not realizing they’re just male flowers. Not all plants have different sexed flowers. Some other species carry both parts in a single flower structure, other plants (such as kiwi) might on the whole be either male or female and every flower on the plant will be either always male or always female. But the squash family produces separate male and female flowers on the same vine.
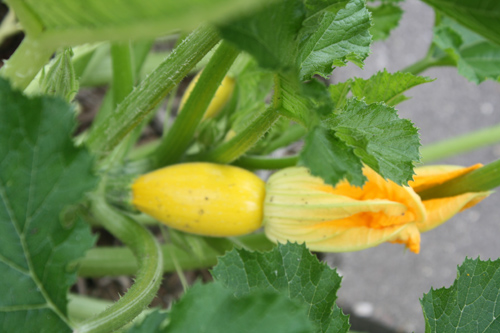
You can very easily tell male flowers apart from female ones. In addition to the inner bits being different, male flowers arise from a skinny stem whereas on female flowers there is a miniature fruit just behind the flower. In the below pictures, which are of a yellow summer squash plant, you should be able to easily identify which flower is which.
Female squash blossom
Assuming you’re getting female flowers and not just male flowers, but rather than growing in side the little fruits on the female flowers seem to whither away, your problem is likely insufficient pollination. The fix for this is to hand pollinate your blossoms.
There are three ways to hand pollinate plants in this family. The first is to use a clean unused paintbrush. Simply wiggle it inside the male blossoms to pick up pollen, then wiggle it inside the female blossoms to deposit it. You can also use a Q-tip to achieve the same result. Finally, you can snip off the male flower from the vine, remove the petals to expose the anther, which is the little male bit with the pollen in the middle of the flower, and, well, simply stud that flower out by rubbing the anther inside against the stigmas (girl parts, pollen receptors) of your female flowers. Hand pollination is best done in the morning before it gets too hot.
Sometimes bees and other insects don’t do the trick 100%, and you need to resort to hand pollination. It may not be an option if you’re a farmer growing a whole field, but for the home gardener it works.
By the way, assuming you used the brush or Q-tip method, when you’re all done the plant no longer has a need for male blossoms, but they are excellent eaten. They are incredibly perishable, best eaten mere hours after picking, so can be hard to find at stores, however they are awesome stuffed, battered, and fried (try stuffing with spicy cheesy polenta, use a frosting piping bag to fill it), battered and fried empty, or just sauteed. Obviously cucumber blossoms aren’t big enough for this, but either winter or summer squash (which includes zucchini) work great. You can also eat the female blossoms, but most don’t because if you did you would never get any fruit from the vine.
Your body has cravings, doesn’t it? Sometimes you crave this, or sometimes that. Those cravings can be telling you something, some studies have shown that when we crave certain foods it can be because we have need for a mineral in that food, that our body may be short on something. Not always, of course, but sometimes.
Minerals are of course everywhere, rocks, dirt, plants, water, but a large amount of minerals can be found in oceans, like salt of course. Mineral content is what can give sea salts their flavor and color. See, over the eons minerals have been washed away from rock, into rivers, and out to the ocean, where they sit. This phenomenon is also one of the reasons why periodic mild flooding of major rivers created very fertile mineral rich areas of arable land.
Minerals are important for plant health just as they are for human health, that is why many, including myself, put an emphasis on composting and using compost, for the micro nutrients. You can buy fertilizer for the macro nutrients, but it is harder to get the micro nutrients.
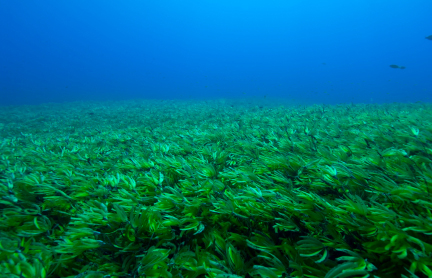
Enter the seas, stage left. Plants and animals from the sea, and indeed, seawater itself, contain more of these trace minerals. So, if we compost plants and animals from the sea, or otherwise use them as fertilizer, we should be introducing more of these minerals to our gardens. Our vegetables will then have access to more of the minerals they need, and we’ll get more of those very same minerals when we subsequently eat them. This is something you can do for your own health, not just the health of your garden.
Plants without a mineral deficiency not only grow better, they also seem to be better able to tolerate attacks by pests or diseases, so having the right minerals in your soil can make a big difference. If you do not know what, if any, minerals your soil needs, you can send a sample to a testing service who will let you know for a relatively low fee.
So, how do you introduce ocean minerals into your garden? Well, instead of buying bone meal, you can buy fish bone meal, and get the phosphorous, but also trace minerals. Instead of getting blood meal, you can get fish meal or fish emulsion, which will give you nitrogen, and trace minerals. You can also buy kelp meal, or compost kelp & other seaweeds if you live near the ocean. Small amounts of saltwater clinging to it will not hurt your compost pile. You can also compost shrimp tails, lobster shells, crab shells, and any other shell or bone from something ocean dwelling that might pass through your kitchen. You still shouldn’t compost meat of course.
People who live near the ocean can cheat not only by getting seaweeds directly, but also by soliciting at seafood processing plants or other such places that might produce large quantities of shells.
You can also buy sea minerals that are concentrated from sea water, and yes, these contain salt. However, if you use it according to package instructions the salt won’t be concentrated enough to hurt your plants.
There is another product called azomite that isn’t from the sea, it is however a mineral rich water soluble powder created from rocks. This would be a way to get the sea minerals without any additional salt.
The manufacturers of all these products claim of course that their product is amazing for any variety of reasons. My mention of them here does not mean I think all the claims are true, skepticism is healthy, I have used all the products linked above and they seem to work. But yes, there are minerals in the sea, and your garden probably needs some of them. Next season I want to do a side by side comparison of some of these products in use to get more scientific results.
I do have two more tricks for you, even if you don’t live near the sea. If you have a water feature in the yard with fish, when you change the water, the discarded water is going to be nutrient rich, especially with nitrogen from all the fish waste. So don’t let the waste-water go to waste, use it on something that likes nitrogen. This is also true for the fish tank you empty inside. If either fish tank uses a charcoal based filter, which many many do, break open that charcoal when you change the filter and sprinkle it into your garden. The activated charcoal, is essentially fancy biochar, which is very beneficial to the garden, and it will have likely soaked up some more nitrogen which it can then release over time.
Now, of course, in addition to minerals washing from land into the sea over all these years, bad things have too. The sea is polluted, there are compounds you don’t want. Is this something you should worry about? I don’t think so. Plants don’t always just drink up and store things, they metabolize some compounds humans might find dangerous. So you have to assume the fish or the plant takes up something, doesn’t metabolize it but stores it, through decomposition this substance stays stable, it is then put in your garden, the edibles you plant take it up, don’t metabolize it, and store it in the part of the plant you eat in a concentration that is dangerous to you. There are many ifs there. I’ve never seen any study showing any danger to using any sea product for compost. The only risk I’ve seen is to your nose, many of these fish products smell, but only for a couple days, the first good rain or watering tends to lessen it.
So, go forth, and bring the bounty of the sea to your garden.
I think all gardeners must grow to hate rodents. In general I hold no ill will towards animals, but just don’t be a nuisance to my garden. I’ve even, in the past, naively, encouraged their habitation in my yard. My how I’ve changed.
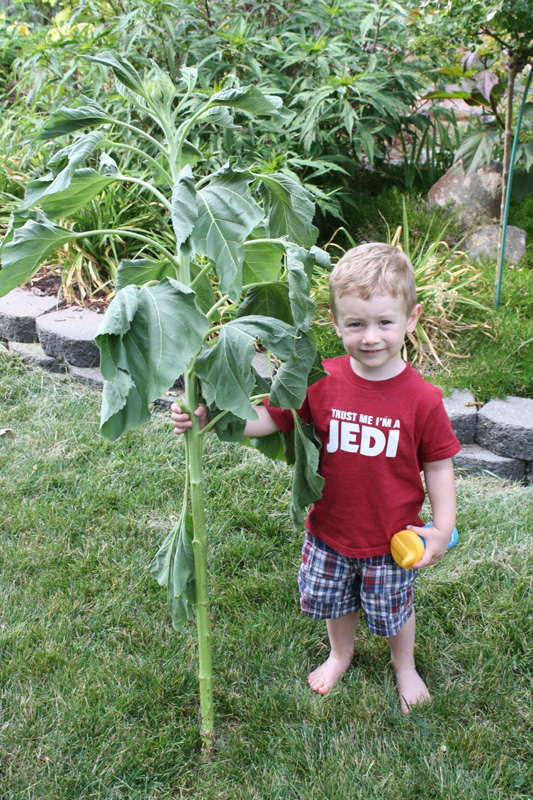
In the picture you see my 3 year old, Finn, and what was to be his flower. A mammoth sunflower, he planted it, and watered it, and watched it grow. Then, one day, an evil fat groundhog made it into my yard and tried climbing it and broke it off at the soil line. I had previously completely blocked off my yard with fencing and stone and cement blocks, this creature burrowed under my fence and under some cement blocks which, because of some quirk in that spot, didn’t fall down into the hole he made to block him, and he got into the yard. He is lucky the city frowns on shotgun pest control. The thing also got into my raised beds, which I also had fenced (which means he climbed a 4 foot fence) and ate carrot tops and kale.
Meanwhile chipmunks steal my strawberries and grapes and dig and burrow, voles dig and burrow, and moles dig and burrow, all over my yard. Oh ya, and then, one of the above, or maybe a squirrel, keeps digging out the replacement sunflower seeds I keep planting.
So I have a water feature that attracts wildlife, and I’ve been watering and letting my kids play in the sprinkler which means my yard is still alive when most of the soil around is dry and dead, so I can see why they come, but I don’t like it.
I’ve really changed quite a bit from a few years ago, I’ve had just too much damage caused by rodents, to garden and house, to really care about them anymore. I know someone will comment complaining about habitat loss, I don’t really care. I grew up in the woods a mile from my mailbox on a dirt road and we never had ground hogs, did not have many squirrels or chipmunks, and I never saw signs of mole or vole activity. Now I live in the city and have copious amounts of all of these. I think the city has too many trees and not enough hunters.