
My First Blooms
April 6th, 2006 To the right you’ll see my first blooms of the year, and like most people my first blooms are crocuses. These have actually been blooming for a couple weeks but I only just got around to taking pictures because we’ve had some cold and rainy weather.
Crocuses are bulbs (technically corms but everyone calls them bulbs) that you plant like tulips (dig a hole, put it in, cover with dirt, forget about it until spring) and they’re generally the first thing that comes up each year for most gardeners. They’ll come up through the snow in some cases. There is some variety in crocuses, but mostly they come in yellow, white, and purple. They can be fairly cheap when bought in bulk. They take up practically no room in the garden and bloom at times when nothing else is in bloom, so why not grow them? They also multiply nicely year after year.
One thing I want to do one day is naturalize a lawn with crocuses. I’ve never done this but I’ve heard it can be fun. Basically you plant crocuses, hundreds or thousands, all over your lawn. They come up right through the sod each year and by the time you need to mow the grass for the first time in spring they’ve already done their show and won’t get in your way. So, in early April each year you’ll have a lawn of flowers, but then grass the rest of the time, pretty cool huh? My complaint about it is the planting, so that is why I haven’t done it. Whenever we build a house though and have to bring in sod I’m going to do it though, I’ll basically just have to toss the crocuses into the dirt and lay the sod right over it, it’ll be easy (I like easy).
So, come fall, plant a crocus or two, or three, or fifty.
Another Coupon from Parks
April 5th, 2006I got another email coupon today.
Deal #1: $5 off $50+ Park Seed order
Expires: April 17, 2006
Coupon Code: “buy plants online”
Enter coupon code during Park Seed checkout process
How to Mulch a Garden Bed
March 24th, 2006This post has been turned into an article located here: How to Mulch a Garden Bed
New Gardening Coupons
March 14th, 2006I got the following coupons in my email, thought they might be useful to some.
Free Standard Shipping with $50 Rose Order
* Coupon Code: roseshipping02
* Expires: Friday, March 31
During the checkout process look for “Enter Bonus Codes Here”
Coupon code is required to get discount.
Deal: $5 off $50+ Park Seed order
Expires: March 17, 2006
Coupon Code: spring5off
Enter coupon code during Park Seed checkout processDeal: Free Park Seed Starting Tray with $20 Seed order
Expires: March 31, 2006
Coupon Code: freetray306a
Enter coupon code during Park Seed checkout process
Irises Not Going Dormant
February 24th, 2006 In the picture to the right you should see my iris patch. Irises are perennials that grow from rhizomes. They’re very common, I’m sure you know what they look like.
In general irises go completely dormant in the winter, that means that their leaves die back all the way to the ground, and then in late March or April they start peaking up like tulips.
Obviously you can tell by the green foliage that my irises have not gone dormant. Sure, they have been abused by the snow and cold weather, but dormant they are not.
The problem with this is that some plants, like irises, need dormancy to rest or they do not bloom or do not bloom as heavily. So really I do not want them to continue growing through the winter like this.
The reason, I’m sure, for my problem is that I planted the irises too deeply. You see iris rhizomes like to lay so that their tops are actually exposed above the soil line. I knew this, and I planted them deeper than that? Why….. squirrels. Without fail when I would plant them as they should be planted the squirrels would dig them up before they had a chance to really take root and drag them off. I didn’t know I’d have this dormancy problem.
So, I’m not sure what to do. I think I’ll go out and give them all a haircut and see if that helps, otherwise I’ll just pray they bloom this spring and if not I may need to dig them all up and plant them again, this time with some sort of obstruction over them so the squirrels can’t get at them.
My Plant Wishlist
February 17th, 2006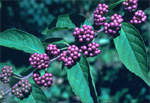 One plant I recently became aware of is the Purple Beautyberry (Callicarpa dichotoma). When I first saw it I couldn’t believe my eyes. The berries on this plant were such a vibrant shade of purple it was amazing. In my research I’ve seen it in plant catalogues, on TV, and in amateur photos and it looks stellar in all of them. Some places peg this as hardy only to zone 6, but others put it at hard to zone 5. So I think I will give it a try.
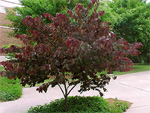 I was recently flipping through a new landscaping catalogue and I saw a tree I had never seen before. Called “Forest Pansy”, it is a redbud with purple leaves… not just purple leaves in the Spring, but all through the growing season. I was impressed to say the least. Redbuds are small trees that flower in the Spring and they are great under larger trees or in small yards, such as in the city. Unfortunately my yard is perhaps too small for another tree. So I don’t know if I will be planting this. If any of my current trees die though I know for sure what is going in their place. Usually Spring flowering trees do not have much interest in Summer and Fall, so this tree that both flowers and has interesting foliage is a real find.
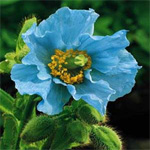 One plant I was really interested in awhile ago is the Blue Himalayan Poppy. Blue flowers are the most often doctored photos you’ll find in catalogues (they’re almost always really purple), but I first saw this one on TV, it really is a true blue flower. However I was disheartened to learn it was only supposed to be hardy to zone 6 or 7. This didn’t make much sense to me, since it is from the foothills of Mt. Everest, you’d think it could tolerate cold weather. However, I was recently doing some more research online and it appears it is hardy to zone 3, it is just that it is a finicky grower and so many have problems with it. In fact many places suggested not letting it bloom the first year at all so it can put more energy into developing a good root system. So I’ve already bought some seeds and will be giving this baby a try.
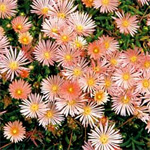 The final plant on my list is Delosperma ‘Mesa Verde’, a type of iceplant. I’ve grown all other commonly sold iceplants and so I figured I should give this one a try as well. In order to give a full opinion on the plant if for no other reason.
How to Propagate Iceplant
February 4th, 2006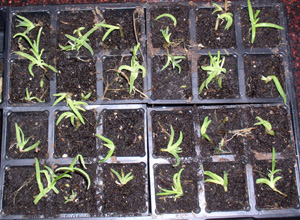 Iceplant is by far my favorite ground cover. It is hardy, quick growing, has attractive foliage, is drought tolerant, and pest and disease free. It also looks like a carpet of blossoms for most of the summer.
I plan on writing a very extensive post about iceplant in the future, once mine are back in bloom and I can get nice pictures, but until then I thought I’d cover propagation techniques… because that is what I’m doing now.
Iceplant is extremely easy to propagate, you just take cuttings (and because it is so quick growing the plant won’t mind) and stick the cuttings in soil, that is it. Now some people say that iceplant doesn’t like moist soil, that it’ll rot. This has not been my experience. Everyone says it prefers well drained or rocky soil (in fact this plant is considered invasive in California where it is taking over some rocky/sandy coastlines), but I haven’t seen any rot yet.
Anyways I decided to tear out one type of iceplant and replace it with another, both of which I already have growing in my garden. The problem is that I decided this around Christmas and if I were to wait for spring to make cuttings I would have smaller plants this year (and I want them to overflow their area) and if I were to buy them, I’d be paying $3-$6 per plant, which is a lot when I need 20 or so.
So in mid January, when the snow had melted, I went out and found still alive Iceplant, I tore up large sections of these frigid plants, and brought them inside. Once inside I made my cuttings, basically looking for pieces with nice bits of stem and smaller leaves (large leaves I tore off). Then I got a cheapo seed starting tray as you see in the picture, filled it with potting mix, stuck the plants in, watered heavy, slapped on a clear plastic cover, stuck it in a big east facing window, and waited. Two weeks later 70% of my cuttings had rooted, I had not watered it or even touched it since (thanks to the cover) and just now I went out and made more cuttings to fill in the empty spots. These plants have been in very wet soil for two weeks and are doing fine by the way.
I could have used rooting hormone as well… but with iceplant rooting so easily what’s the point? If it had been warm outside I could have also just stuck my cuttings right into my garden where I want them to grow. Do this, water every day for a couple weeks, and most of your cuttings will sprout, even in normal garden soil. Its that easy.
So, if you ever want more iceplant (and if you keep reading this blog you likely will, as I’ll probably rave about them lot), don’t buy them, just make cuttings, its easy. In fact, its so easy, that if any of you readers want a free starter iceplant, I’ll make a cutting and send you one, just pay for shipping.
A Label! A Label! My Kingdom for a Label!
January 29th, 2006 I view garden labels as a necessity. I like to know the names of things, because I know one day I’ll want to move something, or dig it up, give it away, or maybe even sell it… none of which will be easy if I don’t know the name of the plant. If you have a relatively small garden you may not need labels, but gardens can quickly grow to include hundreds or thousands of different plants, try memorizing that list. It is especially hard to remember plant names and planting locations when you have a grouping of similar plants. For instance I might have two dozen different daylily cultivars within the same bed, and when they are not in bloom each plant looks nearly identical, in this bed the labels are a savior. Also, in addition to marking varieties, labels are useful for letting you know where buried bulbs are so you do not inadvertantly dig them up.
When I first searched for garden markers I was dismayed at the selection available. The ones I saw in gardening catalogues came only in packs of 10 and were quite expensive, like over $1 per marker. When you’re going to be buying a couple hundred that just doesn’t work. Many were also too short, they would be buried by foliage. Marking techniques ranged from etching on copper, which would last forever but drain my wallet, or drawing with a permanent market on a meta or plastic tag.
None of these solutions were ideal to me, but I finally found what I consider to be a perfect labeling system.
The first step is ebay, I found these zinc coated metal plant markers sold in packs of 100 for what amounts to 33 cents per label. I’ve had them in the ground over 2 years now and they haven’t rusted.
The plant markers were perfect, cheap, decently tall, and in bulk. But how would I mark them? So called “permanent” markers only lasted a couple months. Luckily someone on a forum gave me a tip, a tip that works wonderfully.
I needed to get a Brother P-Touch 1500PC Labeling System. This thing interfaces directly with your PC and prints clear concise labels. For labeling tape I recommend their TZ line, black on white. This is laminated tape, so the actual text is actually secured behind a plastic coating (ultra-weather proof). My labels have been outside for 2 Michigan winters now and they have not faded and they have not peeled off the metal markers. They are also easy to read, even from a distance.
If you’re the type of gardener who wants a 100% natural setting, this probably isn’t for you, but if you value knowing the names and locations of your plants, I have to strongly recommend my own setup as a good one to try.
Asters or Mums for Fall Color?
January 14th, 2006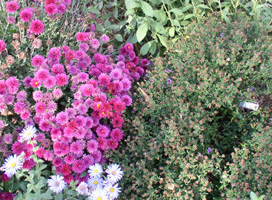 I bought two plants from Lowes in 6 inch pots in the fall of 2004. One was labeled Beth, a mum (short for chrysanthemum). The other was Wood’s Purple an aster. Both asters and mums are daisy-like flowers known for their fall color, meaning they bloom in the fall when others are not blooming.
Over the course of the next year both plants, which I planted in the ground (many keep mums in containers) grew rapidly and expanded to 2 foot wide mounds. However, when it came time for blooms, they were no longer neck and neck. The mum started blooming atleast 2 weeks before the aster and continued blooming for atleast 2 weeks after. In the picture above you’ll see the mum on the left, still going strong, and the aster on the right, with all but a few blooms spent. There is also another aster at the bottom, called Wonder of Staffa, but I’ll talk about that one in another post.
Now sure, when the aster was in bloom the blooms were nice, but who wants a plant that is only going to be blooming for such a short period of time? Especially when a mum blooms at the same time, and blooms for longer? Also considering some mums will rebloom later in the fall?
No… I cannot recommend asters for fall color. Come spring I’ll be composting that plant. Its mums for me.
Snow Insulates Plants
January 8th, 2006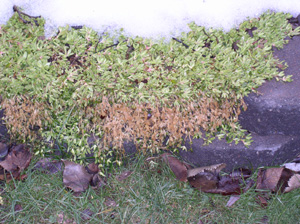 I’ve heard it many times, snow insulates. Both plants and people (eskimos live in it afterall). If you’re stuck outside in the winter, burrowing into the snow can save your life, and a heavy snow cover can also save your plants from the biting cold of winter.
Its said that when winter starts with a heavy snowfall less hardy plants do better. Well for me this year it started that way and then all the snow melted, leaving me with a unique opportunite to see just how much snow insulates.
What you see in the picture is a yellow iceplant, hardy to zone 4 or 5. Typically if temperates get down to around 0, which they do in Michigan, this plant will die down to the ground only to reemerge in Spring. Its draping over a brick retaining wall I have. When we had our heavy snow it covered the ground up to around the first brick or so, and it was on top of the bricks. In short, only the area currently brown was exposed. Obviously everywhere that snow covered was protected from the bitter chill that followed the snow. Its right there, in green and brown, snow insulates.
So remember this, and pray for a big snow early in the season if some of your plants are questionable. You might also consider piling up some snow on top of plants that you cannot otherwise insulate.