
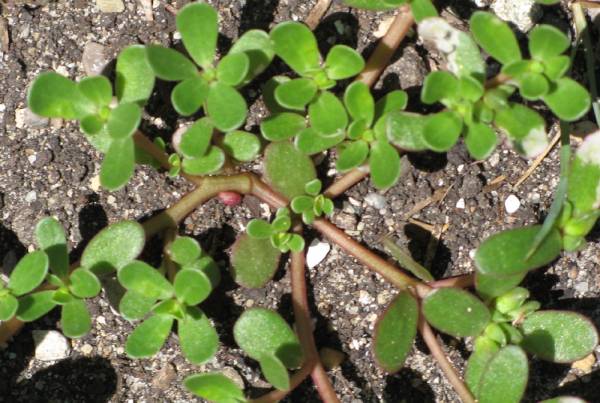
Purslane, Weed or Feed?
June 26th, 2009Purslane (portulaca oleracea), also called verdolaga, pigweed, little hogweed, or pusley, is a weed, or is it? It is naturalized the world over and is a very very successful plant. It can grow in cold northern areas, it is succulent so it can withstand droughts (not unlike sedum actually), it can handle poor soils, and it has this neat trick whereby if it is uprooted it will use stored energy to produce seeds. So all those gardeners that uproot it as a weed and toss it elsewhere are really just spreading it. As such it can be invasive.
But is it a weed if it is a food crop, something cultivated for thousands of years in other parts of the world, and still eaten there today? A superfood with more omega-3s than any other leafy vegetable (so long spinach), as well as oodles of of other vitamins and cancer fighting antioxtidants and health benefits? A plant that is so versatile it can be eaten raw, sauted or stir-fried, even used in soups and stews? Supposedly it also has medicinal properties for a healthy GI tract. Does that sound like a weed to you?
A weed we eat isn’t new, but one that tastes good is, to me anyways. The most commonly eaten weed, dandelion, is just bitter to me, not something I like at all. Purslane though is good, crunchy and fresh, a satisfying texture.
Purslane is a prostrate growing succulent, most resembling ground cover sedum. It has reddish stems and oblong rich green leaves. The stems, leaves, seeds, flowers, are all edible, anything above ground really, so eat the whole thing. If you see this growing in your garden and you want to pull it up, well, I can’t stop you, but if you do pull it up, make sure it ends up in a salad bowl and not your composter.
It grows everywhere, chances are it is growing in your yard right now. I personally seem to get it whenever I get store bought bagged composted cow manure. But I’ve also now planted it on purpose in my yard to get it to grow.
I’ve not found seeds for the prostrate variety most commonly found growing wild, however if you have some you can easily collect seeds thanks to the aforementioned survival property of the plant going to seed after being up rooted. Simply uproot one and hang it upside down over a paper bag, you’ll get your seeds, and once you plant it in a permanent location it’ll reseed readily year after year. The seeds I have found are for an upright variety, I found those on ebay.
When harvesting purslane you could pull it up, but why? Use scissors and just cut off some stems, and they’ll grow back. Constant food for you all summer long. Some people can get confused and harvest a weed called spurge (which is poisonous) when harvesting purslane. I don’t think they look much alike, but I’ll repeat the warning just in case. Spurge is not a succulent, it has a wiry stem, and when broken the stem has a milky sap. Purslane is a succulent with clear sap.
So you have an easy to grow, well adapted, nutritional powerhouse that can take drought, poor soil, is easy to seed save, can be continually harvested from, and cooked and eaten in a myriad of ways. Sounds like food to me. Try carmelizing a pan of onions, add some balsamic vinegar and purslane.
Caterpillars on a Pine Tree
June 24th, 2009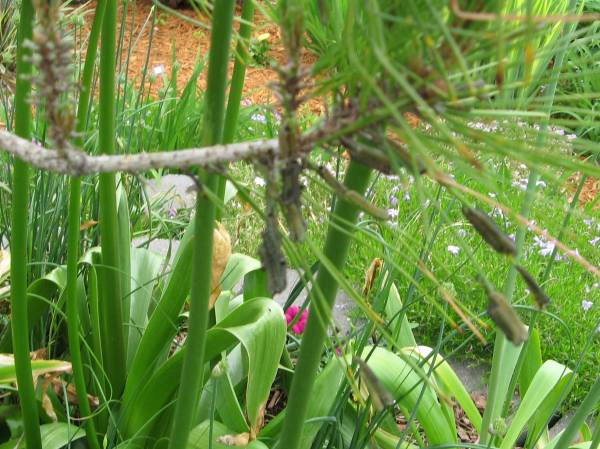
The other day, well, almost 4 weeks ago (we’ve got a new baby, and so I’ve been too busy to blog), on my way to the hospital to see said baby I noticed large clumps of something on my Tanyosho pine. The pine hadn’t been looking too hot this Spring but I hadn’t looked too closely at it, but now it couldn’t be avoided.
Clumps of something had weighed down the tips of the needles to the point where they were drooping noticably, very obvious abnormal. So I took a closer look. It wasn’t a growth, it wasn’t needles with elephantisis, it was an infestation of caterpillars. They looked like the “tent worms” (gypsy moth larvae) that had defoliated so many trees around my parents house when I was younger (eventually forcing government intervention with airplane spraying).
I don’t, or rather I didn’t, often think of pines or other conifers as having pest problems. Their foliage is much more armored and it just didn’t seem like something they’d deal with. But these larvae had made short work of the needles on my pine and had defoliated maybe 30 or 40% of it before I noticed. This, is of course, much much worse than a critter defoliating a deciduous tree, because such trees are used to losing their leaves yearly and growing a new set in Spring. When most evergreens lose needles they usually do not grow back. Pines are somewhat of an exception, they do lose a small amount of needles every year and regrow them, but no where near 40%. So this is a big hit to the tree.
I googled it of course and turns out these are sawfly larvae, and the specifically target young or short pines, who would have thought, with all the other more vulnerable trees out there, the sawfly evolved to have their larvae target pines.
Couple the very bad damage, and the fact that I needed to get to the hospital (not for the delivery mind you, this was two days later) I didn’t bother trying to deal with it by hand (there were many dozens, but they were big suckers, so I could have, technically) or finding an all natural pest control (something I do usually think about, but rarely try, because they’re so hard to find to buy, and the one time I tried a home made concoction I killed every plant I tried it on). I grabbed trusty Sevin, and making sure no bees were present, I went to town. They rapidly started dropping and I haven’t seen one since.
Pictures of My Front Yard
May 28th, 2009My front yard is looking really good this year, and I thought I would share a picture. Here it is circa May 23rd 2009.
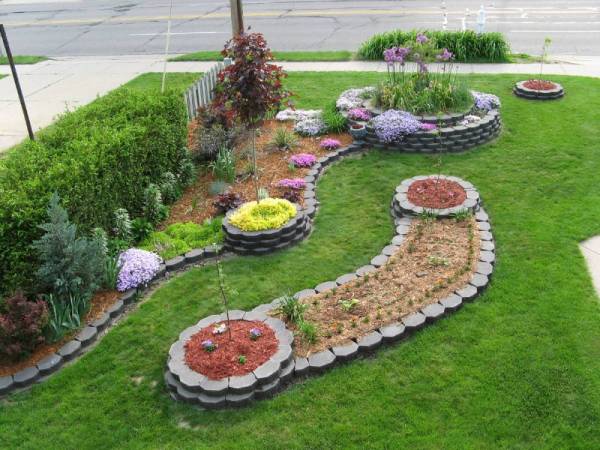
Click the picture to see it bigger. The two smaller beds are brand new, I’ve got two dwarf apples and a paw paw tree planted in them, as well as some vegetables. In the big circle center bed I’ve got a tanyosho pine surrounded by alliums for the time being. Later I will plant squash there, as the squirrels instructed me last year apparently it is a good place for squash.
I’ve got a red maple in the small circle coming up out of a bed of frothing yellow lysimachia ground cover. Then within the bigger bed itself I’ve got an upright blue juniper, some red barberries, a black lace elderberry, lilies, daylilies, yucca, and in bloom all over you see carpet phlox.
Way up by the road you can see the pre-bloom ditchlilies I used to fill the space between the sidewalk and the road.
Next year or this fall, whenever I can afford it, I hope to put in a stone patio between the two larger beds in that S-shaped strip of grass. Something informal with a low groundcover going through the cracks.
Recycle Nursery Pots, Grow Potatoes
May 28th, 2009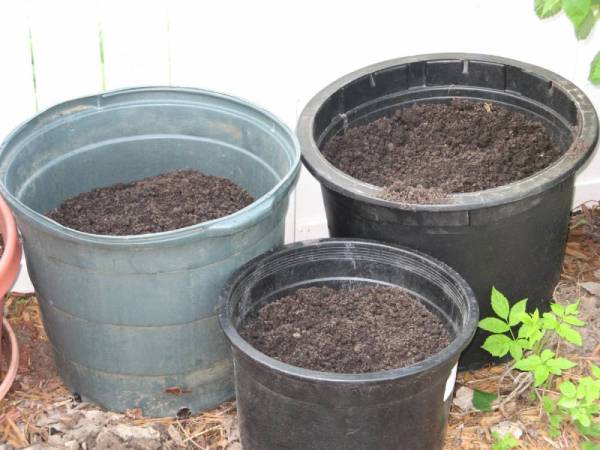
What do you do with the big mammajamma containers that trees or large shrubs are delivered in from the nursery? Well you could recycle them if they’re made of #2 plastic, but many are made of #5 or something and unable to be recycled (at least at our recycling center) and in anycase reuse is better than recycling.
When you buy potato sets (aka seed potatoes) you get a whole bunch. More than what most home gardeners need. You can plant some in trash cans, I do, but I plant the left overs in this nursery pots and it works. The dark plastic of the pots absorbs heat and helps them grow. You put about 4 inches of compost or potting mix in the pots, add your potato sets (4 or 5), cover, and as the potatoes grow keep adding soil each time they peak out, this “hilling up” allows the potato to hopefully form more spuds along the stem.
Then, to harvest, you just dump out the pot, no need to worry about accidentially wounding a spud with your shovel.
This year I’m growing “All Blue” potatoes, they’re purple in color and have some of the same antioxidants as blueberries. They taste the same as others, but are better for you.
How to Stake a Tree
May 20th, 2009Short answer, don’t. Most trees that are staked do not need to be. In fact I would venture that most trees you, the individual homeowner, plant do not need to be staked. Yes, any tree small enough to be handled by one person really doesn’t need to be staked. Trees only need to be staked when their top growth massively outweighs their rootball, and that tends to mean a large tree.
However, if you must stake a tree, let me explain to you how, because it is not as easy as you may think.
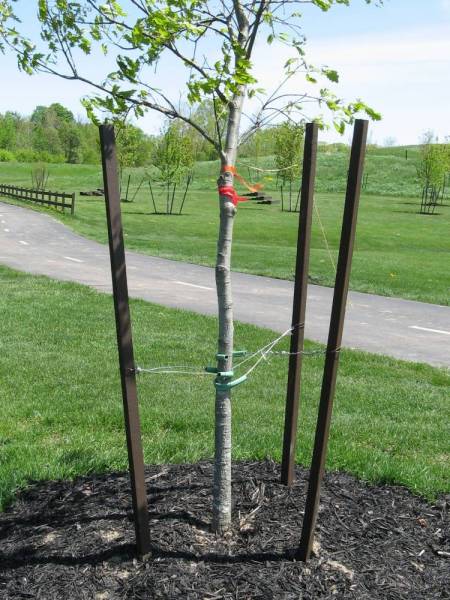
The above tree is an example of what not to do. For one, the tree is far too small to need such massive stakes. If your stake is wider than the trunk of the tree, you’re doing it wrong. For two, there are three stakes. The people obviously thought they needed to immobilize the tree trunk, and long term, those stakes have been there years. This is not the goal of staking.
Staking is used to moderate swings or to protect the tree from violent winds that could uproot it prior to it being established. It is not meant to prevent all movement. If a tree does not move it does not develop a strong trunk. Trees develop strong trunks in response to wind, it is a response mechanism, all plants do. This is also why plants grown indoors can be spindly and tall, there is no wind indoors (you can direct a fan at your seedlings to correct this).
So, when plants aren’t allowed to bend, then don’t put energy into growing stronger, so instead they grow taller. You can see this in nature. Trees clustered together in a grove will be taller and skinnier because they offer each other wind protection. Whereas the tree alone in a field with no wind protection develops a much wider trunk. This has repercussions even within the maple syrup industry as farmers have to balance planting density with the desire to encourage large trunk development.
In addition to not wanting to completely immobilize the tree, you also only need to stake it until it is established, which means one year, tops. Any longer than that and you can permanently weaken the trunk. The tree will grow tall, and spindly, and if you ever unstaked it it’d tip over like a limp noodle, so you think it needs to be staked more, nope. The only think that’ll fix a spindly trunk is removing the stakes. You stake for the roots, not for the trunk. Because of how staked securely increases vertical growth in lieu of a thicker trunk, nurseries often do it because many unwitting consumers buy the tallest tree. When you do your shopping, do yourself a favor, buy the one with the widest trunk.
Then, finally, the actual material you use to tie the tree has a big impact as well.
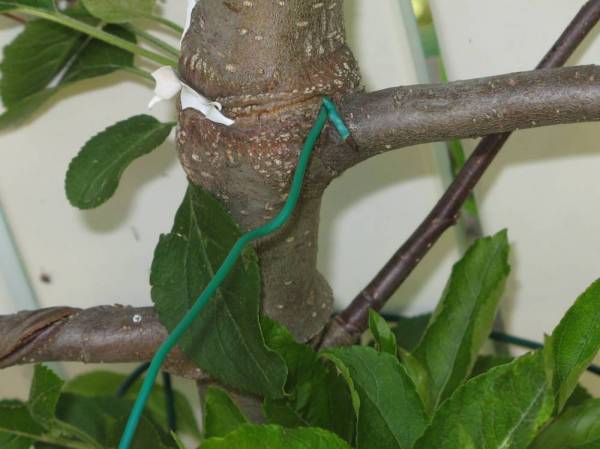
The above is a picture of my espaliered apple tree. Espalier is a method of training a tree to grow two dimensionally (such as along a fence) as opposed to three dimensionally. It is used for aesthetics, but also to increase air flow, make it easy to harvest fruit, and to spray fruit trees. Training is the exception to all of the above rules and is different from staking, if you’re training a tree for bonsai, espalier, niwagi, or whatever else (such as training a weeping tree to stand upright), you obviously need to tie it and manipulate it as such, but I show you this picture to show you what can happen. I had wrapped a wire around the trunk of this tree and forgotten about it, as you can see the tree has now grown around the wire and is completely encapsulating it. There is also now a good chance that eventually this wire could choke off and kill all the top growth of the tree. This wouldn’t be the end of the world to me, because two good scaffold branches exist below this point, but it would be a set back. What I should have done is loosened the wire every year, I forgot to.
But I mention all this to illustrate what can go wrong if you use the wrong material, like wire (or even synthetic ropes), to stake your tree. The tree can and will grow into it. and it can permanently harm the tree. The one thing the first picture in this post did right was to run their wire (which they shouldn’t have been using to begin with) through a bit of tubing to provide it some padding, but over time even that tubing is not big enough to fully prevent the tree from growing over it because padding or not, it is still on there tight.
So, now that I’ve written you a book on what not to do, let me write you a couple sentences on what to do.
To properly stake a tree place two stakes one foot away from the trunk on either side of the trunk in such a way that they’re perpendicular to the prevailing winds (which means typically one stake on the north side, and one of the south side, unless you’ve got abnormal wind directions in your area). Tie the stakes to the tree using something broad and flexible. Specialty tree ties are made, but old nylons work great. They’re stretchy, flexible, and broad. Then, leave your stakes on no more than one year. But before you do any of that, think if you really need to stake at all, and if the tree is less than six or seven feet high, the answer to that is usually no.
Video: How to Assemble Your Compost Tumbler
May 18th, 2009This was the first video I filmed, but I hadn’t posted it to my blog until just now (obviously).
This video covers how to assemble a UCT9 Compost Tumbler from Organic Compost Tumbler. I do it in less than 10 minutes (though, I did three takes, so by the third take I was pretty good at it).
Video: How to Build a Raised Island Bed with Retaining Wall Bricks
May 17th, 2009I’m doing videos now, this is the first one I’ve posted (though the fourth I’ve filmed). Some notes.
1. Expect to spend around $5 a linear foot for a 2 brick above ground (3 rows total) retaining wall as in the video. This assumes $1.50 per brick.
2. Use high quality soil for back filling. I used composted cow manure, it is like $1-$2 a bag, not much more expensive than standard topsoil, but oh, so much better. You rarely get the opportunity to fertilize beneath plants, do it when you can. It all starts with soil. This isn’t poop, it isn’t smelly. It is cow manure that has been composted for a year or more. Its just some of the richest darkest earth you’ll find.
3. Raised beds rule! Sod busting sucks, critters eating plants suck, tilling sucks. With a raised bed you only need to cut up a little sod and can instead dump dirt in instead of tilling or tearing dirt out. Much much easier, much better for the plants. Raised beds also increase drainage, lift your plants off the ground and away from munching rodents (though, obviously, they can climb, so it isn’t foolproof protection. But… rodents also don’t like to sit on top of things exposed to owls and cats and the like). The buried course of bricks can also confound moles and gophers (yes!). If you want to really confound them lay a layer of hardware cloth (fence-like metal sheeting) at the bottom to prevent tunneling up into it. A raised bed also makes it easier to weed (less bending) and can even provide a little freeze protection since cold air sinks.
4. Stone raised beds are the most awesome, but the hardest to make and really really expensive. Wood raised beds are the cheapest and the easiest, but aren’t at all good looking. Retaining wall bricks I think are a good compromise of ease and affordability with attractiveness. By the way, one the size I made in the video is perfect for a dwarf fruit tree.
Full text construction directions to follow soon.
How to Protect Plants from Frost, and Building Microclimates
May 16th, 2009
So, bad knews. I thought last weekend was the end. I allowed myself to say “Wow, no late frosts this year, awesome!” Boy was that stupid. Now, tonight, they’re predicting a late frost.
I bought some hardy kiwi vines in 2004 and they have grown quite a bit. Had I known in advance I would have bought the variety called “Michigan State” which was developed a mile from my house and so probably can handle my climate better, but I didn’t know that variety existed. So the ones I have are very vulnerable to late frost. What is worse, this is the first year that they’re blooming, the flower buds are set, I’m quite excited. Maybe it would have bloomed in previous years if not for frosts (that happened a little earlier than May 17th!). So this frost doubly annoys me because it could prevent my first fruit.
So, since these are big sprawling vines, I tied tarps over them, what else can I do? In vineyards they have gas fed torches and literally run the fires all night. I thought about doing that with my tiki torches or my grill, leaving it on low all night, but decided not to. Small plants can be protected with unside down jars, pots, buckets, even cardboard boxes. You can use a styrofoam row cover like I posted about previously. Big vines and trees though that are marginally hardy you need to think of microclimates. In hindsight I wish I had planted this vine in a better microclimate.
A microclimate is a small area that might functionally be a zone or two warmer than where you normally would be. For instance if you lived in zone 5, you might be able to build a (or use a natural) microclimate that is really zone 6 or maybe even 7.
The first major factor in creating a microclimate is wind. The simplest microclimate can be created by blocking wind with a house or a fence or a series of trees. If there is a shrub or small tree marginably hardy, planting it really close snuggled in with other trees or shrubs (evergreens preferably) will shelter it and help it survive the cold.
The second factor is sun exposure, southern exposures (in the northern hemisphere) will be warmer, as well western exposures. An area that is sheltered to the north and east and exposed to the south and west is about as warm as you’ll get, and is the microclimate where my onions are.
The third factor is going to be radiant heat. Buildings radiate heat, as do rocks, stones, bricks, concrete, or pavement that absorb sunlight during the day and release it at night. A plant planted along a building’s foundation benefits both from heat from the building as well as the wind break.
The fourth factor is water. Liquid water does not go below 32 degrees (salinity aside), else it’d be ice. So a body of water (anything, big or small) that is liquid in effect provides a buffer. Pools, ponds, streams, lakes, all can warm the nearby air in winter (or fall or spring) and cool it in summer. The general rule is that water moderates. You will get more of a benefit if the wind typically blows across the water to reach you, so for most of the US if you live on the east side of a lake you’re warmer than people who live on the west side. The bigger the body of water the larger the affect is to the temperature. Water also raises ambient humidity, and humid air retains more heat so cools down slower at night.
The final factor is elevation. Wind trumps elevation so being on the top of a hill, exposed, is no good. But, cold air does sink, and a garden on the side of a hill with a slope down and away can receive some benefit and avoid a frost if the temperature only gets down to 31 or so. So, so long as you are sheltered still, a raised garden can and does provide some temperature protection if the cold air has somewhere to sink to.
If you look around your house you may see some microclimates already. If you’ve got the same species of plant in different locations pay attention to when they break dormancy, when they leave out, or when they bloom. The ones that do so first are in a warmer microclimate.
Had I known about the marginal hardiness of my vines I may have planted them elsewhere, such as on the south side of my house, someplace less exposed. There isn’t room near them for a water garden, a big one, but I could put in a well sized one, and I may.
Sometimes I go to the nursery and see plants I know are not hardy here (like blue atlas cedars, le sigh) and I’m always both tempted to buy one put it in a microclimate and pray, and tempted to swear at the people for trying to sell a plant that isn’t hardy here. But if you find yourself in such a situation, think of microclimates, and maybe, just maybe, you might have a spot in your yard that’d work.
Carpet Phlox, a great groundcover
May 10th, 2009When this blog started I really liked Ice Plant and it was my favorite groundcover. Not anymore. As much as I liked ice plant for it’s drought invulnerability and it’s nonstop all summer long flowers, it is only marginally hardy here and I had problems keeping it coming back.
I planted some carpet phlox way back then too though, and it is still going strong and spreading, and while it doesn’t flower all summer (Spring only) I still love it, and think it may be my favorite flowering ground cover.
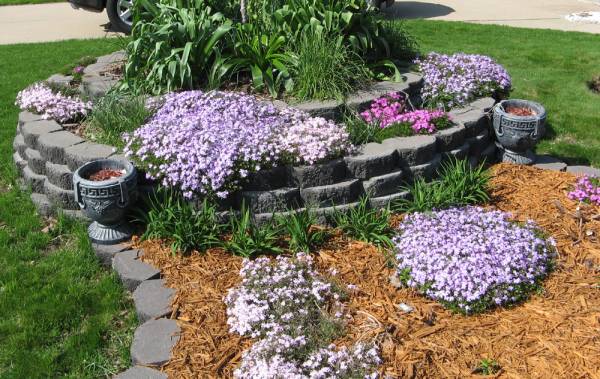
It forms a nicely evergreen spreading mat of foliage that keeps weeds down and otherwise acts like a mulch for the soil. In spring, concurrent with tulips usually, it’ll be covered in blooms, absolutely covered. It also has a scent, and looks great cascading down walls.
I have three varieties, though I do not recall they’re specific names. One is pink, but it is sold as red. One is lavendar, but it is sold as blue, and the third is a candy-cane like white with red stripes.
The best performer for me as been the lavendar (aka blue). It grows the fastest, flowers nicely, and is very hardy and evergreen here in my mid-south Michigan zone 5 garden. Pink (aka red) has the same hardiness as the blue, but grows perhaps a little slower. The flowers are brighter though (you can’t out-bright hot pink).
The “candy cane” looking one is a poor performer. It is the least hardy, getting some die back here, it grows slower, and seems much more susceptible to drought than the other two (or, it needs more water) all told it has been a poor performer and I do not recommend it.
The other two I recommend fully.
Carpet phlox spreads like other ground covers by slowly creeping and having new roots get formed where it touches the ground. I also believe there is some seed based spreading going on as well. It seems to grow a foot or two in a year, depending on the variety and the health. Supposedly hardy to zone 3. I’ve seen some people pooh-pooh it because it doesn’t flower all summer, but the foliage is not unnattractive and the plant is largely carefree, no weeding, no seeding, no watering, no fertilizing. That has to be worth something. Sure, there are plenty of annual groundcovers that’ll bloom all summer, but those are annuals, and so much more work.
All told, next to some golden lysimachia, I think carpet phlox is my favorite ground cover. But then again, it is Spring, and it is really beautiful right now (everyone who walks by the yard turns their head). Maybe I’ll feel different in the fall.
How to Protect a Row of Seedlings from a Late Freeze
May 2nd, 2009I live in Michigan, we are not blessed with the longest growing season known to man. So we try to stretch that, and to stretch it we need to be able to protect plants from late frosts or Freezes as late as late May if we’re really unlucky.
You can put in a hoophouse or something like that but plastic sheeting does not provide a whole lot of protection.
But you can very easily build a styrofoam box to put over your seedlings. Think of it like a rectangular “rose cone” those styrofoam cones us northern gardeners place over our roses to protect them in winter.
Expanded Polystyrene Insultation (aka styrofoam) is a cheap building product used to insulate primarily basements. It comes in standard lengths (8 feet) and standard widths (14.5 inches, which is the gap between standard 16″ on center framing). It is also really really cheap. Extruded Polystyrene Insulation is more expensive (this is the pink board or blue board you see at the store) and works as a better insulator, if you need more protection. It also comes in bigger sheets which may require cutting (a utility knife works).
You’ll need lengths of the expanded insulation mentioned above to cover 1 8 foot row of seedlings. Stand two up on their sides, place a third on top to form a box, and using your hands press finishing nails through the top into the sides to secure them together. There are also glues you can buy if you want more security. Then duct tape the seams for added resistance and put ends cut to size on the same way (with additional duct tape for security) and you’re good to go. Just remember this thing is extremely light, so weight it down so it doesn’t blow away.
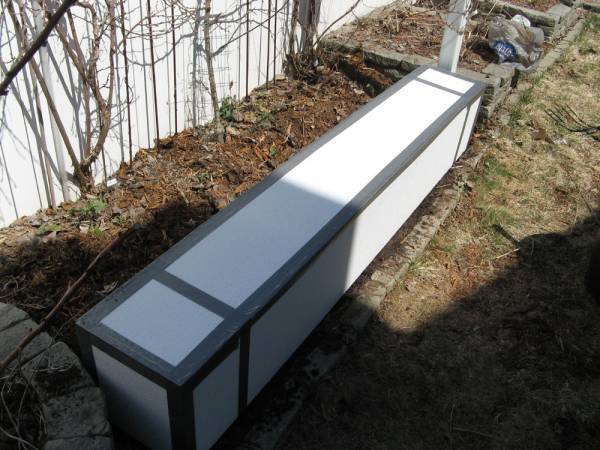
Now you can protect a whole row of seedlings from a late frost.