
Extend the Harvest: How to Make Jam
January 27th, 2010This isn’t strictly a gardening post, strictly, but as I look outside and see the cold barren wasteland of Hoth I can’t really write much about gardening, can I?
However, extending your harvest is something that is interesting and useful for all people who grow edible plants, which is a whole lot of gardeners, so I’ve decided this is on topic enough for me to post about.
I love making jam, I can make really cool flavors that you cannot buy in a store. I can give the really cool flavors away and feel that they’re special gifts because they’re unique and I made them myself. I also like the concept of self sufficiency and so I can, if I choose, not give a dime to smuckers and still have all the toast and PB&J’s I want, all year round.
Plus, one can only eat so much fruit when it is in season. You give it away then, or it goes bad. And sometimes fruit that isn’t good enough to eat out of hand, can still be canned. Such as odd looking pears & apples.
How to Can
Call this your 2 minute primer. It is actually really easy to do. You’ll need mason jars & lids, which you can buy at the grocery store. You’ll need pectin (which is what helps it set), which you can also buy at the grocery store. The pectin will come with instructions as well. And you need a couple big pots and a small canning toolkit. I like this set here because the ladle holds the perfect amount to fill a typical jar up to the appropriate level while still leaving head room.
Anyways, back to your primer. First, you must sterilize everything. Put a clean towel out on your counter and boil some water, put all the tools in the water, all the metal lid rings too, but not the actual lids. With the lids while the water is coming up to boiling, but still just barely simmering, dip them in briefly, then remove and put on the towel, no touching with your hands. Give it a few minutes at a roiling boil, remove everything and set on the counter (wash your hands too, you did do that right?). Now put the jars in the water, and leave them there (keeps them warm).
In another big pot make your jam or jelly or whatever as per your recipe, then using the ladle and funnel ladle into a hot jar you just removed from the boiling water, leaving one quarter inch of space left at the top. Using the magnet tool put a lid on the jar, then secure a metal ring on, but do not tighten it, think secure, not tight. Do this for all your jars, then put the jars back into the boiling water with at least 1 inch of water above them, you may need to boil them in two batches, and boil for 10 minutes (at sea level, you mountain people will have to go longer).
After the required time remove the jars and place them on cooling racks, they’re now done. You should hear clicks and pops as the vacuum seals start working. After a few minutes of cooling test each lid by pressing down on the center of it, if you can move the little lid popper thing, it isn’t sealed and you can try again, or just put that jar in the fridge and eat it first.
The other jars should be good for a year to forever, use a sharpie to write a date on the lid, and store them in the pantry, but always err on the side of caution. If you pull a jar out of the pantry and the seal is broken (the popper pops when pressed) discard it. All jars should be hard to open the first time, if they’re easy, it didn’t work. If you open a jar up and it smells wrong, discard it. If it is off color, discard it. If mold is growing, discard it. Better be safe than sorry, you can always make more jam.
Now, my three favorite recipes. If you make any of these, come back and post a comment letting us know how it worked out.
Banana Rasberry Rum Jam
This stuff tastes so good I don’t know why it isn’t sold in stores. There is just a hint of banana flavor in the jam and it makes a mean PB&J, probably because, apparently, bananas go well with peanut butter (see Elvis). It is also good on toast and I’ve used it to glaze salmon. The alcohol in the rum boils off during cooking, it is just used for flavor.
3.5 pounds raspberries fresh or frozen (since raspberries go bad so quickly I usually freeze the ones I harvest from my garden that I don’t eat that same day, and then when I have enough frozen, make a jam)
3 very very ripe bananas
1 cup of dark rum
1 cup of cranberry juice
1 package of “Ball’s No Sugar Needed” pectin
3 cups of sugar (we’ll use some anyways, but normally we’d need 6 with regular pectin)
1/4 cup honey
pinch of salt
Add it all to a big pot and cook until it is liquid and boiling, stirring frequently, very frequently. Skim off any foam on top (it is perfectly edible, just air bubbles). Then run it through a food mill in batches to remove the seeds. Put it back in your pot, back up to boiling, and then ladle into the jars and process as mentioned above.
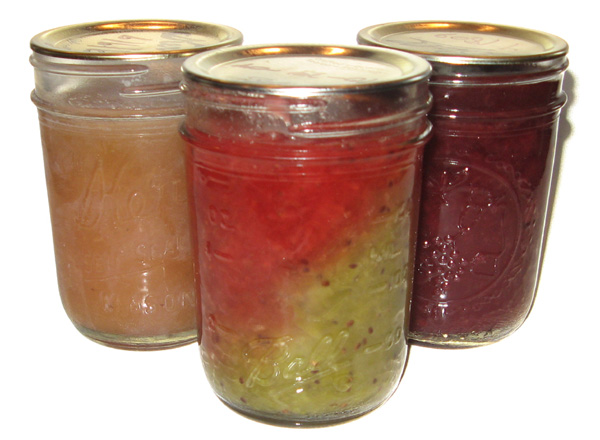
Makes about 9 jars. All jars in this article are half-pint size.
Caramel Pear Butter
I love my pear tree, but because I don’t spray it or otherwise baby it during the year I get a lot of messed up fruit, maybe it fell off, maybe an insect ate some of it. Maybe it is just underripe. Whatever the problem, pear butter is the solution. Cut off the bad parts, keep the good parts, and make pear butter out of them. You could also do this with apples, all the rejects from your tree. You can use this on toast etc, but also, try glazing some pork with it.
1/4 cup apple juice (cold pressed natural please, this replaces the pectin)
6 tablespoons fresh lemon juice
7 pounds ripe pear flesh, peeled, seeded, cored
3 cups packed light brown sugar
1 teaspoon fresh grated nutmeg (really, buy whole nutmeg and grate it fresh, tastes so much better and keeps far far longer, trust me)
3/4 teaspoon coarse kosher salt (other salt is okay, I guess)
Add the fruit, apple juice, and lemon juice in the pot and cook, stirring often, until the mixture is liquid and boiling. You may want to add the lemon juice first or as you go to help prevent the pears from browning. Boil for about 15 minutes, cover, and then simmer another 20 minutes. Blend with an immersion stick blender (or blend it in a real blender in batches, immersion blenders are so much easier, and good for soups too). Now add the sugar, nutmeg, and salt, boil until the sugar dissolves, simmer uncovered until reduced to 8 cups, stirring frequently.
Then ladle it into the jars as above and process as above. Note, no pectin is added, but apple juice has some in it, still, if you want it less sauce like and more jam like, add a little bit OR add some unripe apple flesh to the pot at the beginning (also high in pectin).
Makes about 15 jars.
Strawberry Kiwi Christmas Jam
I make this jam with the little fuzzless hardy kiwi I grow in my garden. I call it Christmas jam because you can make it two-tone red and green if you make each fruit separately and then pour in layers. You can also easily mix the two together. So if you want to do it separately, divide everything in half (half of the sugar to each pot etc) or just mix it all. You can use regular store bought brown kiwi if you don’t grow or can’t find the smaller green hardy kiwi, but peel them.
1.5 pounds hardy kiwi, stems removed.
1.5 pounds strawberries, cleaned and green bits cut off.
4 cups of sugar
1 packet of “Ball’s No Sugar Needed Pectin”
3 tablespoons lemon juice.
Cook fruit and juice together until liquid and boiling, mash with potato masher, cook a few minutes more, add sugar and pectin, stir frequently until everything has combined. Check taste with spoon, smile, it is good.
Prepare your jars for canning as above, ladle and process as above. Makes about 10 jars.
How to fix a tree with a split trunk from wind damage
December 15th, 2009Readers of this blog will know that my favorite tree is my forest pansy redbud, indeed the related posts you’ll find at the bottom of this missive will point to the other blog posts where I have mentioned it. I love this tree because it has spring interest, in the form of the standard pink redbud blossoms, but it also has a somewhat unique purple colored leaf that creates nice interest in the summer as well.
I wanted one of these probably for 2 years before finding and buying one, and then, back in early October, disaster struck! A wind storm heavily, heavily, damaged the tree. Splitting the trunk in two places.
In retrospect going out and looking at the damage, it was bound to happen, the tree had grown so well that some limbs obviously outweighed the strength of their junction with the trunk, it should have had some preventative pruning done, but I was busy being a new dad.
Some people, when a tree is damaged like that, would just cut it down. If they think it’ll never be perfectly shaped again, they don’t want it. I personally think a tree that survives damage will have more character and be more interesting, plus, I did say it was my favorite tree, so I decided to repair it.
When faced with this sort of damage you really have two options, you can try to mend the split, which is possible when it is a 50/50 split or close to and there is still substantial amounts in tact on both sides. Or, if one side is severely weaker, it may not be able to be saved and so you’ll have to trim it up and make it as clean as possible. I had to do both.
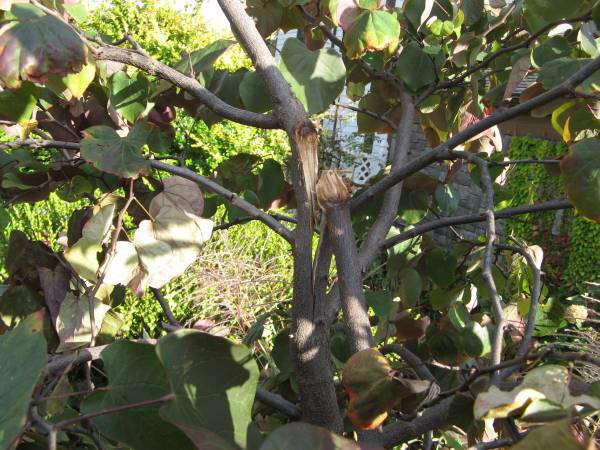
The picture above is of the upper trunk split, this one you’ll notice is really severe with no structural integrity left on the right side. Trees do all of their physiology in the thin green moist layer right beneath the bark (xylem, cambium, and phloem layers, sometimes just called cambium) so if there isn’t enough bark area left to sustain the split branch, it’ll die. If you’re a few hours or a day after the damage and the leaves are wilting, you’ll know there isn’t enough cambium left. You might be able to do some heavy pruning so that the remaining foliage is better matched to the remaining cambium, but chances are you just need to cut the limb off.
So, for the damage shown above, the leaves were already wilting and the structure was so obviously compromised, so I cut the limb off, as cleanly as I could.
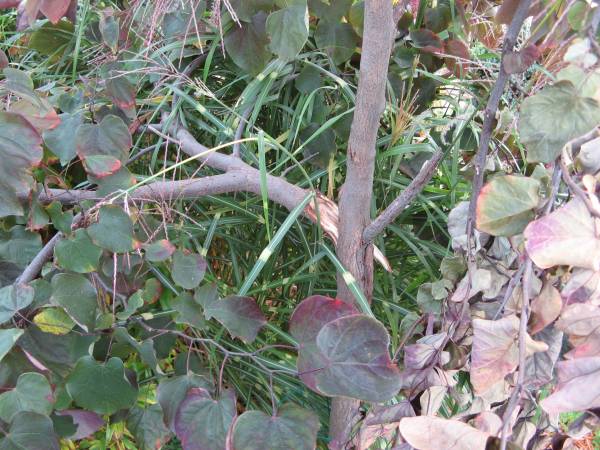
The above picture is of the lower trunk split. This is the first branching point of the trunk, the first main scaffold branch split off. In this case though the prognosis was much better, the leaves had not wilted in the least (and I was easily 8-10 hours after the storm) there was still structure integrity to the branch (it was hanging parrallel to the ground, not drooping all the way) and the split was probably 40/60. So I decided to fix it.
The first thing I did was some severe pruning to reduce the weight load of the branch. This branch had grown significantly during the summer and really weighed too much, I probably took off 70% of it’s mass. Just so I could lift it back into place as much as anything else.
I temporarily tied the branch up with twine, temporarily for a few reasons, namely because if you tie a tree you choke it. People run into this all the time with birdhouses. They do not want to “hurt” the tree so they use rope, twine, or wire (the worst) to tie a bird house to a tree. Really, the better thing to do is just to nail it. A tree can survive a puncture wound no problem, but if the tree grows into a rope or wire it’ll impede the flow in the cambium layer and choke it.
After the tree was in place I got out my power drill and bored a hole through the tree at the site of the split. Then I went down into my basement and looked through my screw/nut/bolt/nail organizer. In a bin called “toilet parts” I found some large brass bolts, these were perfect. Brass doesn’t rust, and being an alloy of copper it may have some antifungal properties. I put a large bolt through the hole and secured it.
I then drilled another hole a few inches above the split and put a longer bolt through there. I made sure the hole was slightly smaller than the bolt so I really had to shove and pound it in (thus making sure there would be no gap) and then I used a wrench to tighten nuts on both.
My tree was now a cyborg, and the actions I took may seem severe, drilling two holes, but as I said, trees can survive puncture holes no problem. There was another flap of torn bark and I actually brought out my nail gun and put some brad nails into that, more wounds, but the tree doesn’t mind them.
Eventually the tree will grow over those metal rods, incorporating them into it’s structure, and being all the more stronger for it, with no adverse damage, because they go through the cambium layer, not around it.
So, weight removed, gash mechanically repaired, now I had to worry about insects and diseases. I had both a can of tree pruning sealer and a can of natural shellac wood sealer. I had just read an article saying shellac was better than the other stuff and so used it. Shellac is an all natural waxy resin made by insects and used in everything from wood products, to food, to pills. You probably eat a little bit every day, it is harmless, but it seals wood good. Insects and diseases love open wounds and so it was important to seal the tree with something.
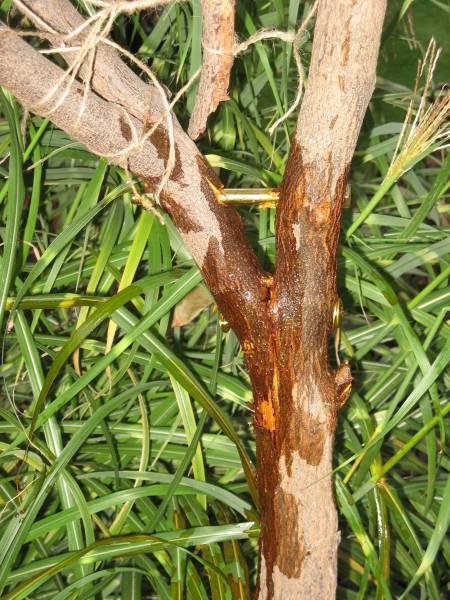
That taken care of, the last thing I needed to worry about was water. Just like with concrete, water can get in a crack, freeze, and then widen and make the crack worse. Even with the shellac the force of water expanding as it freezes was a potential hazard. What I eventually did, though which is not shown in the picture, is just put a bead of silicone caulk around the top of the crack (but not the bottom) preventing any water from seeping in, but if any does, still allowing it to seep out. Silicone is a neutral and inert substance and the tree will probably grow around it fine, or, after healing has progressed, I can take it out. Another option would be to wrap the tree in some sort of plastic, but that can hold in moisture too close to the bark and promote rot, I think my caulk solution is best.
I’ll post an update next year to show how the tree is doing.
Should you repair every tree? No, you shouldn’t, if there is a safety issue where the tree overhangs a structure or is where people often sit, walk, or play, you should always err on the side of safety. If the tree limbs are too big for you to manage to put back into place, you may not have to cut the tree down, but you’ll need to remove the limb. But, if your tree is not yet too large to manage (mine was only about 10 feet tall) you can try to repair it. It doesn’t need to be a total loss.
San Francisco’s New Composting Law
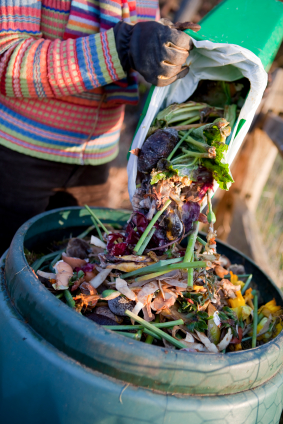
October 21st, 2009I just heard about this on the news. Apparently today a new law in San Francisco took affect, enacting the strictest trash ordinance in the country. Everyone either has to compost at home, or get a separate bin to put their compostables in for curbside pickup, or be fined with fines starting at $100 for individuals and $500 for businesses.
Well, I’m sure some citizens may hate this, but this is an opportunity for gardens, you’ll probably be able to finagle lots of compost from neighbors, or just do midnight raids on those green compost bins on the curb.
But if you’re going to be composting in a city, or trying to compost in San Francisco for this new law, there are issues you need to consider, especially if you don’t have a lot of land, yard, or plants.
Now, I wouldn’t really worry about making too much compost over the course of a year, unless you have no garden whatsoever. You may think you produce a lot of kitchen scraps, but you don’t, not really. Because they’re mostly water they shrink vastly in size while they rot, a cubic yard of uncomposted material may, in the end, produce a cubic foot of compost.
But there are things you need to worry about, such as rodents. Any open pile or bin with an open bottom or unsecured lid can and will attract wildlife, and not the kind you want. In the country it is mostly bears and raccoons and opossums. In cities you might still get raccoons and an opossum, depending on the size of the city, but mostly you’re looking at rats, dangerous and disease carrying rats. You don’t want to build a rat habitat in your yard, so you don’t want a pile or bin.
A compost tumbler is superior in that it is raised off the ground and fully enclosed, so that is what I would recommend for anyone in an urban or even suburban environment, or people in bear country (honestly, the tumbler will excel pretty much everywhere).
Don’t think you can squeak by leaving it exposed, I once let a bag of compost on my porch for a couple hours, and that is all it took to attract an ugly opossum.
Another big issue for the urban composter, is ingredient balance. Compost works best with aerobic decomposition which uses oxygen loving bacteria that need a balance of moisture, nitrogen, and carbon. Kitchen scraps tend to be high on the first two ingredients, but lax on the third. I solve this partway by loading all my kitchen scraps into brown paper bags, which are a carbon source, but that isn’t even, even I’ve had problems.
My main solution is to take newspaper, which is 100% biodegradable, run it through my paper shredder, and do that. It balances out the moisture because it is dry, and adds the necessary carbon. As a general rule of thumb, if your compost tumbler smells like garbage or sewage, you have anaerobic bacteria working instead of aerobic and you need to add more carbon (newspaper, shredded fine), less water, and mix it up (tumble) to produce more oxygen.
This balance issue is more an issue for city dwellers than country dwellers because urbanites have less trees, and so less leaves that’ll drop in the fall, which are a great and primary source of carbon for many composters. You can also use straw from a farmer, which is against more accessible to those in the country.
Another option for brown material is sawdust from untreated unpainted and unstained wood. You can get such sawdust from carpenters, building sites, saw mills, etc. Just make sure it is all untreated, and it is a miracle ingredient.
Finally, small amounts of wood ash or charcoal, again from unpainted, unstained, and untreated wood, also is an excellent source of carbon, but it can affect the Ph of your compost so you can’t use it in large quantities. So if you have a fire pit or fireplace and burn natural wood without lighter fluid or anything like that, you can save and use the ashes and any left over charred bits in your compost. In fact there is a whole gardening method called biochar that utilizes burnt wood to a large degree.
Following these tips should help you produce usable fertilizer for your garden from all the kitchen scraps your neighbors are going to be sending your way.
How to Propagate Hydrangea
October 19th, 2009I love big mophead hydrangeas, they do really well in shade or part sun, and get big bright flowers on them. They don’t do well north of where I am, but I’m pretty much at the northern border of where you’ll reliably get blooms every year, so I can grow them.
I always want more, and the easy answer is to propagate them. There are two main ways, layering and cutting. I’ll explain layering briefly but this post is mostly going to be about cutting.
Laying involves picking a flexible cane on the side of a shrub, carefully stripping the bark in about a one inch segment as if you were stripping the vinyl from an electric wire, bending the cane down against the ground, and layering something heavy like a brick on top to hold it in contact with the soil. It will root and thus form a new plant directly adjacent to the old one. This is a good method to create a hedge.
To propagate with cuttings you simply cut off a section at the terminal growth of a cane and pot it up.
Okay, it is simple, but let me give a little more detail.
You’ll want to snip off a section of stem about six inches long with one set of opposing leaves attached. Make the cut on a diagonal to maximize surface area. Dip the cutting in rooting hormone (available at any well stocked garden supply store, Lowes, Home Depot, etc). You’ll want a small pot or other container with premoistened potting mix. You can buy a special rooting mix, vermiculite, or something like that too, but plain potting mix should work. Using a pencil make a small hole, and then put your cutting into the hole, and gently firm the soil.

You now have a cutting in a pot, but your work is not done. Without any roots the cutting will not be able to suck up water, and so it’ll dehydrate. Since plants respirate and lose water through leaf surfaces you need to minimize leaf surfaces. So, there should be two leaves attached to your cutting, cut each leaf in half. It seems harsh, but it is necessary.
The final step is to do something to hold moisture around the plant. You need containment, but also volume, anything that isn’t rigid could hold moisture up against leaf surfaces and promote infection. You can put wooden sticks in the pot to prop up and open a plastic bag, or what I prefer is a clear two liter pop bottle, cut in half. The world’s cheapest greenhouse, and it works. Don’t worry about sealing the bottom, you’re not trying to make it airtight or anything.

Give your cuttings a few weeks to form good roots before planting them up or removing the cone. Then you can share them with friends or use them to expand your own garden.
Stalking the Purple Potato
October 7th, 2009I love the idea of purple potatoes. Antioxidants and various other nutrituiets are often marked by color and flavor. Foods that are colorful, like blueberries or pomegranites, or butternut squash, have nutritients. Also, foods that are flavorful, cinnamon, nutmeg, most spices. The stronger the flavor, the darker the color, the better it is for you.
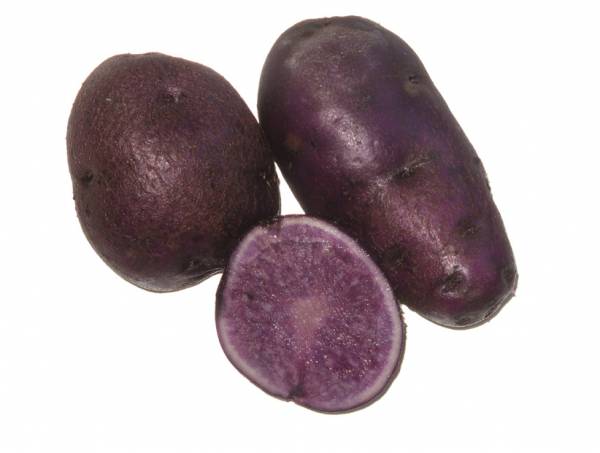
So the relatively bland and white potato has little going for it. But did you know in the Andes, where potatoes are from, they grow in all sorts of colors? One of which is purple, containing the same antioxidants as blueberries. And, they taste just like normal potatoes.
Locally I can only find them in mixed bags of gemstone potatoes at the store. Last year I planted one and it grew and I got a decent little harvest off of it. This year I ordered seed potatoes from Burpee, potato variety called “All Blue” I can’t say I recommend it. It definitely seemed different than the unknown variety I planted last year.
Firstly, many of the potatoes had a mostly white interior. I picked the best one of the picture you see here, but many had large sections of white around the outside. The spud also seemed more susceptible to scab, and yields weren’t too good. The color also faded significantly when cooked, making mashed potatoes with these ended up brownish white. This never happened with the ones I get from the store. I’ve decided this is an inferior variety.
There is another purple variety, “Purple Majesty” that I’ve seen available as seed potatoes. I think I’ll try that one next year. Considering the added nutrition benefits and no change in taste, I can see no reason why these shouldn’t take a bigger share of the domestic potato crop, hopefully it grows in popularity in the future. Nothing quite like eating your fries, and getting your antioxidants too.
Squash, Frost, Babies, and Kiwi
October 6th, 2009I’ve been a busy bee. Not blogging though. My last post, prior to this one, was July 30th. On August 1st my wife went back to work, which left work-at-home dad (aka me) as sole caretaker during the day for our then 2 month (now 4 month) year old son. I’ve hardly had time to harvest food from the garden, and not even always that, let alone do any gardening and or blogging about it.
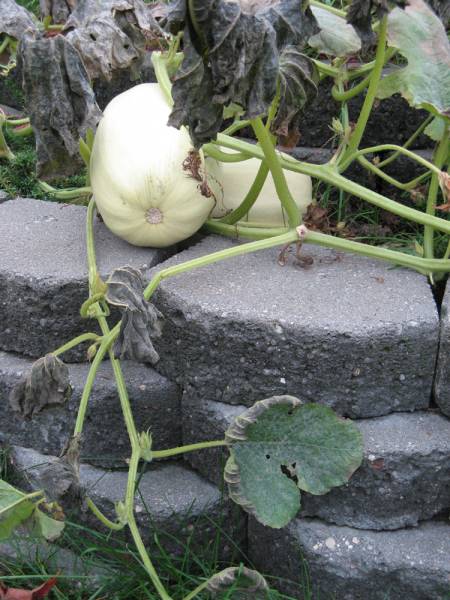
But, it is time to start again, so let me say, I hate frost. This year we had a really cold early Spring but then it warmed really quick so we had a warm late Spring, with no late frosts. What a wonderful way to start the year. Then, of course, we had a really cold summer, so cold that plant growth and flowering was severely retarded. Then, October 1st, we get a freak early frost, and man I hate it. Going to bed earlier because of the baby so I didn’t watch the 11 o’clock news to see it coming. So I put down no protection, and my winter squash, which needed until probably mid october, all but died.
But, it isn’t dead. The vine lives, a few leaves live, and if it warms back up (it has been cold and dreary since) it may still grow some, maybe. We’ll see. It has squash on it, they merely need to mature.
This frost was so early that the mums had just started to bloom and some of my hardy hibiscus were still blooming, and those are summer flowers (but as I said, cold weather retarded things all summer).
One thing it did not claim was my hardy kiwi. For the first time, ever, my kiwi flowered and fruited. I don’t know if the vine finally reached maturity to do so, I planted as a seedling in 2004. Or it could be that it always gets hit by late frosts. No late frost this year, but if I had left the fruit on the vine another week it might have been hit by the early frost, wouldn’t that have been ironic?
I’m liking the kiwi, my 5 year old vines (one female, one male) yielded 7 pounds of the small quarter-sized fruit. Well, there was probably 8 pounds on the vine, but I couldn’t reach them all for picking. They’re smaller and more nutritious than the fuzzy kiwi most people know, and you can grow some varieties as north as zone 4. There is one variety called Michigan State, hybridized about a mile from where I live, but I didn’t know that when I bought my vines so I bought some generic variety, which is probably why it is more vulnerable to late Spring frosts. The plant is a vigorous grower (lots of pruning to keep it from going where you don’t want it) but overall is very attractive and works even as an ornamental vine. No pest or disease problems that I’ve seen, japanese beetles slightly like it, but they’re easily dealt with.

I’ve seen on another blog where the first year with fruit the girl got only a handful of fruit, so I’m glad I got as much as I did. You eat them whole, and they taste just like kiwi. When they’re really ripe they have a minty taste. You can also apparently make jam and whatnot with them. The fruit keeps well in the fridge too. This will definitely be a vine I plant wherever I live.
Smelly Soupy Poopy Compost Tumbler
July 30th, 2009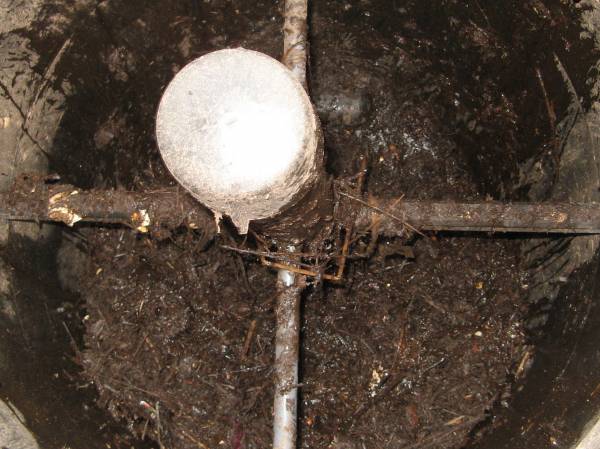
Composting is not an exact science, and even someone who has used a compost tumbler for a long time like me can mess up.
I use my compost tumbler in the following way: I take brown paper bags and while cooking put scraps of veggies, peels, watermelon rinds, etc, in the bags. Then I toss the whole bag into the tumbler. The bag provides the brown, the contents the green, and it should compost, and it does compost. I know though that the bag doesn’t provide enough brown, but I also add clippings from the garden, including chipped branches and other woody stuff, and of course in Fall I add leaves.
So, in this batch, not enough brown, too much green. It got wet, it get smelly, it got poopy. This is not good compost. You need enough brown to absorb that moisture and make sure it doesn’t smell. Compost shouldn’t smell, if it does, you need to add more brown, more carbon.
If this was Fall I would add leaves, I could also add straw, or more shredded woody prunings. But instead I’ve set upon a cheap, easy, and fast solution. Shredded newspaper.
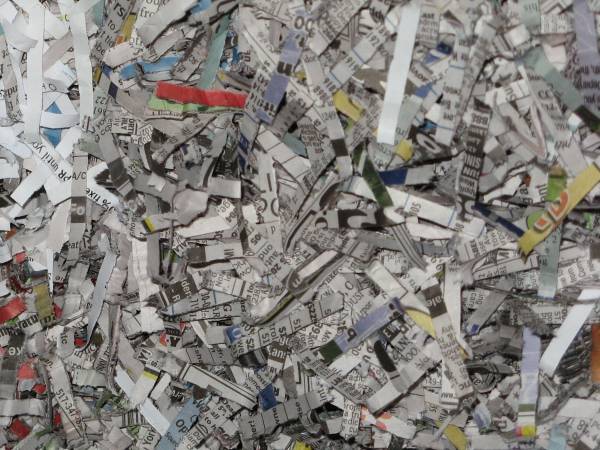
To make this all you need is newspaper, and a paper shredder. Run Sunday’s paper through, leaving out any glossy or otherwise fancy pages. Newspaper print is completely organic and biodegradable, the ink is soy based. It’ll absorb the water, and because it is paper, will decompose fast, quickly rectifying my compost problem in less than a week.
The Best Type of Pot for Container Gardening
July 13th, 2009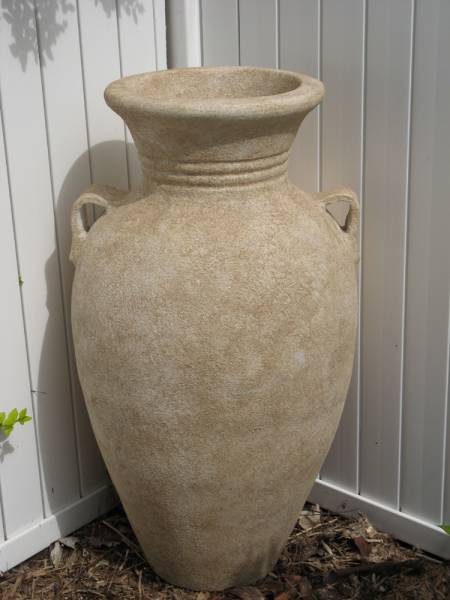
Garden planters can be made of a wide variety of materials, do you know which is best, do you know the pros and cons of each?
Ceramic
Ceramic or clay pots from plain terra cotta to fancy glazed colorful examples, are some of the most widely recognized and used garden containers, probably because they’re old technology. They do have numerous downsides however. They are expensive, and fragile if broken. What is more such pots cannot be left out all year round in places where it gets below freezing, full anyways. Supposedly you can get double fired ones that can take the cold, but I’ve never seen one for sale and they’re supposedly twice as expensive as the already expensive normal ones. Such pots are also porous (the non-glazed ones) and so need to be watered more frequently. The good thing about ceramic, where they really excel, are in style and color. Colorful glazed pots maintain their color better than the other types I will mention, and many colors are available.
Plastic
Plastic pots are the cheapest, and very durable. Some cheap plastic pots do become fragile in cold weather, but good ones don’t. They are nonporous and can easily retain water. Where plastic suffers is in colors and styles. Plastic containers typically are not painted (though they can be), they get colors from the plastic itself being infused. This is both good and bad, but mostly bad. It means that the entire pot is usually going to be one solid color, with no detail of variance. It also means that the colors can and will fade, really quickly, really significantly, when exposed to sun. The only good thing is that there is nothing to flake off (unless it is painted). Plastic can otherwise be left out year round, and can retain water well for those water loving plants.
Metal
Metal containers are not that popular, but they do excel in a variety of applications. If you want the simple galvanized metal look you have a basic no-maintenance container. Painted metal containers are typically done with a powder coating or other durable finish, these types of paints typically do not need maintenance and last a long time. Metal can also be easily embossed with designs so you can find some really cool looking containers. The downsides of metal is that it can rust eventually, how quickly will depend on the quality of the manufacturer. For instance some “copper” containers aren’t really copper, but a thinly plated steel and they can rust. Also, sometimes the coating or painting process is incomplete and the little uncovered crevasses can then rust. Then of course, if you scratch the pot with a trowel or something, that scratched bit can rust. Metal is also more expensive than other types other than ceramic. But you can leave them out all year round.
Foam
Foam pots are made by having polyurethane foam expand into a mold. They can create very intricate designs, and technically, are insulated. This would make them a good choice for a plant that needs a warmer root ball during winter than you’d get in another container (though, honestly, an container is a bad choice in such a situation). Once the form is made it is then painted. Unfortunately the paint flakes of quicker than any other type of pot I’ve found, the foam underneath yellows in an ugly fashion, and they can crack from impacts. All told, foam is my least favorite type of planter, they seem to only look good for 1 season. They can be relatively inexpensive though.
Fiberglass
Fiberglass pots are some of my favorites, they are extremely durable, available in a wide range of colors, and water tight. They do have some of the issues of plastic, colors can fade, but not that much, paint can flake, but not as badly, and while most fiberglass pots are largely one color, there are usually accent colors added. They can also be nicely textured to resemble old ceramic urns and whatnot. Price was they’re fairly inexpensive, though not as inexpensive as plastic. If you’re looking for a pot that can closely resemble ceramic without the price or durability issue, fiberglass is the one.
Concrete
For durability nothing beats concrete. It lasts and lasts and lasts. Concrete is my favorite kind of pot. It is somewhat porous, not very though, and holds water well. It is heavy, which can be hard to move, but it also means the wind won’t be blowing it over. Concrete, like plastic, when colored has color all the way through, unlike plastic though, it tends not to fade. Concrete, like foam, is made with molds, so it can have intricate designs on it, but unlike foam, paint adheres better (through it is rarely painted, you could paint it at home though). Concrete can be a little pricey, more than fiberglass, less than ceramic. And because of the weight you’ll never find really big concrete pots (fiberglass is best for big pots) but for small and medium size containers they’re great. The only downside is limited color options, you can get uncolored, charcoal, a greenish color, and a brownish color typically. If you made one yourself (doable) you could get a wider variety of colors, and you can buy concrete paints and stains.
Wood
Wooden containers, usually boxes or barrels, are fairly uncommon nowadays, and while they do have a rustic charm, they are the least durable of the lot, with rot and warping and pests all being a problem. It is not something I would recommend using, and wood is also fairly expensive, especially rot resistant woods.
So there you go, those are all the common materials used for garden containers, now hopefully when you’re at the garden center picking one out you’ll be better equipped to make a decision on which to buy.
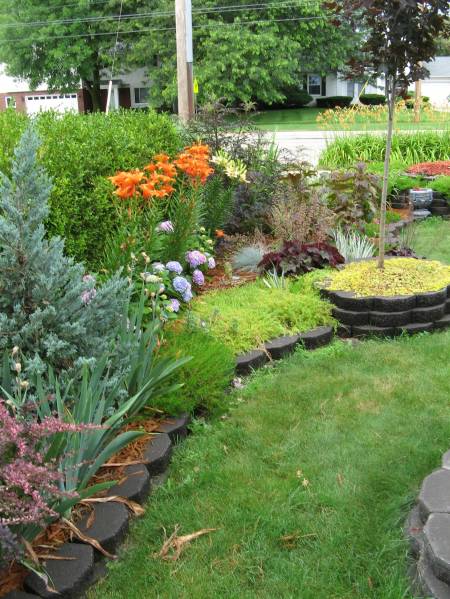
Three Simple Tips for a Beautiful Ornamental Garden Bed
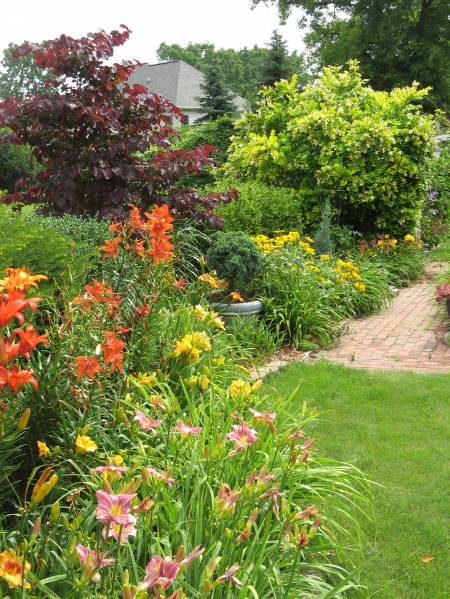
July 11th, 2009My garden beds are looking wonderful right about now, and, not to toot my own horn, but nothing else in the neighborhood comes close. I was pondering my success today, and decided that there was probably just a few key principles I follow in the design process to achieve the looks I’ve gotten. I know there are a lot of homeowners out there who probably do not want to think about garden design as much as I do, so I thought I’d share these three simple tips that anyone can follow to create a bed that looks like it was professionally designed and is visually appealing.
1. Avoid Straight Lines and Even Numbers
Your garden bed should avoid any and all straight lines. If your bed is a foundation planting the back of the bed may be straight because it borders the house, but the front better have a curve to it. Pickpockets and magicians move their hands in arcs to distract us because our eyes cannot follow curved lines as well as straight lines. So when you use a curved line in your garden design you’re forcing the eye to slow down and follow along it rather than skip to the end, you’re telling eyes to stop and smell the roses so to speak. It makes the garden more interesting. Long sweeping curves look far better than straight lines, one of the most boring garden beds you’ll ever see is a flat straight 3 foot wide section along the foundation of a house. In a formal geometic garden straight lines can work, but such gardens also tend to require fulltime staffs of landscapers to maintain their precision pruning, they aren’t the style most of us want or can afford.
Even numbers, or planting things in matching pairs, should also be avoided, as they are easier for our brain to add up and categorize. Instead plant things in odd groups such as 3 or 7, it feels more natural and is more visually interesting.
2. Plant in Many Colors
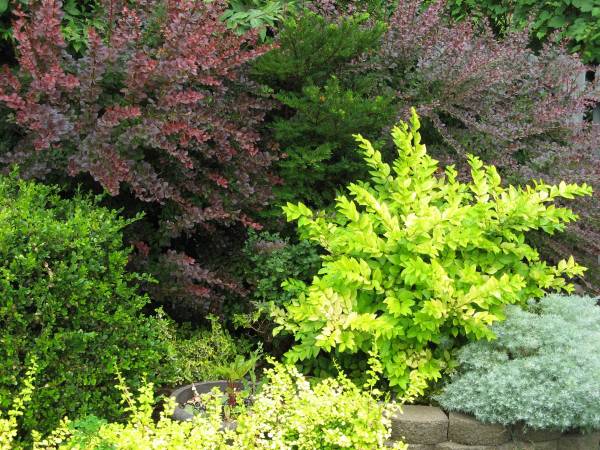
Flowers are transient, foliage is forever. Every garden bed should have atleast one plant that has foliage that is red or purple, one that has golden or yellow foliage, and one that has silver or blue foliage. The more shades you can add the better, bonus points for black foliage.
In the red/purple foliage category there is barberry (in the pictures), purple smoke bush, ‘forest pansy’ redbud (a wonderful purple leaved tree seen in a picture here), various heuchera or heucherella (in one of the pictures), red maples (in one of the pictures), some ornamental cherries, some sedums, and some types of hardy hibiscus.
In the yellow/gold category there is golden privet (which smells wonderful and honey bees love, in a picture), eunonymous, lots of hostas, some heucheras or heucherellas, golden barberry, some arborvitae, some other evergreen hybrids, some sedums, and lysimachia.
In the blue/silver category is the well known blue spruce, but there are many varieties that are bluer than what the average person is familiar with, really striking. All types of juniper (my favorite are upright narrow varieties, in pictures, or groundcover varieties), some irises, artemisia, various other conifer cultivars, some hostas, and blue fescue.
In the black category there is “Black Lace” Sambucus, and black mondo grass, as well as a type of bamboo.
3. Plant atleast one of each of the follow…
- A tall ornamental grass. For northern climates this generally means miscanthus, but in the south you have other species to choose from. Many people overlook grasses because they can be expensive and seem plain at the nursery, plus they think they have a lawn full of grass so why need one in a bed? But tall clumping ornamental grasses provide a feathery texture that creates interest with the wind like no other plant can. Only in a full shade bed, where most would not grow well, would I recommend not planting atleast one.
- An evergreen. You’ll want interest in winter, and evergreens provide structure to a garden bed. Garden beds can’t be all flowers, then need structure and anchors, foundation, you get that with trees and shrubs, and let one of them be evergreen. I really like dwarf pines, but there are lots of options.
- A tree or standard-form shrub with an exposed trunk. Foliage and flowers are not the only part of a plant worth showing, bark trunks provide interest all their own with interesting colors and textures. A standard-form shrub is a shrub that has been grafted on top of a trunk to resemble a tree, so you can plant one of those, or an actual tree (one that has an exposed trunk, ie not a spruce). It doesn’t have to be a large tree, but you need something that’ll have interesting bark one day.
Follow those simple guidelines and you will create more visually interesting garden beds. One final fourth rule, if you can afford it, is something inorganic. A large boulder can be invaluable to a garden bed, or use stone or brick as your edging material. A scultural item can work as well, be it made of wood such as driftwood (technically organic I guess), stone, ceramic, bronze, glass, concrete, whatever. A large container works here as well, a container a 5 year old could hide in, that big.
Introducing: Wildcrafting
July 9th, 2009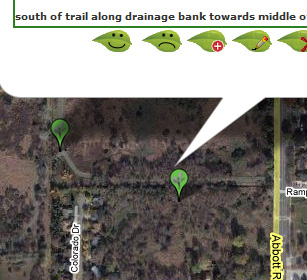
When I’m not gardening I’m running websites and I have a new one I want to tell you about. It isn’t strictly about gardening, it is more about living off the land, but topically those two things are very close, and I think many of you will be interested in this.
Wildcrafting.net is an advanced mashup of plant data and Google Maps which allows you to find or plot exact locations where a plant grows. If there is a wild elderberry bush growing on the side of the road, you can plot it, then come midsummer when the berries are ripe, you can visit the site and see all the local elderberry locations, thus allowing you to drive around and pick loads of elderberries.
Of course there are hundreds of plants, elderberries aren’t the only option, but the overall goal of the site is to make it easier for people to go out and find free food growing in nature by marking the locations where wild edibles grow on public lands. There is also an option to keep your marks private, allowing you to use the site as a diary or library of your own known locations, if you don’t want people to know about them.
Right now the site is brand new, there aren’t many plant locations plotted yet, hopefully that will change, so that eventually with enough user participation the maps will just be full of plotted locations. Allowing anyone to pull up the site, type in their address, and see what free food grows near their house.
This site was built as an extension of the Wilderness Survival Forums, so to participate you must first register there. Then you can add marks, add pictures, comment on marks or plants or pictures, rate things, add new plants, and more, all for free.
So go ahead, check it out. Wildcrafting.net Wild Edibles.