
My 2021 Plant Wishlist
December 21st, 20202021 is fast approaching, over the last, maybe year, maybe 18 months. I’ve developed a plan (a 30 year plan) to turn my property into botanical gardens. I am now thinking very long term with my plantings and I’ve been saving bookmarks of plants I want to get in the next year but I thought, hey, why not make a blog post? I will probably buy all of these, but I’m not sure I will plant them, I have some little trees in containers still I bought last year or even the year before I haven’t decided where to put them yet.
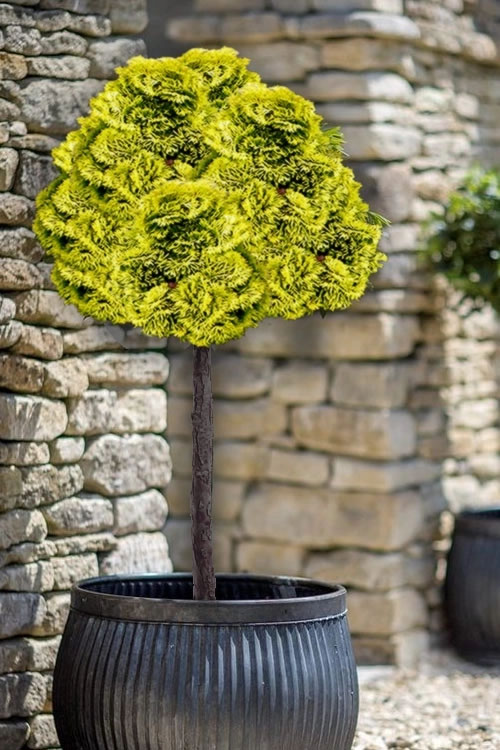
Golden Dwarf Hinoki Cypress Tree (Standard)
I like hinoki cypresses. Why? Well, have you seen one? I cannot explain why, what makes this different from other similar plants. This is not truly a cypress, it is a chamaecyparis, but if you look at the way the scaled needles extend out from a branch it is done in a different and unique way which to me, always makes this plant visually attractive.
I already own at least one of these, and I’ve owned others in the past at prior locations. There was one I owned where the leaf tips were gold and then it was green further down, essentially a two tone plant, that was very nice. These dwarf forms though grow very slowly. The one I have is tiny and it is growing in a bed with some groundcover and it barely sticks up above the ground cover. It is a standard green as well so it sort of blends in. In 10 years things will look different, but 10 years is a long time to wait.
This though, this is a standard form, and it is golden. So the standard form (which I love) means that it is a high graft, they take a straight trunk and graft something on top, usually a dwarf (most weeping cherries are technically made this way). You can find blue star junipers (a dwarf) grafted in standard form which I really really like. This is in my opinion the best way to showcase a globular dwarf evergreen. Essentially it ends up looking like a topiary but without any need for pruning because of the very slow growth rate. I actually have one of those blue star standard form junipers, it is I believe 17 years old, I’ve transferred it when I moved, and the trunk is now a solid 6 inches thick and while I have shaped it with pruning it never truly needed it. Purchase.
So this plant I know the exact spot I will put it, which is near the other hinoki I already have. It will reach high above that ground cover and with the yellow foliage create a nice pop of color.
Amber Glow Dawn Redwood Tree
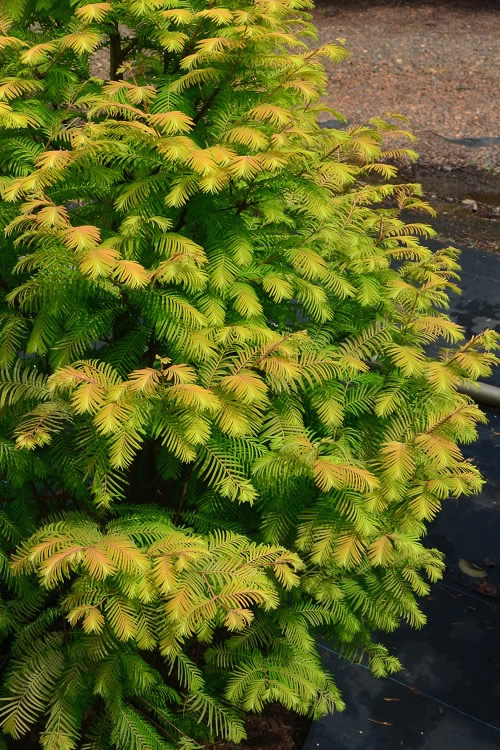
I promise you I don’t just like chartreuse foliage conifers. But hey here is another one! I have always liked metasequoia, they are famously called a dinosaur tree because they were thought to be extinct but then were found growing in a valley in China. They once covered the earth and are related to our redwoods, sequoias, and bald cypresses. A deciduous conifer (my favorite) with small cones they develop really attractive trunks in old age like a bald cypress. Also like a bald cypress they like it moist.
Despite my love for this tree I have struggled growing them. I planted one at my parent’s house in northern Michigan that is growing very well last I knew. Meanwhile one I planted at my old house in southern Michigan always struggled, I hope it is still alive with the new owners. I planted two down here in Tennessee. One way down by my mailbox that received no supplemental watering, always struggled, and finally bought the farm one hot July. The second, a cultivar called gold rush (also yellow, but growing large) is alive. I’ve figured out it prefers acidic soil and I have alkaline limestone and clay up here so I’ve top dressed with some sulfur. It is growing, but not thriving. It also also close enough to the house I can give it supplemental water. I theorize it may have done better if planted elsewhere on my property, perhaps somewhere with some shade or a moister area.
So Amber Glow is a little more gold, or orange, than gold rush, it is also smaller, not really a dwarf but perhaps an intermediate it only gets to about 20 feet. A nice pyramidal form I can probably find a spot for it more readily than another gold rush or species form metasequoia. Purchase.
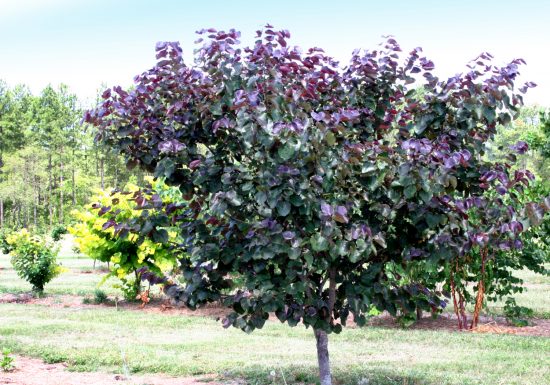
Merlot Purple Leaf Eastern Redbud Tree
On the topic of trees I haven’t had a ton of luck with, there are the purple leaved redbuds. There is Forest Pansy Redbud which I grew in Michigan and did fine until the heavy branches caused a trunk to split and it never really recovered.
There was also a Ruby Falls redbud which looks the same but is a weeping form that I had tried growing.
Why grow this at all? This isn’t really a dark or red leaved tree, it is solidly in the purple realm, cranberry maybe, wine maybe, but solidly purple to me. Which makes it a rarer foliage color and that makes it very useful for designing garden beds with contrasting foliage colors. I hadn’t thought about growing this tree again and then I stumbled upon this cultivar named “Merlot.”
So why this tree? Well it is a crossbreed that is drought and heat tolerant which makes it perfect for the South and makes it better able to take the sun, which is what I mostly have available as planting locations. If Forest Pansy struggled in the Michigan sun then I knew it wasn’t going to handle the Tennessee sun, but this tree I am hoping will be able to take it. Purchase.
Silver Smoke Arizona Cypress
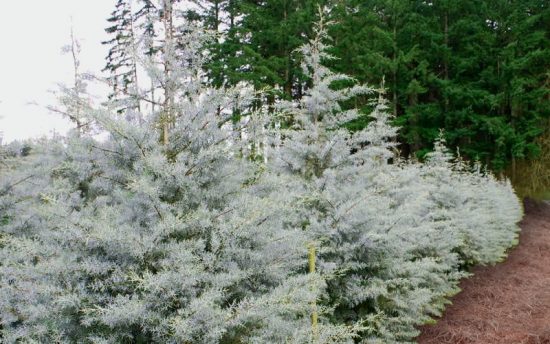
I was just talking about contrasting foliage colors and can you look at this tree? Wow!
So I have struggled for a bit at finding blue evergreens for the South. What I would have used in a more northern climate, the colorado blue spruce, is not happy down here, not at all, though I am growing one cultivar that is so far surviving the others have all died. Then I discovered the arizona cypress. I’ve found it under different names, including “blue ice” or “carolina sapphire.” Regardless of the name it is a nice blue evergreen, albeit with scaled leaves and not true needles, that grows in a similar form to a blue spruce with a similar color and can take the heat. I have planted 5 or 6 of these around my property.
Then I was simply browsing websites and came across this gem. Silver Smoke Arizona Cypress. Outside of silver ragwort I’m not sure I’ve seen a plant this color. So of course because it is rare and unique I have to have it, because that is how I roll. I do not know where I will plant it. I do have one idea where I was thinking to plant yet another blue arizona cypress, so maybe I will plant this silver one there instead. Purchase.
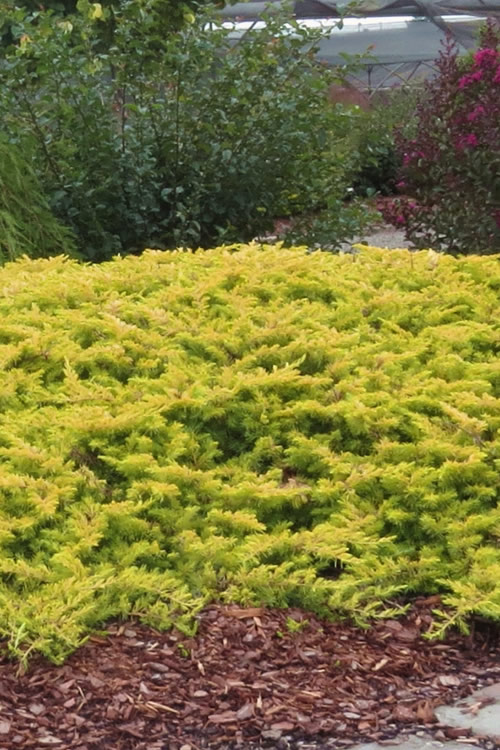
All Gold Golden Pacific Juniper
I promise when I set out to write this I didn’t realize it would have so many gold plants. But I am a huge proponent of contrasting foliage colors so it makes sense.
My mulch bill is ridiculous. I go through over a thousand bags a year. I get the bags because I’ve calculated it and it ends up being cheaper than local bulk suppliers. With enough groundcover I can drastically lower my mulch bill so I invest in groundcovers.
These prostrate junipers I think make excellent groundcovers. They are evergreen of course, resilient to pests and diseases, and they spread, but they don’t really overspread. They are very easy to keep in line.
I have several, the common blue rug junipers I have planted in various locations, they’re slow spreaders but they spread. I have one that is quite nice called “Copper Harbor” that does not seem nearly as vigorous, or as gold, as Golden Pacific here. This one gets a little bit of height on it which I like, and being more vigorous means it will cut down on my mulch bill faster.
A lot of this I’m going on faith, because I don’t really own the plant yet, but based on the pictures and my reading this seems like it’ll be a winner for somewhere in my garden. Right now I am thinking I will plant it around the back side of my pond near some Cryptomeria and my hardy sugar cane. Purchase.
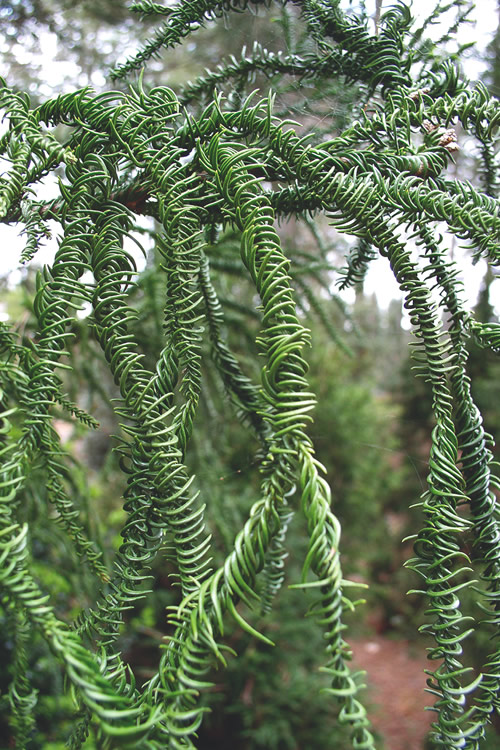
Rasen Sugi Cryptomeria Japanese Cedar
I have am obvious penchant for rare, and unique, and strange plants. As I said above I want to turn my property into a botanical garden and to me that means a plant zoo. You do not go to the zoo to see squirrels and deer, right? You go to see red pandas and lemurs and things you cannot see in your backyard. Rare and unusual things. I would love it if a child tours my place and sees these interesting plants and thinks “wow isn’t that cool” and develops a love of gardening.
Anyways, so, check this guy out, isn’t that cool? I’ve found since moving to the south that I source a lot of japanese plants because of the similar climate. When I want an evergreen that is going to be able to stand up to the southern heat, japanese evergreens are up to the task. Since I cannot really grow spruces cryptomeria has become my new best friend.
I have a handful of the normal species sort. Last summer I also discovered this crazy rare one at a botanical gardens and was able to source it in the Fall, I haven’t planted it yet but I have a spot picked out. It is called Cryptomeria japonica ‘Araucarioides’ or “Snake Branched” japanese cedar and it looks vaguely alien with very long trailing whip like branches. But it is not on my 2021 wishlist because I already own it.
Browsing I discovered “Rasen Sugi” here though, look at those needles on it, the twists, the turns, this is a weird plant. I like weird plants. It grows narrower and smaller and more open than the species cryptomeria so I should be able to find a place to plant it, though I do not yet have a spot picked out. Purchase.
Cedrus libani ‘Green Prince’
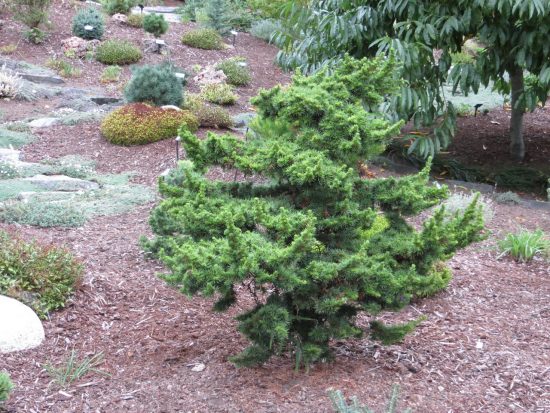
Hey look another green plant! I really like the true cedars, cedrus. They have short needles and an open branching form so they end up giving a very architectural appearance showing off their trunks and branching habits. They’re very structural, which I like.
This guy is a dwarf that ends up growing, without pruning, into a natural bonsai form. I really like the appearance of bonsai but I prefer my plants in the ground so this is a nice way to get that aesthetic without the pots and root pruning. Purchase..
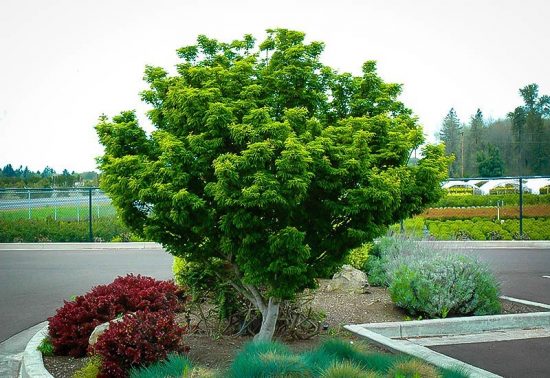
Lion’s Head Japanese Maple
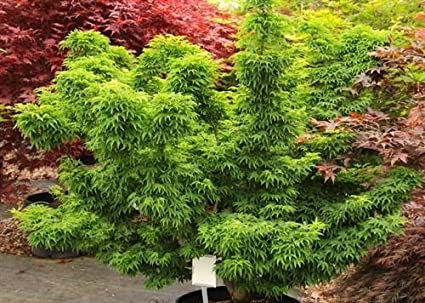
Acer palmatum ‘Shishigashira’ calls to me. I’m drawn to it and I am not entirely sure why. It just feels so bushy, the leaf nodes are so close together its clustered and overloaded and different than other trees. It is a japanese maple but its plain green, right? Not any of the fancy foliage colors japanese maples are known for. Also not really any of the leaf shapes like laceleaf that japanese maples are known for. But what it does have is a short distance between leaf nodes which makes it feel overloaded with leaves and that gives it a very unique garden aesthetic.
The only other plant I can think of that appears this way is cannabis. Think about the bud cluster on a cannabis plant, it is sort of overloaded with foliage and bud and feels sort of top heavy in that regard. Well, look at these. I almost think they could have named this Acer palmatum ‘Cannabis.’
This does get a nice bold red fall color. It stays small at 15’x12′ and can take some shade, or sun. So it can fit in a lot of places. I really like how the foliage is clustered at the top allowing you to enjoy that while also enjoying some structure of the lower branches and trunk. But mostly what draws me is the very unique heavily foliated terminal branch ends. Purchase.
Australian Tree Fern

Tossing in a houseplant to mix things up. I saw an Australian Tree Fern for the first time a couple months ago and I knew I had to have it. I ordered one and it is not doing well so I think I will need to order another one. I haven’t quite learned what this plant likes yet.
I’m told it needs frequent misting, and I mist it, but it is still wilting. Is it overwatered? It is a fern, I’m told to keep it moist. The pot does have drainage but I’m watering it and misting it daily. I don’t know what is going on with it but it is close to death so I’ll have to try again.
But I really want one of these in my house. They’re so beautiful, they get big, they feel primordial, like I should buy some little plastic dinosaurs to sit next to the trunk in the pot. Yes, I said trunk, this fern will develop a trunk. In it’s native habitat it will grow very large, but in a container size tends to be more constrained.
Right now I have it in my master bath thinking the added humidity might be a plus, but I worry the light in there isn’t enough. So next I will try my kitchen I think. But I like this plant enough that I will keep buying it until I get it right. Purchase.
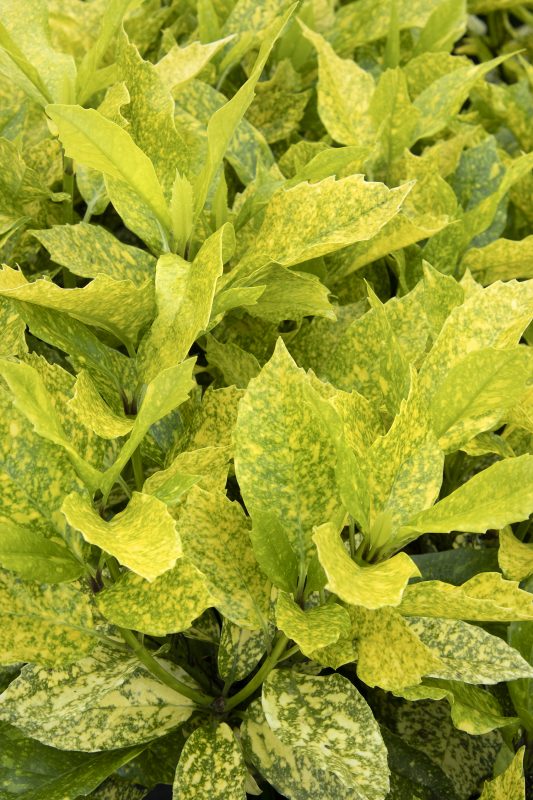
Aucuba japonica ‘Mr. Goldstrike’
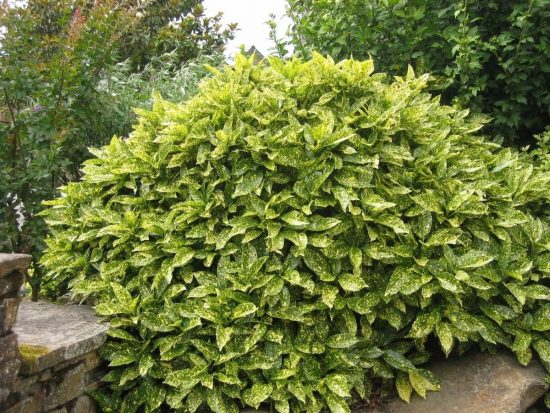
Another gold plant, another japanese plant. I have seen this around town, not this specific cultivar but this species, planted in public parks or along walkways and I did not know what it was. It gave off every appearance of being a tropical houseplant, with the glossy leaves and bright colors and yet its evergreen year round down here in zone 7. I certainly never saw this in Michigan but after moving to Chattanooga I would see it everywhere.
Of course I never saw a label on it so I had no idea what it is, I finally figured out what it was this year and so now I need to buy one.
Hardy in zones 6-10 this guy will grow to 6’x6′ which is pretty big, and it loves deep shade. So with this coloring it can really brighten up a dark spot. Oh, and most importantly, deer don’t like it. Aucuba is dioecious which means there are both male and female plants. This variety is male, but the females will produce bright red berries for added interest. I will probably get several of these because I have so many spots where I could use this. Purchase.
Dats A Nice Daylily
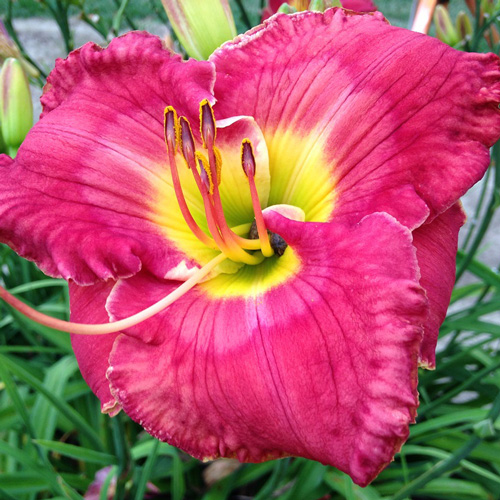
Daylilies used to be my favorite, I collected them, I had dozens of varieties all labeled, including some high end expensive ones. I’ve moved on from them some but I still like them and plant them. I found myself wanting a vibrant pink one and I zeroed in on this variety for its size and other traits.
I have been burned in the past buying higher end daylilies with beautiful blooms. Yes they had beautiful blooms but maybe on anemic foliage, short flower scapes, and maybe only put up 5 or 6 blossoms a season. Now I care less about having the fanciest bloom than I do about it being just overall largely floriferous. I want large blooms and I want a lot of them, fragrance is also nice.
I found this variety, it seems to be what I’m looking for, so it is on the list. Purchase.
Monkey Puzzle Tree
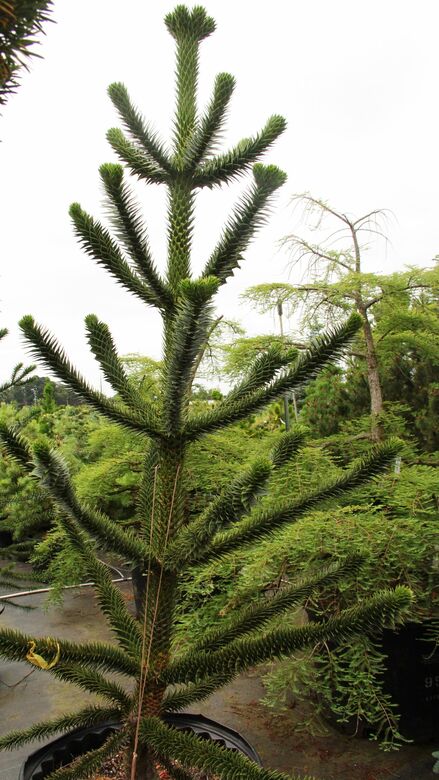
I feel like at this point I don’t need to explain why I like this tree. It is rare, it is unusual, it has a strong structural appearance with an open branching habit covered in spike foliage.
I actually had one, and it was growing great, and then suddenly this Fall it died. I believe something ate the roots. If it was going to die I would have expected death during the winter, because hardiness is always a challenge. Though the variety I get is native to the Andes mountains and so can take the cold, usually this is considered a tropical plant. It didn’t die in the cold though, it died during a pleasant fall, so I’m thinking an animal ate the roots, which has happened to some other plants of mine. I always get very annoyed by this. You spend this money investing in a plant and an animal kills it.
I need this plant in my life though so I will buy another one. I am as of yet undecided if I shall plant it in the same location as last time. Purchase.
Wollemi Pine
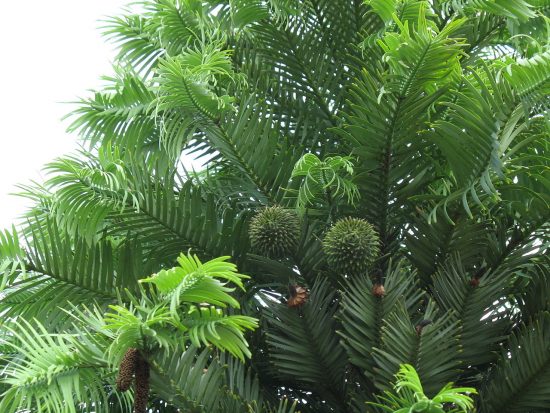
Last, but not least, the wollemi pine. Actually not a pine at all, related to the monkey puzzle tree. Thought to be extinct then discovered in Australia not too long ago (1994) in a rift valley. This is the rarest tree in the world, with less than 100 adults surviving globally.
So rare and unique, check, check.
I cannot find one to buy. Apparently National Geographic sold some to the public years past. You can buy them in Australia, but I cannot find anywhere to get one shipped in or to find a US supplier. I have found one at Conifer Kingdom but its a giant thousand dollar specimen, I want a little one because planting small plants is often better.
Supposedly it is very resilient, is adaptable to a very wide variety of conditions from sun to shade to wet to dry to loose to clay. It is susceptible to at least one fungus in Australia, it is unclear if it would be susceptible to fungus elsewhere. Supposedly hardy down to 10 degrees F, but its so new there isn’t a lot of data here.
The male cones are long and dangle like, well, male parts. The female cones are very large, round, globulous, like, well female parts. It is very interesting looking plant and like nothing else on this planet. All told it looks to me like the love child of a coconut palm and a pine tree. Very tropical feeling. I really want to give it a try. Plus, its an endangered species, so if I can successfully grow one I’m helping to save it. No idea where to purchase.
The Virtue of Buying Small Plants
December 8th, 2019Have you ever seen a seed grow? Stupid question right? You’re on a gardening blog I’m sure you’ve seen a seed grow.
Have you ever stopped to think about the difference in vigor because something grow from seed versus something grown in a pot and then transplanted at some later date? It is astounding. I have seen trees, when grown from seed, get taller than me in a single year, and that rate of growth does not slow down.
The reason of course is roots. When planted from seed roots do as roots do best and spread widely and deeply, depending on the species of course. This natural root formation is most ideal for almost any plant (tomatoes, perhaps, being one exception, because when you transplant them you can do it deeply and allow more root formation along the buried stem). The larger a plant or tree is, the greater hurt it will have incurred by being in a container.
I can buy in early spring a buddleia from a mail order nursery. It will arrive small, a couple inches tall maybe, in a 3 inch pot, the roots barely filling that container. If I then plant it it will have time to develop, roots will spread, and it will end up very healthy and large and floriferous by the end of summer. I did this this spring with both hardy hibiscus and buddleia (I mean I’ve bought hundreds of plants from mail order nurseries, but these two are foremost in my mind right now) and both ended up 3’x3′ by the end of the summer, super healthy, only watered with rain, and they came in little pots.
Brick and mortar nurseries would never sell that plant, they know consumers will not buy it unless they see its blooms at the store. So they only get sold in later summer, by that time they will be maybe in a 1 gallon pot, which will still be too small for them. They will have survived only by daily extra waterings at the wholesale nursery, that is the only way their confined roots were able to get enough water to stay alive. You can cut away and tease the roots before planting but that will not solve the problem that the overall area of soil covered by the roots is not sufficient to support the top growth of the plant without additional care and you will essentially have to give it supplemental watering for the remainder of the year or risk it dying, especially if it ever gets hot and dry where you live. The spread of roots in a potted plant is measured in inches, the spread of roots in a soil grown plant is measured in feet.
I ran into this problem in a big way this summer with some rudbeckia I bought from Lowes. Not faulting Lowes or anything but they were so incredibly root bound they had to likely been getting watered multiple times a day to survive, and so when I planted them, and when I even continued to water them, they still keeled over. For many plants having them grow all year in a small container and then selling them once they bloom is not going to produce a healthy result in your garden.
Have you ever purchased a tree from a nursery and had a hard time wrapping your head around how so much tree can be supported by so little pot? Daily supplemental watering and fertilizer. Which is fine if you’re planting this tree near a hose, but trees are often planted in the far reaches of our yards or property and what then? Death by dehydration. However if you purchased a smaller tree, earlier in the season, this might not be as large of a problem. Additionally this is why people say “fall is for planting.” By planting trees in the fall you’re giving them time to get their roots established and spread out more before the introduction of summer heat.
Still, no matter what, a seed grown plant or tree will probably always be more vigorous than a container grown one, and one that is transplanted when small will be more vigorous than one that is transplanted when large. We all want instant gratification, so it may take a leap of faith to go with something smaller, however I can almost guarantee it will eventually catch up.
That being said, there is a virtue of buying larger plants and trees – they’re harder for deer to kill outright.
Propagating Plants with Cuttings
November 21st, 2019I have had only very limited success in years past propagating plants from cuttings. It is something I always wanted to do, but was the one aspect of gardening I failed at, time and again.
In Michigan I really did not have a good setup. Very few windows with nice light, and cats all over the house. Before moving to Tennessee I took a lot of cuttings of bushes I would want for my new property and put them in trays and put them outside in the shade with humidity domes and they all rotted eventually.
Here I have tried it a few times. Rooting in water then transplanting, rooting in soil with bag or something over it as a humidity dome, rooting in a tray again with a humidity dome, rooting in a tray with rock wool plugs and a vented dome. I had a lot of failures. Some things worked in water, sweet potatoes, etc. But most did not. The rock wool plugs and dome worked okay, until everything inside rotted. Some things had rooted, but they rotted anyways. I had the dome on, and sealed, for a couple weeks, opened it to check on things, looked good, so I vented it and put it back on, and in two days mold on everything.
I feel like a rooting medium really is best, not just water. Roots are lazy, if they get everything they need right outside the front door they aren’t going to walk around the block and look for things. So for many plants rooting in water will not work because the water and any nutrients are too readily available. This is also why you should water containers deeply and let them dry out between waterings. Otherwise (and again, this is species specific, there are exceptions) plants will only put roots in the top part of the soil because they’re able to get everything they need from there without growing deeper. This is also why bottoms up watering systems work so well.
But for me, getting the humidity just right so that the plant survives long enough to put out roots while not rotting has been the major challenge… until now.
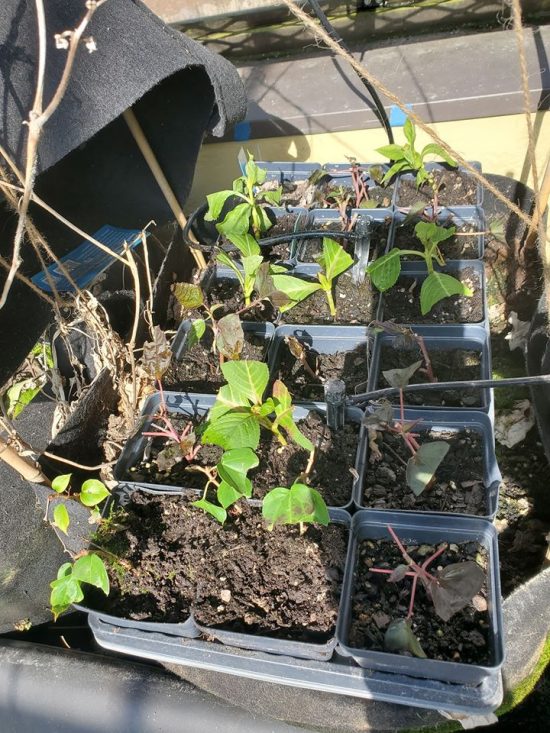
I’m blessed to have a greenhouse, a real legit one, climate controlled, automatic venting, etc. It is humid and super damp inside, but there is good airflow because of fans. So what I finally figured out is if I just plant cuttings in potting mix (sand might be better, but potting mix is working fine) and do not use a dome, they do fine, they get sufficient humidity just from being in there. My cutting success rate now seems to be close to 80%, which is way better than 0%.
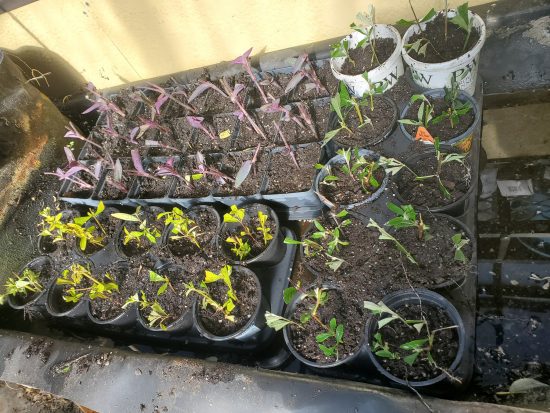
I’ve been doing some hardy hibiscus and buddleia and hydrangeas and some other things such as shrubs for hedges and am having pretty good success. I go in once a day, most days, and mist the cuttings with a spray bottle and they have been tied into my automatic watering system and things are going well. I have a giant property and this will allow me to get the volume of plants I need to landscape it all without breaking the bank.
One strategy I’ve adopted is to place multiple cuttings in each little pot. This way if I do have failures odds are I’ll still end up with something growing in that pot – and if all 3 or 4 succeed I can always thin out the weakest.
Growing Petunias Indoors
January 30th, 2019I have a pretty neat house, and one of my favorite features is a giant skylight over a stairwell. I’ve wanted to grow flowers in window boxes around those stairs, and it gets essentially full sun despite being indoors, however there are a couple caveats in that I have to use window boxes with no drainage (because it would drain on to my steps below).
I previously blogged about my indoor gardening when I posted about growing Morning Glory indoors… that experiment ultimately did not work out like I had hoped. The morning glories grew but they were not as vigorous or floriferous as I would have liked, then they started to decline. I also have tried jasmine, which didn’t really flourish in my window boxes with no drainage, and I’ve tried begonias, which are doing well but drop too much plant litter for my taste.

Because I am growing these things in window boxes indoors over living space I had to close all the drainage holes in the boxes. There are other ways I could have handled this such as by using an insert and backfilling with rock so the insert drained into the window box (which I would have still closed up). But doing so would have significantly reduced the amount of soil for the roots of the plants and I ended up deciding on giving the plants more space for their roots rather than drainage. I do not think my watering regime is keeping it too swampy in the bottom of the containers but perhaps the morning glory simply did not like it.
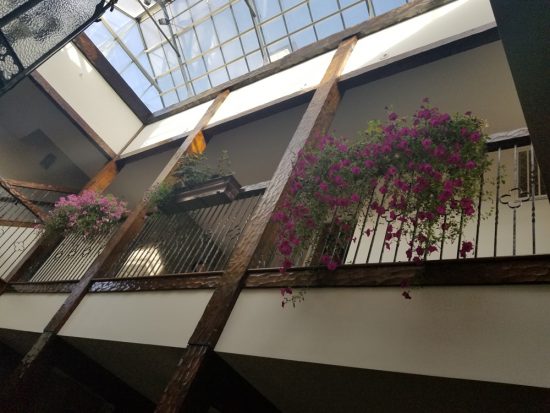
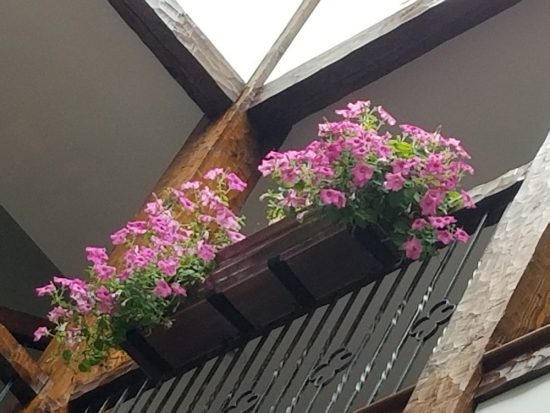
So I’ve switched. I planted jasmine in two of the containers, along with petunias. The jasmine was doing fine though there was some initial transplant discomfort, then it got glossy green, now it has declined, it just wasn’t a happy plant. The petunias though, they have taken off, they’re doing really well. I bought “wave petunias” and they’re cascading down into the stairwell with dozens and dozens of blossoms. I give each window box about a quart of water a day and that seems sufficient to keep things in good health. This is the look I was hoping I would get with the morning glories, but live and learn.
It is now almost February and they are still going strong. They need a little pruning (which is going to make a mess) and they’re blooming less with the shorter days I surmise, but they seem very healthy. I’m sure by now they’re fairly rootbound but must not mind. I think I will be able to keep petunias growing in these window boxes quite long term.
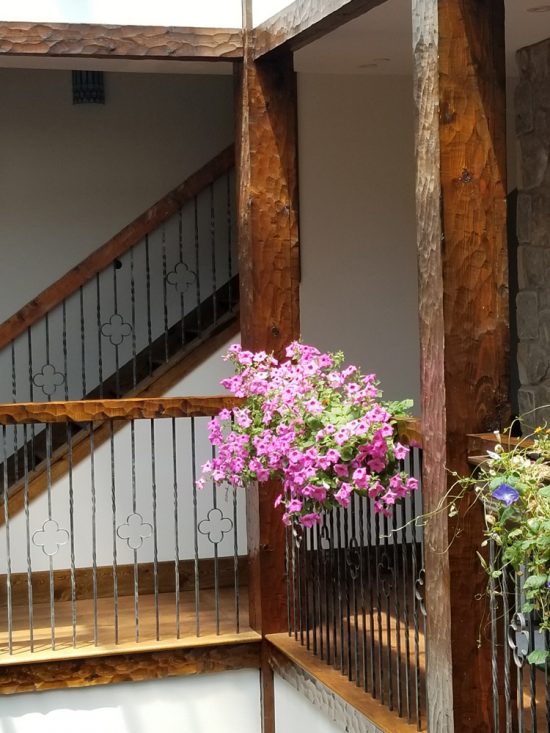
The pink ones I really like, they were labeled a Wave Petunia and bought at Home Depot. The purple ones were also labeled a Wave Petunia and bought at Ace, they got more leggy, longer trailing, which can seem attractive, but also less densely flowered. One of my main goals was to perfume the house with the scent of flowers but none of these petunias are very fragrant. I have some new Scentsation petunia seeds on order that I plan to use and I will probably swap out the purple petunias and the middle planter where I had experimented with begonias for these new fragrant ones.
Using Sunflowers to Christen a New Perennial Bed
April 22nd, 2018I’m pretty excited, the last bit of construction on my house is finally done and we’ve moved into landscaping and cleanup mode and that means gardening.
I have ambitious plans and I know it will take me years to fully develop the garden beds I have in mind but I cannot wait to get started.
But, then there is the soil. I’ve got pretty hard red clay type stuff, fill dirt, it’s been compressed by construction activity for years, I can hardly even dig into it. It’s the kind of soil you need to take a mattock to. So we top dress it with a layer of cached topsoil, and then I had some really nice black dirt I had brought in, but still, some inches down, there it is, the crap soil. And this is typical in most new construction. A few inches of top soil over fill dirt. Some of these beds I’ve managed to do more than a few inches but it will still not be ideal.
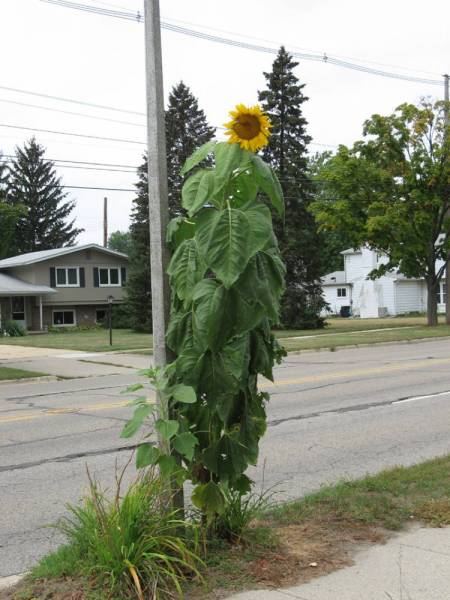
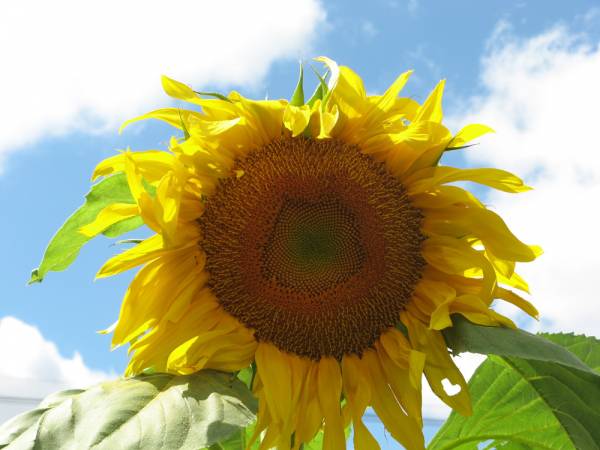
So yesterday, after the guys were done spreading the soil where I wanted it, and in advance of the rain we will get today and tomorrow, I planted around 100 sunflowers, mammoth ones.
I don’t have a picture, and its just dirt anyway, so here, have a picture of one I grew years ago.
See, as I discussed previously in this other blog post on root depth, one of the best ways to improve your soil is to plant things with long and deep root systems. These roots will penetrate into the soil, even the subsoil, providing a channel for water infiltration and creating organic matter down there over time. Deeply rooted plants are also less susceptible to drought.
What if you’re not aiming for permanent plantings yet though? You don’t want to create a mess of deeply rooted shrubs or perennials that you’ll have to dig up. The best thing is something that will grow, and produce a large root system, and then die. So, my idea, is to use sunflowers.
Sunflowers are heavy feeders, which means they will take a lot of nutrients from the soil, so there is a tradeoff here, but I do not care about that as much. I can always fertilize and add nutrients back into the soil. I’m looking for something to improve soil structure and performance. I also wouldn’t do this in a vegetable bed where it will be dug or tilled on an annual basis. This is for a perennial bed where I will not be digging in unless I’m removing a plant or adding one.
Have you ever tried to uproot a sunflower? It is nearly impossible because of their long tap roots that can reach 5 feet down. I don’t know if they’re as strong as a daikon radish, which is another good plant for this objective, which exudes hundreds of pounds of force with it’s taproot and so I assume is able to penetrate my hard clay, but I’ll find out.
I don’t fully know if this will be successful, mostly because of critters. Everything loves to eat sunflowers and I am surrounded by forest out here, where I’m planting them is not fenced. If the critters do not get at them though I will be able to enjoy their blooms from my pool deck, I will get a copious amount of seeds to feed to the chickens I plan on getting, and I will have used the power of nature to break up my subsoil allowing future plantings to do better.
Growing Morning Glory Indoors
February 14th, 2018All of my adult life because of a combination of kids, cats, and poorly placed windows, I’ve been severely limited in my ability to grow plants indoors. First I had an apartment, with little room, and I didn’t know as much then as I do now. I had a patio garden and some hanging pots of pothos near my patio sliding door, but not much else.
Then I had a house, and I gardened the hell out of that house. Most of the pictures on my blog are from that house, but it was outdoor gardening. It did not have a single south facing window, not a single one. No deep window sills for plants. We did an addition off the back and I had a deep window sill added there, but it was just one, and not big enough for a large potted plant, 8 inch pots tops. I lived there for 13 years.
Then we moved to Tennessee and lived in a rental a couple years while we built. I had a few more windows and more natural light but with a baby and the cats and the transient nature of the place I didn’t do much.
But now, now I have my forever home, that I designed… and while in some sections of the house I intentionally do not have many windows, in others I do, huge windows, deep window sills, a greenhouse, and…. in the middle of the house…. over the stairs…. a skylight. And not just any skylight, a 22×11 skylight. This thing is a beast of natural light, it filters down to the first floor. 30 feet-ish below the skylight apex I have my amorphophallus titanum in a small pot, the cats and kids don’t bother it though I worry. More like 35-40 ish feet below the skylight and off to the side I have a ginger lily doing fine with just that filtered light. The potential for me to grow around this stairwell under the skylight is very high, and stratified. Shade plants do well on the bottom levels, but sun lovers can do well at the top, because the third floor right under the skylight is super bright and gets a good quantity of direct sunlight. There is a spot or two where a large potted tropical tree would go nicely, but I need the pot, and the tree, and to be fully moved in and not unpacking and whatnot. It will take me awhile to fully take advantage of all the great locations for me to grow in this house… and I haven’t even mentioned the greenhouse.
I love the idea of beautiful fragrant flowers growing indoors, having little experience with indoor plants thus far I know I have learning to do. I want to explore trying to grow Gardenias as I hear they are very fragrant, but finicky indoors, so I say trying. Right now though I am working on morning glories.
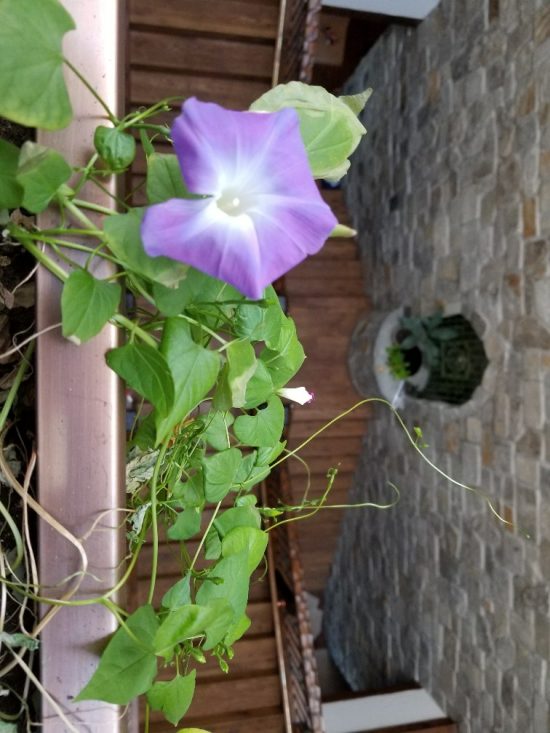
So a stairwell has a lot of vertical height right? What better place for a trailing vine plant? I’ve always loved the classic morning glory appearance so I am growing those, and it works. Some years ago my parents got me a nice copper planter, a 4′ window box, and I never had anywhere to put it. I tried at one point to mount it on my old house but turns out my house sheathing at that place wasn’t strong enough to support the box. Then I realized, you know? I could put it indoors on my railing around the stairwell, and what a great place to grow morning glories.
So, I did this. And I’ve proved it’ll work I have some morning glories potted and blooming, even though I’ve been barely watering them (apparently they tolerate drought well, who knew). I’ve been barely watering them because apparently the window box leaks so a couple days ago I had to de-pot everything, clean the box out, and apply FlexSeal to hopefully make it water tight (it was dripping down on to my stairs every time I watered). A window box with a tray would be better, but that is not what I have.
I am excited that it worked though. I can just envision in a couple months having a very healthy drape of morning glory showing off in my central stairwell. Now I just need to think what else I want to plant, ideally something fragrant.
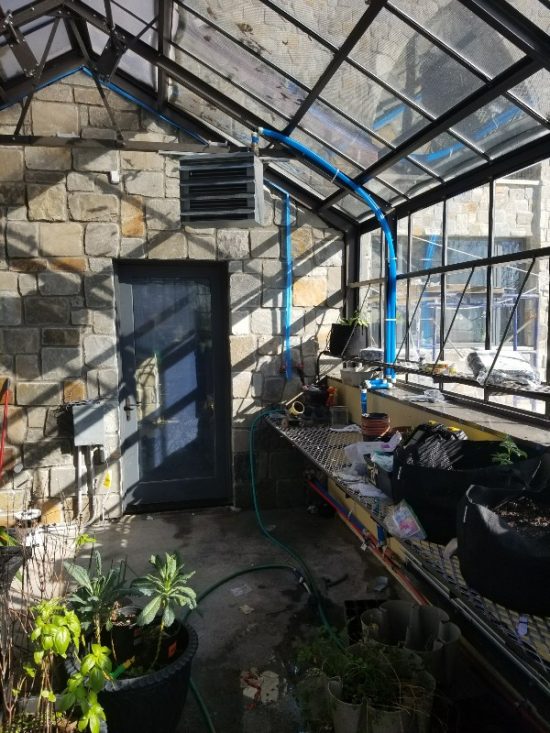
How to heat a greenhouse
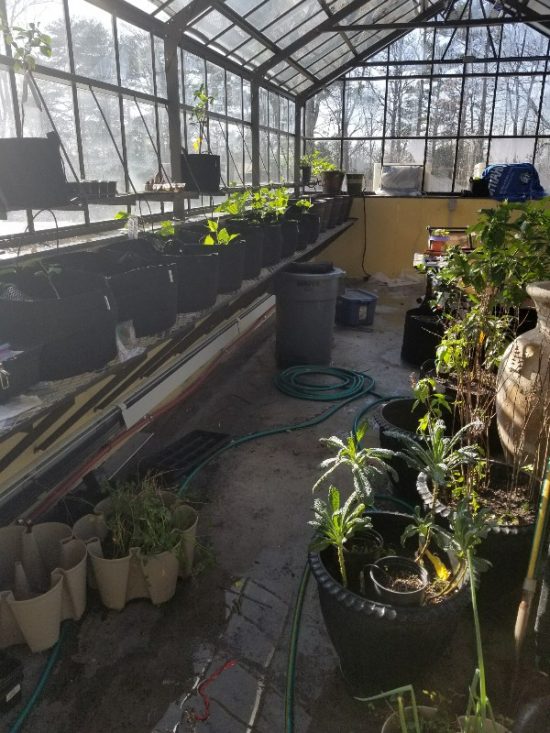
December 18th, 2017So I’ve planted my greenhouse and I have things growing. I do not yet have my automatic watering system setup yet, I have drip irrigation run to about half of it, but it isn’t automated. The humidity stays so nice and high in there though that watering needs haven’t been too bad.
I planted some morning glories for color and interest, beans, beets, cabbage, kale, sweet potatoes, lettuce, spinach, purslane, sugarsnap peas, peppers, some herbs, and I also have some citrus trees growing. A blood orange, a tangerine, a lemon, and a lime. Plus an avocado tree I started from the pit.
The veggies are mostly cool weather crops, but the citrus needs warmth, and I have been worried about maintaining the heat in my greenhouse at a minimum of 50 degrees lately. We had some cold weather here in Chattanooga and I’m up on a mountain.
So originally I was going to do a heated floor in my greenhouse, and I guess I could have. I was going to do it all through my first floor. Radiant heat like that is supposed to be so nice and efficient, but it became a cost problem. Essentially I would have to put in two systems, one for heating, one of cooling, which increases the overall expense. I would also need to invest in a concrete subfloor for my 1st floor (which is above a basement) which is a whole lot more expensive than osb. So I kicked that plan to the curb earlier on. I thought I would put a wood stove in my greenhouse where I could just start a fire on the coldest nights. That would be doable, but I cut that as well. The chimneys and all that were adding to my cost, though in retrospect it may have still been economical. Our plan for the house changes to be a zoned split system that pumped refrigerant around to air handlers, I could have put a dedicated air handler for that in the greenhouse but each zone was quite expensive. Then I thought I would get a propane boiler (we don’t have natural gas) to do my hot water and I could do a side system off that to heat the greenhouse with a radiant baseboard, and that was the plan for awhile, but then we kicked that to the curb as well and just got a straight propane water heater (well, 2 of them). But in the meantime the refrigerant plan with the HVAC went away and now our HVAC system works similarly only it sends hot and cold water, so I could have used radiant pipes in the floor had I not already poured the slab….
So what I did was install a radiant baseboard that was connected to hvac system. It wasn’t cheap, over a grand in materials plus labor. And you know what it provided? Next to no heat, 1000 BTUs or something an hour. That is nothing. The problem is radiant heat is meant to work off a boiler, off water 180 degrees+, my hvac system uses water more like at 120 degrees or less. This wasn’t producing the heat. The baseboard helped, but was not able to keep up.
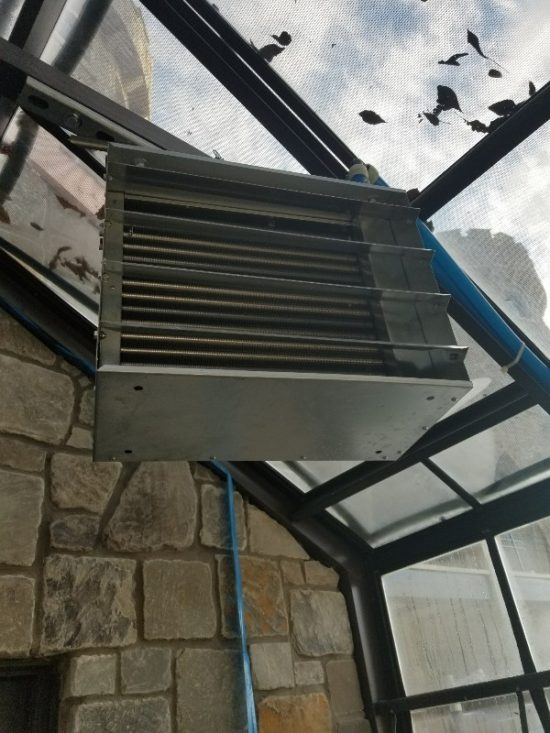
Then I stumbled upon this really cheap hydronic (that is, using water) air handler on eBay (I think I searched for greenhouse heater). For like $200 I got a 100,000 btu air handler that is hung from the greenhouse superstructure. I wish I had known this thing existed before. It isn’t pretty, and I don’t imagine the fan is that efficient, but it works great so far for my greenhouse. For the baseboards I already had the hot water lines run so it was just a T and 7 feet of pipe to hook up this thing. It comes on if temperatures drop to 50 or below and produces a good volume of warm air while also providing circulation. I would have saved quite a bit of money had I known about this thing in the past. Apparently it is also good for garages and warehouses.
I have a pretty high end and insulated greenhouse. The foundation is insulated concrete forms, the glass is insulated low E stuff, it doesn’t need much heating, especially if it gets sunny. But on the nights after days where the sun is never seen it does need help, and this apparently will do the job.
Harvesting Sweet Potatoes
November 17th, 2017I am finally moved into my new house after years of construction (its still not done and we’re at more than 2 and a half years since breaking ground) and even more years of planning, and hopefully soon I can get back into my garden more frequently now. Being without a proper garden all this time has been hard on me. I had then put up this garden I think 2 years ago now, but not living up at our build site I couldn’t really deal with it.
So I mostly grew weeds, and some tomatoes, and some other things, but mostly weeds. This year was worst than last year. Last year I actually managed to come up more and do some weeding, and there was also a drought. This year there was plentiful rain and I had less opportunity to come up and deal with weeds. I settled for simply putting plastic straight over some large sections of the garden to kill the weeds but they just grew out of control in other sections or too big for the plastic treatment (my garden is 5000 sq/ft, it is a lot to handle 15 minutes at a time). The weeds grew taller than me because of all the rain, and most regretfully they were able to go to seed before I could do anything like kill them or till them under. I hate it when this happens, allowing a weed to go to seed is a cardinal sin of gardening. I fear next year I will have it even worse.
Right now my plan for next year is to landscape fabric the whole entire thing, and poke holes for planting. That is the only thing I think will truly allow me to get a handle on my weed situation.
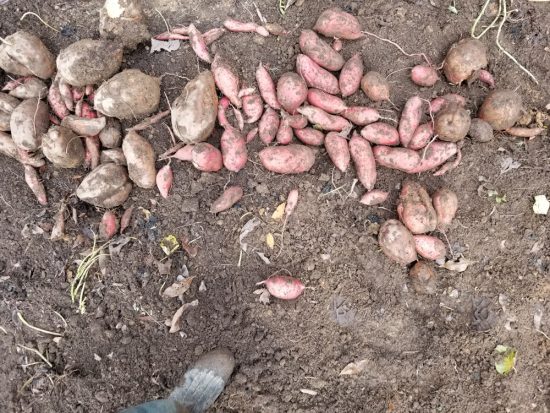
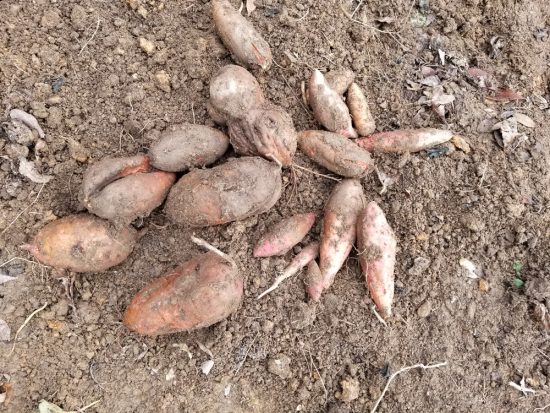
The only thing that truly grew well for me was sweet potatoes. I planted I think 25 sweet potato slips. I had tilled the section and then immediately planted the sweet potatoes and thanks to the regular rains and hot humid weather they were able to grow enough to shade out most weeds in that area. I still got some tomatoes, not as much as last year, and some peppers, some beans, and the kale is out there still growing strong enjoying the colder weather, but I got so, many, sweet, potatoes.
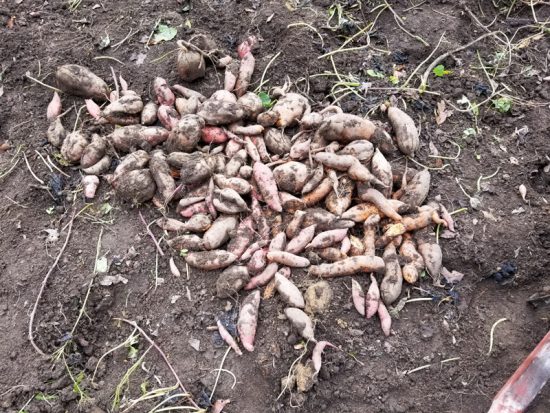
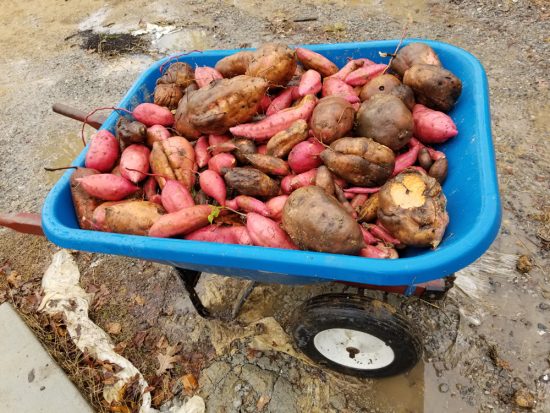
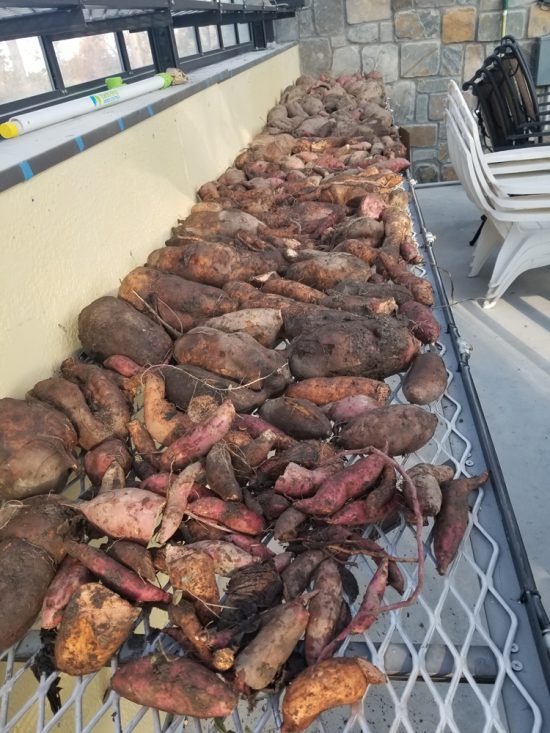
This was my first time successfully growing them, I had tried a few times in the past without much luck (but often in Michigan where they aren’t well suited, here now in Tennessee it is a different story). I got I think 300 pounds of them. I completed filled a large two wheeled wheelbarrow and, despite being quite a strong man, could barely move it. They have been curing a week and a half in my greenhouse (it gets cooler at night but is otherwise the only room I have that can get up to 90+ during the day which is what sweet potatoes need I’m told). I’ve lost a few to rot, likely already rotting before harvest. I’m also sure I missed some still out in the dirt. They are supposed to cure for 2 weeks then go somewhere into long term storage (still dry and relatively warm), so I haven’t tried any yet. But sweet potato casserole is calling come Thanksgiving.
So once the curing is done my family could eat a pound a day and have them last nearly a year. I never really felt like I could truly feed my family off my land until now. But now I think that my garden is capable of providing enough food for that (plus all of my fruit trees and whatnot) and add in hunting in our forest I think we could really live off the land. Not that we need to in our modern society, but there is something primally rewarding about the notion that it could be done.
In furtherance of that belief I am trying to maintain my sweet potatoes. One tuber I dug up still had small plants attached to it, so this one is already potted up in my greenhouse. There were also many small potatoes I found that won’t be great for eating but I have them half submerged in cups of water to generate more slips. If I can get slips off of these I will plant them (I also bought a 200 gallon fabric pot for my greenhouse for my winter sweet potato patch), and experiment with growing sweet potatoes year round. I don’t much want to be able to generate a large harvest here in my greenhouse, it would be nice but I’m realistic about it. My main goal is to just make sure I have live sweet potato plant material come late spring so I don’t have to order slips or make my own off a store bought sweet potato. I want to have a greenhouse full of sweet potato vines I can divide and root and transplant out in the garden, not just little slips, but healthier larger vine segments, “super slips” if you will, to get a start on the next season and provide the missing link in true self sufficiency. I would like to thus prove to myself that if cut off from the rest of society I could continue to grow these perpetually with my setup.
I will let you know how it goes. I also just learned that sweet potato greens are edible and nutritious, so I might nibble on those over the winter as well.
My biggest concern, both with my curing and my overwintering, is the temperature swings in my greenhouse. It gets up to 95 or 100 degrees if the sun is shining, but at night it can drop to 60. It has a heater but the heater is not capable of keeping it very warm at night. Humidity is no problem. So I’m not sure if this is going to consistently provide the summer mimic temperatures for the potatoes to thrive or if it will be too cold at night. I’m also not sure what the swinging temperature will do to my curing process. This will be an experiment for sure.
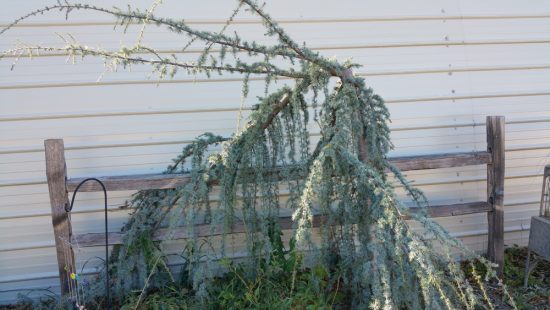
Weeping Blue Atlas Cedar, Cedrus atlantic ‘Glauca Pendula’
May 4th, 2017I’ve been pining after a weeping blue atlas cedar Cedrus atlantic ‘Glauca Pendula’ since I first saw it on Paul James’ Gardening by the Yard way back when. It is hard to put into words what I like about it, or all the cedrus. I remember it being one of Paul’s favorite trees so maybe his enthusiasm rubbed off on me a little bit.
Overall I enjoy this species because of how the needles are presented, maybe. The needles are not long like a pine, nor do they fully cover the branches, like a spruce. Instead they are held in tufts, and this leaves a large amount of the structure exposed which then allows you to appreciate the architectural nature of the trunk and branches. The weeping form of course has very interesting structure. Left to it’s own devices, like many weeping plants, it would grow prostrate along the ground, the wood cannot support the foliage or itself until it is several years old so it requires training as it grows, training into whatever interesting shape you want, and then the side branches will all droop down like old moss clinging to something, it always evokes a prehistoric feeling in me.
So when I lived in Michigan I couldn’t grow this. I had seen some people try to make it work, with a microclimate, but even the one nursery nearby that sold any recommended against it (and said they sometimes would lose inventory to the cold). Hardy to zone 6, they just weren’t going to cut it in zone 5 where I lived. But now I live in Tennessee, zone 7, and it was high on my list when I moved down here. I finally saw one at a Lowes and picked it up.
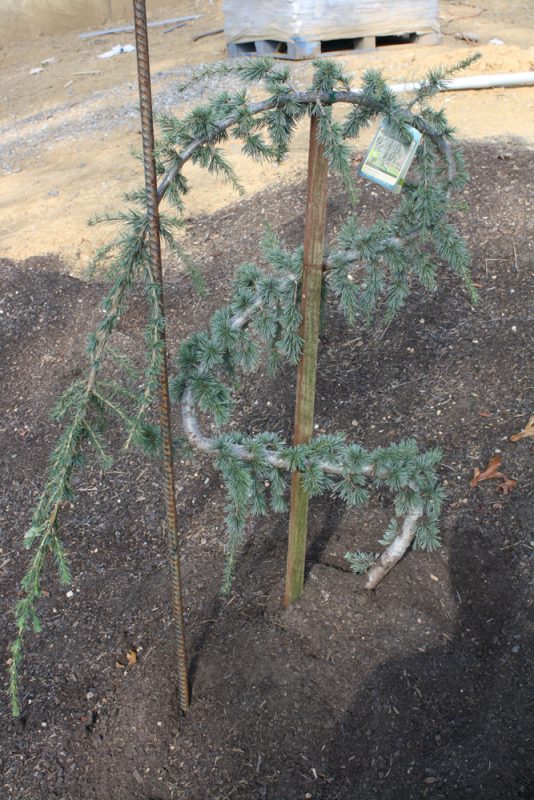
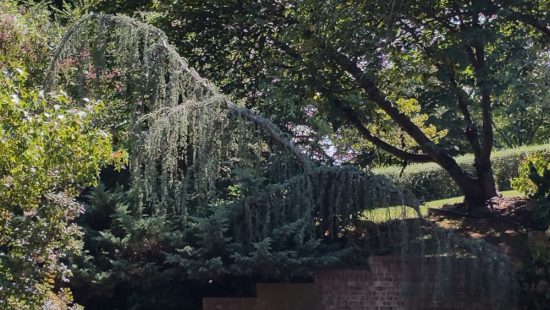
I planted this on a berm near the driveway of my future (under construction) house. Right now I just want it to get established, which is hard because my little corner of the world is (was) having an epic drought. Eventually I will figure out how I want to train it. They get really pretty when they get big, you can make an archway, or like a big leaning dinosaur like thing. They’re just very architectural with their branching.
The below picture is a good example of a smaller tree.
Then this picture is a good “creeping dinosaur” example of a mature tree.
Great Flowering Groundcover: Homestead Purple Verbena canadensis
April 27th, 2017I have always liked flowering groundcovers, something about a carpet of blossoms just does it for me. Plus the more ground covers I have, the less mulch I have to buy.
When I lived in Michigan my go to was creeping phlox, which I had planted all over my yard like in the below photo. It spread reliably though not super fast, bloomed like mad in the Spring, and the foliage was not unattractive… and yet it bloomed like mad in the Spring only, no other time.
Creeping Phlox Emerald Blue, Back Garden
Now that I live in the South I still like creeping phlox, and I drive by this home regular that has a whole front slope covered in it and it looks great, but I’ve been trying to get it going and not having as much luck. Meanwhile, I’ve discovered verbena, something not hardy up in Michigan. I can buy it down here at Lowes for 5 or 6 bucks for a gallon pot, less when it’s on sale. I recall buying maybe a 3 inch pot last year for maybe $2.
So I planted this one solitary plant late last summer. I spent all summer trying to find it, I had read about verbena, thinking it was the plant for me (even deer resistant! which is important, because organic free range venison has been getting all up in my business), and couldn’t find it, mail order nurseries were all sold out, then I go to Lowes one day and boom, trays and trays of it. I buy one I think, to give it a try. I planted it early last Fall, witness below:
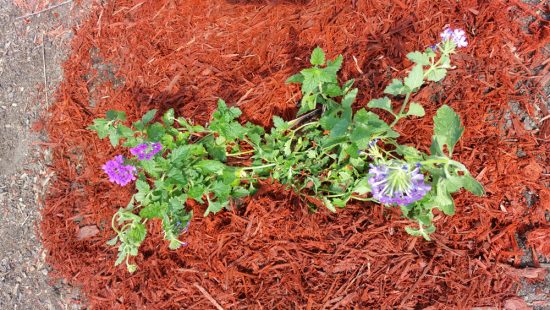
Newly planted Homestead Verbena
Cute, but small, yes? Not really florific yes?
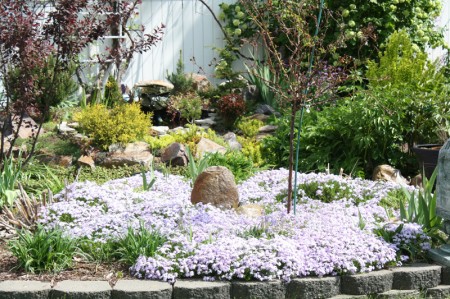
We had a drought late last year, really really bad, extreme on the USDA drought map, many of the plants I planted alongside this verbena did not make it (I planted it where I’m building a house, not where I’m living, and so it wasn’t able to get reliably watered). The verbena not only survived that drought, it thrived. Winter came, then here, in Spring, look what this plant has done:
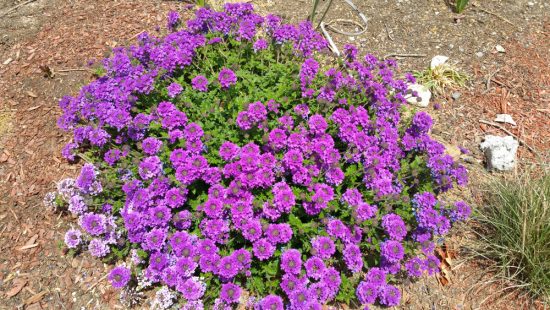
That is the same verbena, two seasons later, not two growing seasons later, two seasons, call it 6 months. It did that in 6 months. And those flowers, and they’re still blooming strong. That is why I think this will be my new favorite groundcover, it blooms from early April until November. My understanding is that the blooms will lessen later in the summer and I can deadhead or cut back to encourage more heavy bloom flushes, but still, blooming at all for that long of time, and drought resistant, and deer resistant. Sign me up. It is taller than creeping phlox, getting up to 8 inches or so in height.
I like this so much I planted a bunch at my business too, and bought more for the slope where this first test went, and I think I will get more still.
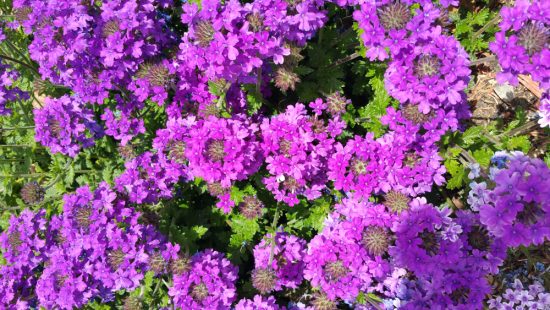
The plant will spread, which of course you want it to do as a ground cover, rooting where it comes in contact with the soil, and it is also easily propagated from cuttings. It needs sun for flowering, the more full the sun the better.
Blog Categories
- Critters & Creatures (20)
- Gardening (222)
- Edible Gardening (60)
- Plant Profiles (32)
- Planting Ideas (40)
- Troubleshooting (48)
- Gardening Coupons & Deals (13)
- Greenhouse Gardening (4)
- Landscape Design (22)
- Pictures (8)
- Reviews (2)
- Videos (5)
Recent Forum Posts 
| Thread Title | Replies |
| Looking for electronics recycling c... | 1 |
| hi | 0 |
| savetiktok | 1 |
| Hello all | 0 |
| Онлай... | 0 |
| Hello all | 0 |
| Introduction | 1 |
| Thuja Green Giant | 0 |
| write my philosophy paper for me | 0 |
| I am looking for some advice. | 4 |
|
Members: 3191 | Posts: 3764 Come Join the Discussion Today! |
|
Site Categories
Archives
- December 2020
- December 2019
- November 2019
- January 2019
- April 2018
- February 2018
- December 2017
- November 2017
- May 2017
- April 2017
- September 2016
- July 2016
- June 2016
- April 2016
- March 2016
- February 2016
- December 2015
- November 2015
- September 2015
- June 2015
- May 2015
- April 2015
- January 2015
- December 2014
- November 2014
- October 2014
- September 2014
- July 2014
- June 2014
- March 2014
- February 2014
- December 2013
- November 2013
- September 2013
- July 2013
- June 2013
- May 2013
- April 2013
- January 2013
- December 2012
- November 2012
- October 2012
- August 2012
- July 2012
- June 2012
- April 2012
- March 2012
- February 2012
- October 2011
- September 2011
- August 2011
- July 2011
- June 2011
- May 2011
- April 2011
- January 2011
- December 2010
- October 2010
- September 2010
- August 2010
- July 2010
- June 2010
- May 2010
- April 2010
- March 2010
- February 2010
- January 2010
- December 2009
- October 2009
- July 2009
- June 2009
- May 2009
- April 2009
- March 2009
- January 2009
- December 2008
- November 2008
- October 2008
- September 2008
- August 2008
- July 2008
- June 2008
- May 2008
- April 2008
- February 2008
- January 2008
- November 2007
- October 2007
- September 2007
- August 2007
- July 2007
- June 2007
- May 2007
- April 2007
- March 2007
- February 2007
- November 2006
- October 2006
- September 2006
- August 2006
- July 2006
- June 2006
- May 2006
- April 2006
- March 2006
- February 2006
- January 2006
- December 2005
- November 2005