
How to Grow Black-Eyed Peas
Days to germination: 5 to 8 days
Days to harvest: 85 to 100 days
Light requirements: Light shading
Water requirements: When weather is dry
Soil: Sandy and well-draining soil
Container: Suitable
Introduction
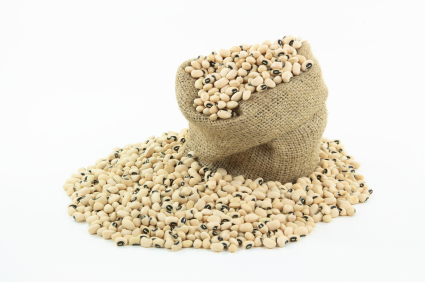
The little black spot on an otherwise white bean gives the black-eyed pea it’s name, though it is also commonly called a cowpea. The black and white variety is the most popular form of black-eyed pea but there are actually other types as well. Some have pink or purple “eyes”, and the crowder variety has black peas.
As with most other peas and beans, you can get both bush and vining types (also called determinate and indeterminate varieties). Big Boy is one popular bush type, and most crowder peas are also compact bush plants.
The black-eyed pea is better suited for dry hot climates than other legumes, and it’s a more common crop around the southern United States than in the north. In the south, it’s considered good luck to eat black-eyed peas on New Year’s Day. They are also an important food crop throughout Africa, which is where the plant originates from.
The peas are loaded with protein, fiber, iron, calcium and even some vitamin A. They’re never eaten uncooked, mainly because they are dried at harvest.
Starting from Seed
Most gardeners don’t start their seedlings indoors as they don’t transplant all that successfully. Just sow your seeds out into the garden after your last frost date.
Though your plants will love the heat, they don’t actually love the bright sun. Try to plant your black-eyed peas in a part of the garden that is somewhat protected from the high sun of the afternoon. If they are in full sun, just water more often.
To help your plants get a good start, you can use an inoculant designed to naturally help peas and beans fix their nitrogen. Try to get inoculant specific for black-eyed peas (also labeled as cowpea inoculant), rather than the inoculant used for other types of beans. It’s a powder that gets mixed into the soil when you plant your seeds.
Sow your pea seed in rows, about 4 inches apart. You can also plant more closely, and thin out the sprouts later on. Peas should be planted about an inch and a half under the soil and kept moist until they’ve germinated.
If you are growing indeterminate plants (the kind that vines), you will want t provide some support to keep the vines off the ground. It’s better if you install a trellis or poles at the same time you plant the seeds or you may damage the plants if you try to put something up later on.
Growing Instructions
As long as you are getting regular rainfall, you shouldn’t need to water your plants very often. When they are dry, give them regular waterings without soaking them each time. Frequent and light watering is better.
The black-eyed pea can create its own nitrogen under the soil, so be careful not to provide any high-nitrogen fertilizer during the growing season. If using manure, it must be well-aged for this same reason.
Containers
If you are going to grow black-eyed peas in a container, you should stick to bush varieties and your pots should be around 12-inches deep with very good drainage.
Soil in a container will dry out faster than outside garden soil, but you still want to make sure you are not over-watering your plants. Only water when the soil has dried to the touch.
A bush type of pea should be able to support itself, but you will need a trellis or stakes for any potted vines. To keep your supports from being too heavy for the pot, and tipping it over, you should secure them to the ground or a wall rather than just in the container itself.
Pests and Diseases
One of the most common problems with black-eyed peas are root-knot nematodes that attack the roots and can go undetected if you are not carefully watching your plants. When your plants stop growing and start to suffer for no apparent reason, dig one up and see if the roots have swellings or knots. There is no treatment, and you should dig up the effected plants immediately to prevent spreading. Plant your black-eyed peas elsewhere next year, or try nematode resistant varieties.
Bean mosaic virus can also strike your peas, but again there are resistant varieties that you can grow so that you don’t have to worry about it. If your plants aren’t resistant, make sure to keep the aphids away as they spread the disease.
Aside from plant diseases, many insects can wreak havoc on black-eyed pea leaves. Various leaf-eating insects need to be removed as soon as you find any, such as bean beetles, all kinds of caterpillars and grubs, grasshoppers and others. If you pick them off yourself, that is usually sufficient but larger insect populations may need pesticide sprays.
Harvest and Storage
You’ll be harvesting your black-eyed peas only once the pods and peas have thoroughly dried. Wet weather at maturity can (and will) keep your peas from drying and risk mold damage. If the weather is not suitable, pick all the pods and bring them indoors for their drying period. Left on the vine is best, so only do this if necessary.
Spread the pods out where they won’t be disturbed, in a warm area with good air movement. Whether dried inside or outdoors, they can be shelled out of their pods when the peas are hard enough that you can’t bite into them.
As long as the peas are completely dry, they will store for a long time without special conditions. Keep them in an air-tight container to keep out any insects or mice, and you will be able to keep using your peas for up to a year.
If you want a little harvest before your peas mature, the very young green pods are edible but they do get tough quickly. Pick a few very small ones for use in salad or a stir-fry.
April 15th, 2015 at 9:28 pm
Planting my first crop of BEP in a few days. The ground is wet, so I can’t do it now, but I am already excited. My son started two plants indoors in a container. Interested in seeing how this will go.
April 28th, 2015 at 6:05 pm
Ty, good luck with the BEP’s, I bet they turn out fine. My son, now 24 loved to help in the garden when he was young – during teenage years, he hated it – now out on his own, he plants a garden! I think the early start gardening helps develop a life long love.
I have not planted any BEP’s yet – like you it has been too wet – hope to plant the first rows this weekend. I have had some rain and my tank (pond) has caught about 6 feet of water. Will be enough to get me through the summer, even if I plant a large garden this year.
May 1st, 2015 at 7:04 am
Ty – it is also too wet here but I hope to plant the first rows this weekend. I hope your son’s experiment with containers works well. My son helped in the garden when he was young – hated it as a teenager – now out on his own with his on little garden. (:>)
May 1st, 2015 at 7:11 am
General garden update – very good rain over the past 2 weeks – over 4 inches. My tank (pond) that I pump water from to water the garden lacks about 2 feet being full – I can plant a big garden this year. Right now I have onions, potatoes, tomatoes, carrots, okra, squash, and zucchini. Will plant sweet potatoes, cantaloupe, and the first rows of BEP’s this weekend.
May 1st, 2015 at 7:18 am
For BEP’s, I have found it best to plant a couple of rows every 2 or 3 weeks as the summer progress’s. BEP’s will make very well for about 3 good picking’s, then slow down. By planting rows every 2 or 3 weeks, you can produce BEP’s all year without being overloaded by planting them all at the same time. I plant, tend, and pick – my wife shells, cooks, and freezes. Don’t want to overload her with too many at the same time!
May 7th, 2015 at 11:28 am
I am getting ready to plant my first little crop (backyard garden) of black-eyed peas and I don’t know if I put one (1) pea(s) or two (2) per hole. I am in South Florida and any help would be greatly appreciated.
May 7th, 2015 at 11:43 am
Ops, I forgot to click on subscribe to comments.
May 9th, 2015 at 10:15 pm
I am in zone 7b and will be starting BEP for the first time this year. My hubby does not like dried beans, hoping he will enjoy fresh ones more. How sturdy of a trellis do I need for the BEPs? Could I plant them with corn and allow the stalks to act as a natural trellis?
May 12th, 2015 at 11:40 am
Planted 10 rows of BEP’s on May 4th and 5th. They were ‘peaking’ up on May 10th. I have been asked where I get the BEP seed. Don’t laugh – I just by dried BEP’s at the grocery store. I plant them pretty thick, 8-10 seeds per foot, then thin them back to about 3 to 4 plants per foot.
May 18th, 2015 at 7:03 am
Hi, enjoyed your posts. It’s too wet to plant right now, waiting until I can get into the field. Do you use supports for your BEP’s?
May 23rd, 2015 at 6:59 am
Sara, I agree with your hubby, dried BEP’s are just bad. I bet he will like fresh ones. My wife did not like BEP’s until we started growing them. They are best when first cooked, but you can freeze them also to enjoy after the growing season. I will re-post my wife’s recipe next.
Several years ago I put up post and string for a trellis. It was a waste of time and effort. I just let them grow by themselves. The plants support each other. You will have a few long vines, but not enough to justify the trouble of a trellis.
May 23rd, 2015 at 7:19 am
Kim’s (my wife’s) BEP’s recipe.
Put peas and snaps in a pressure cooker. Kim uses a 6 qt pressure cooker. Fill cooker about 1/2 full with peas and snaps. Add enough water to cover them by at least one inch. Add 1/2 package of bacon cut into one inch squares. Sounds strange but she does not add any seasoning, just the bacon. Cook on high temp until pressure cooker rocker / vent weight starts to jingle. Turn heat down to medium, cook for 30 minutes. Follow pressure cooker instructions for cooling down before opening cooker. Enjoy!
May 23rd, 2015 at 7:24 am
Ann, it is too wet here also, but after years of drought, I am not complaining. I do not use supports for the BEP’s. I plant two rows pretty close to each other, about one foot apart. The plants tend to support each other.
May 23rd, 2015 at 7:32 am
General garden update – planted so far, onions, carrots, potatoes, tomatoes, okra, squash, zucchini, cantaloupe, cucumbers, hot peppers, bell peppers, and of course black eye peas. My tank (pond) is FULL!
So far I have harvested onions, a few tomatoes, and just last night, our first red norland potatoes! I will plant more black eyes and squash after it dries up some.
May 27th, 2015 at 3:14 pm
BEP’s planted on May 4th and 5th are up. Four of the ten rows are weak, poor stand. I think they held too much water during the rains. Cantaloupe is also struggling. Everything else is in pretty good shape.
Really starting to harvest Red Norland potatoes. I dig a few every other day. Tomatoes are loading, have picked a few. I took off work for the next two days so I hope to get caught up in the garden with weeding and plant a few more rows of peas.
May 28th, 2015 at 6:06 pm
I am in Dallas area. My red potatoes are ready for harvest, thinking to plant BEP in there space. Have gotten 4 tomatoes, earliest ever. But it has been so wet and cool the plants are not doing so great, and not producing new small ones. Am interested to see how well BEP will do for me, never tried them. Have a quite small garden so never had room for them.
June 2nd, 2015 at 2:15 pm
WEEDS!!!, Wow – with all the rain, I have more weeds in the garden than I have ever had. Starting to dry out some now. Picked the first squash of the season yesterday. I do squash like I do BEP’s, plant a couple of rows every 2 or 3 weeks. Planted 2 more rows of squash yesterday. Plan to plant 4 more rows of peas this afternoon.
Of the 10 rows of peas I planted on May 4th and 5th, 6 of them are up good, will probably till up 4 rows and replant. Those 4 rows just held to much water. There are a few plants up, but not enough to fight the weeds. It will be easier to jus replant them.
June 22nd, 2015 at 12:48 pm
It has been a while since my last post. It was nice to see post from fatma Richards in the UK and Tricia in California back in early May. Good luck with BEP’s to both of y’all.
Tricia – I hope y’all get some rain, I know y’all need it. We finally got a really wet spring / early summer. My tank is full and the lake that supplies my community we from 9% full to 93% full! SWEET!
June 22nd, 2015 at 12:55 pm
Keith, Congrats on red potatoes and tomatoes. I bet BEP’s following your red potatoes will do fine. There is at least another month of planting time for BEP’s in our garden zone.
August 3rd, 2015 at 7:31 am
I have been picking from BEP rows planted May 4th and 5th. Have picked three times so far. Plants are still producing. NOTE: If you are in zone 7 or warmer, if you want a fall BEP crop, better get them planted this week! I planted 9 rows yesterday and hope to plant 5 or 6 more rows by the end of the week. I will also plant 2 rows of squash.
August 3rd, 2015 at 7:40 am
Garden tip of the day: Bending over to place garden seed can be tough on your back. Here is a simple solution. Get a piece of 1 inch PVC pipe cut about mid chest height. Use super glue to glue a funnel into the PVC pipe. Now just set the pipe bottom end where you want to plant the seed, and drop the seed into the funnel. Works perfect!
August 21st, 2015 at 9:43 pm
Am enjoying hearing about the different harvest stages y’all have done, all the way from immature pods to full fledged dry ones for dry peas. I got on here to see if anyone has this problem. I only planted about 5-6 seeds, and didn’t really know what to expect as I really planted them to shade the ground where the cucumber stalks needed it; kinda’ like a living mulch. Anyway, the plants are very healthy and producing well, considering I didn’t plant enough to get enough at one time. Anyway, the problem. Most of the pea pods are empty, except for one or two peas inside. Pod are 4-6 inches long and drying, yet fairly empty. BTW, these are pink-eyed, purple hulls. Thanks for any input or ideas. Tommy, I will use your idea about the PVC pipe AND will try to find a place to plant a few for fall. I’m in central Texas, zone 8.
August 29th, 2015 at 5:10 am
Buying the black eyes from the local grocery store in Orlando, in the dried pea and bean department, works very well. Legumes are economical and germinate well.
September 24th, 2015 at 10:08 pm
New to this blog. Tommy, thanks for your frequent posts. I am south of Los Angeles, the BEPs I planted in May next to my tomatoes have climbed the 7 feet tall tomato cages and are producing now , better than ever. The tomatoes have died by now. I planted more BEPs in the last 2 days, curious to see if they will succeed, so late. I got my seeds years ago at a grocery store in Cyprus. If you want I can send you some seeds to try to see if they are tastier than yours. When you say you planted squash I hope you don,t mean zuccini! The zuccini have only a small fraction of the nutrients of squash, I will try your wife,s recipe tomorrow.
January 3rd, 2016 at 1:30 pm
how tall do black eyed peas get?
January 26th, 2016 at 3:30 pm
I am having trouble posting, this is just a test post.
January 26th, 2016 at 3:36 pm
First I am sorry I did not post much after August last year. I had problems all year with grasshoppers. They ate everything. I pride myself in having an organic garden even though I do use some commercial fertilizer. Grasshopper got so bad, I could not believe it. I could walk in the garden and they here just jumping everywhere. I got so mad, I started picking whatever was ready, then I would spray the entire garden with liquid 7. I think it just made the grasshoppers mad, but I felt better! ????
January 26th, 2016 at 3:43 pm
I must tell everyone I live in Texas out in the country in a misquite tree pasture. We love it here but that means when there is a rash of grasshoppers in the pasture, they move towards my garden. I think the cool wet spring was perfect weather conditions for grasshoppers.
Anyway, I have recovered and I am looking forward to the new garden season. I also must say, I am retiring from work at the end of this month. Three more workdays! After 35 years, I think I am ready. With a full tank (pond) of water to pump from and plenty of time to garden, look out, I might post everyday!
January 26th, 2016 at 3:51 pm
Now for the first update of the new garden year, I will start planting onions this weekend. I planted some garlic a few weeks ago and it is starting to come up. I am going to try to mow a “buffer zone” around the garden. The yard / house is buffer on the east side of the garden. I will have to pick up branches and dig up cactus on the north and south sides then mow around and between trees. The west side of the garden area is pretty bare ground anyway. First grasshopper I see, I am getting out my shotgun! Ya’ll have a GREAT garden year.
February 4th, 2016 at 11:50 am
Well, it is official, last Friday was my last day at work. Fellow employees gave me a little retirement party. It was nice. Today is my 4th workday of retirement. I think I am going to enjoy this!!!
February 4th, 2016 at 11:57 am
Finished planting onion sets Tuesday. I planted a total of 40 bunches, mostly 1015 sweet yellows. I separate the onions and cull the small onions before I start planting. If the onion is smaller than a coffee stir straw, I cull it. I have found if you plant the real small onions, they will make but by the time you clean them to eat, they are just pearl to quarter size. Lots of trouble for not much onion. Conversely, the large onion sets are most likely to bolt (go to seed) but I still plant then and harvest as soon as I see any sign of bolting. They still make good salad munching onions.
February 4th, 2016 at 11:59 am
Next up will be spinich, I will plant a couple of small rows in about a week, followed by potatoes at the end of the month.
February 4th, 2016 at 12:04 pm
George, I hope you liked my wife’s BEP recipe. Yes, I plant mostly yellow straight neck squash. While I do usually plant a single short row of zucchini, it is not my favorite. I sometimes boil some yellow squash, zucchini, and onions. Salt and pepper to taste, makes a nice side dish.
February 4th, 2016 at 12:09 pm
Marcy, I am sorry, I cannot help with your question because I have never planted pink-eye purple hull BEP’s. Maybe someone else can help.
Did you try the PVC pipe and funnel suggestion?
February 4th, 2016 at 12:33 pm
Enough for today, I had better get in my afternoon nap????, I know this is a gardening blog but I must say, go Denver Broncos in the super bowl. Absolutely nothing against Carolina Panthers, I just want to see Payton Manning go out with a win. This will be his last shot, Cam Newton will have several more opportunities before his career is over.
February 9th, 2016 at 1:08 pm
Well Brancos won but if I were a betting man, I would go ahead and bet on the Panthers to win it next year. Don’t hold it against me but I am a huge Dallas Cowboys fan, but until Jerry Jones goes to the Super Bowl in the sky, the Cowboys will continue to disappoint their fans!
Garden update, not much to say. I am going to plant some spinich, maybe this afternoon. I am also working up several spots in the garden to plant potatoes later in the month.
February 23rd, 2016 at 5:34 pm
Austin, sorry I just saw your question. BEP’s will get about 2 foot tall. They will also put out runners that will grow longer. Some people put up trellis or something else for support. Even though I have done that before (post with string), I find it to be WAY to much trouble. In one bed, I often plant two rows of BEP’s back to back, say about a foot spacing between the rows. The plants tend to support each other. Works fine!
February 23rd, 2016 at 5:48 pm
General garden update: planted spinich on Feb 10th. I soaked seeds overnight then planted. Got up a good stand of plants and will need to thin. I put chicken wire around Rows to keep the rabbits out.
Yesterday I finished planting potatoes. Put out about 60-70 red norland said and 100-110 golden Yukons. I know that sounds like a lot, but believe me, fresh potatoes are one of our favorites. Plus, you do not have to harvest them all at the same time, just dig a few plants as needed. I find the Reds make first, then the Yukons. Next post will be how to plant.
February 23rd, 2016 at 5:56 pm
First couple of years I planted potatoes, I was disappointed in the yield and having to dig!!! Instructions will tell you to plant them 4 to 6 inches deep, then hill (add more dirt) as they grow. Here is what I do to grow “no dig” potatoes. I like small seed potatoes, small enought that I do not cut them in pieces, I plant the whole seed potatoe. (This is not an advertisement, but I really like the seed potatoes from Lowes. They generally come 10 to a package. Most are small and you can plant the entire seed potatoe. A few will require cutting into pieces.) if you cut seed potatoes into pieces, cut them several days in advance of planting to give the cut time to ‘scab’ over.
February 23rd, 2016 at 6:06 pm
Now, here is how I plant potatoes. I usually plant them in a block, not rows. I put up a small mound of dirt on each side of the block to hold water. I dig VERY SHALLOW holes, just deep enough to cover the seed potato. The holes are dug about a foot to 18 inches apart in any direction. Put one seed potato in each hole and cover with dirt. When you are finished, they may only be covered by an inch of soil. Water enought to wet the ground and then water every few days. Do not let the soil dry out but at the same time, do not flood it.
February 23rd, 2016 at 6:14 pm
As the potatoes start to grow, cover them with straw. I use wheat hay bales for straw. (I know, I live in the country and have access to wheat straw hay, but even if you live in the city, you can buy straw.) Believe me, it is worth the expense, plus next year, look at how much humus/mulch you have added to your garden from the decayed straw. As the potatoes grow, keep adding more straw, cover the plants at least 1/2 way. They will keep growing, and the straw holds mosture. When the potato plants start to bloom, keep them watered, a little every day or every other day.
February 23rd, 2016 at 6:21 pm
When the potato plants are blooming, they are producing, keep them wet and make sure potatoes are not protruding from under the straw. The plants will start to die, then it is harvest time. (I usually start digging a few potatoes before the plants completely dies down.) To harvest, simply pull back the straw, the potatoes will be laying on top of the ground, no digging required!!! Yes, there may be a few you have to dig under with a hand held scope, but they are easy.
February 23rd, 2016 at 6:26 pm
Want to really know why it is worth the trouble and expense (buying straw) to plant potatoes, just wait until you eat a “fresh” potato, then you will know. My wife, who does not set foot in the garden, loves fresh potatoes. It is always nice to keep the wife happy!!!!!
February 23rd, 2016 at 6:37 pm
Final post for a few weeks, as of today I have garlic, onions, spinish, and potatoes planted. Next up will be post about plantings after last freeze date, including black eyed peas. One of my buddies who does not garden said, “if God intended him to garden, we would not have grocery stores”. To which I replied,” there were no grocery stores in the Garden of Eden!” Happy 2016 gardening!!!
February 23rd, 2016 at 6:48 pm
Sorry, one more post. I just reviewed previous post. I must clarify on post numbered 91, you will need to add straw multiple times, not just once as the post might imply. I usually add straw covering the plants 1/2 up at least 3-4 times during the growing period. It is critical to keep forming potatoes from being exposed to sunlight. When planted so shallow, the potatoes have a tendency to grow out of the straw. Keep them covered!
August 9th, 2016 at 3:43 pm
We planted our bep around June 20 in Central Louisiana. The plants came up beautiful. They are now about 2 1/2 feet tall, with a beautiful color,with runners everywhere, but no blooms in sight. Do you have an explanation?
October 16th, 2016 at 10:02 am
Thanks I will use this info. for my science project 🙂
July 23rd, 2017 at 2:49 pm
Harvest them dry?!!! You can buy dry peas for penny’s. The only reason for growing your own blackeyed peas is to have fresh green peas which you can’t find in stores. Dried peas are awful. Garden fresh peas are absolutely delicious cooked in chicken broth with bacon. Throw in a few snaps also. I grew up in Texas. Never heard of anyone intentionally letting there peas go dry!
March 19th, 2018 at 8:54 am
How much water to a I water the BEP’s