
Extend the Harvest: How to Freeze Kale
January 26th, 2013I’ve blogged about kale a lot here, I really like it as a crop. It is a super food, incredibly healthy, and easily tucked into many many dishes. It is also easy to grow, and easy to harvest all summer long just a few leaves at a time. It also lasts through some serious cold weather, down into the 20s at least. Maybe, when I move south to Chattanooga, I’ll be able to grow it all year round (in my future greenhouse at least) but here in Michigan I can’t. So, in the cold winter months, if I want to eat it I need to store it somehow, and for kale I think the best method for storing is freezing.
As an example of what happens to kale when it is frozen you can look out into your frozen garden and see it brown and shriveled and not very delicious looking. That will happen too in your freezer if you don’t follow the correct steps. You cannot simply toss kale in your freezer and have it last, some small prep work is involved.
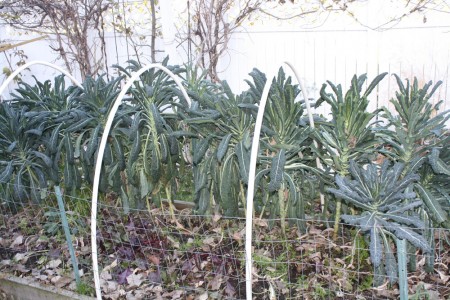
So, in perhaps October or November, after you’ve had some frosts but it hasn’t gotten deep into the 20s yet and the kale is still green, harvest what is remaining and process it for storage.
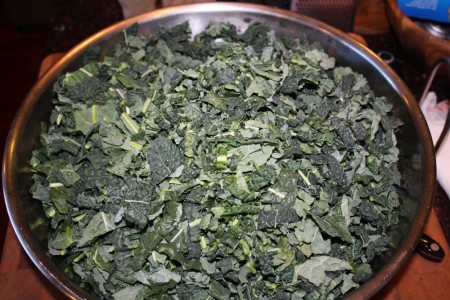
First of all you should process the kale to be in the form of which you want to use. In my case that is chopped up. Once it is frozen if you want to chop it up it is much more difficult, and messy, for rather obvious reasons. If you pre-chop it you can just go from the freezer bag to the fire (crock pot, saute pan, stock pot, etc), which is much easier when you’re actually cooking.
The next step is to blanch it. Plants contain enzymes that break them down, they are what turn plant materials brown in your winter garden, which is not what you want to happen in your freezer. Blanching, putting the plant material in boiling water briefly, deactivates these enzymes and allows the kale to stay fresh and green in storage. Most vegetables need to be blanched before storing, no matter what your storing method, be it canning, freezing, or dehydrating.
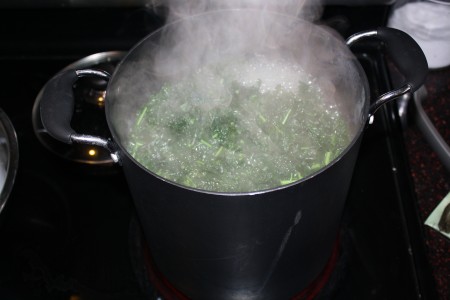
To blanch kale bring a large pot of water to a boil and put the chopped kale in in batches for 3 minutes each. Then, because you don’t want to keep cooking the plant, remove it (a handled “spider” strainer is the perfect tool for this, you should own one) and put it in a bowl of ice water to stop the cooking process.
Continue processing your chopped kale like this until it has all had a turn in the boiling water. The next step will be to remove as much of the moisture as possible from the kale. Put the blanched kale in a strainer suspended over a bowl, I then like to put a second smaller strainer inside the first and weight it down, to press as much water as possible out of the kale. You can also get hands-on with this task and literally grab hand fulls of kale and squeeze them like a sponge to get the water out. There is no set threshold for how much water to remove, but in the future when you’re cooking you want to be adding kale to your soups, not water, and the more water left in the kale the more ice crystals will form which could shred any remaining texture.
Once the kale is sufficiently drained you should portion it into meal sized portions. You should know approximately how much you add to soup or stir fry or sloppy joes or taco meat when you make these meals, and put that much in a bag. Typically somewhere between 1 and 2 cups. Squeeze as much air out of the zip top bag as you can, and seal it shut. I then like to put these smaller bags in a larger one that I then label and at this point you can toss it in the freezer.

The kale will last many months in the freezer, at least until your crop comes in again early next summer, assuming you do not eat it all first.
I really like summer because growing so many foods and herbs myself it is easy to tuck small amounts of them here and there into dishes I cook, providing added nutrition to my family, and using preservation methods like this there is no reason why such practices cannot continue in the winter when my garden is covered with snow.

13 Responses to “Extend the Harvest: How to Freeze Kale”
Leave a Response
Blog Categories
- Critters & Creatures (20)
- Gardening (222)
- Edible Gardening (60)
- Plant Profiles (32)
- Planting Ideas (40)
- Troubleshooting (48)
- Gardening Coupons & Deals (13)
- Greenhouse Gardening (4)
- Landscape Design (22)
- Pictures (8)
- Reviews (2)
- Videos (5)
Recent Forum Posts 
| Thread Title | Replies |
| hi | 0 |
| savetiktok | 1 |
| Hello all | 0 |
| Онлай... | 0 |
| Hello all | 0 |
| Introduction | 1 |
| Thuja Green Giant | 0 |
| write my philosophy paper for me | 0 |
| I am looking for some advice. | 4 |
| Fruit that's really nice, but not c... | 0 |
|
Members: 3189 | Posts: 3761 Come Join the Discussion Today! |
|
Site Categories
Archives
- December 2020
- December 2019
- November 2019
- January 2019
- April 2018
- February 2018
- December 2017
- November 2017
- May 2017
- April 2017
- September 2016
- July 2016
- June 2016
- April 2016
- March 2016
- February 2016
- December 2015
- November 2015
- September 2015
- June 2015
- May 2015
- April 2015
- January 2015
- December 2014
- November 2014
- October 2014
- September 2014
- July 2014
- June 2014
- March 2014
- February 2014
- December 2013
- November 2013
- September 2013
- July 2013
- June 2013
- May 2013
- April 2013
- January 2013
- December 2012
- November 2012
- October 2012
- August 2012
- July 2012
- June 2012
- April 2012
- March 2012
- February 2012
- October 2011
- September 2011
- August 2011
- July 2011
- June 2011
- May 2011
- April 2011
- January 2011
- December 2010
- October 2010
- September 2010
- August 2010
- July 2010
- June 2010
- May 2010
- April 2010
- March 2010
- February 2010
- January 2010
- December 2009
- October 2009
- July 2009
- June 2009
- May 2009
- April 2009
- March 2009
- January 2009
- December 2008
- November 2008
- October 2008
- September 2008
- August 2008
- July 2008
- June 2008
- May 2008
- April 2008
- February 2008
- January 2008
- November 2007
- October 2007
- September 2007
- August 2007
- July 2007
- June 2007
- May 2007
- April 2007
- March 2007
- February 2007
- November 2006
- October 2006
- September 2006
- August 2006
- July 2006
- June 2006
- May 2006
- April 2006
- March 2006
- February 2006
- January 2006
- December 2005
- November 2005
February 3rd, 2013 at 3:06 pm
More people need to grow their own fruit and vegetables. There is a big trend for organic produce in the supermarkets these days, but the price is horrendous! Grow it your self! Its relaxing, healthy, and fun! If you need help – talk to a landscape gardener
February 18th, 2013 at 5:42 pm
Thank you for the tips; kale has always been one of my favorites. I didn’t know about blanching it. It’s on my list for my new spring vegetable garden.
Cheers!
March 5th, 2013 at 9:14 pm
A very handy tool in the kitchen for us garden folks is a salad spinner. I blanch almost all of my harvest(well those that need it) and then give it the ice bath and then a spin in the salad spinner! it really does get the water out and the grand daughter really likes to crank the handle for me. I got it from my mother who picked it up second hand at a yard sale like new.
another handy thing(at least for me) is the vacuum packer that I bought years and years ago. The blanched produce gets vac-packed and then frozen and I have had a couple packs of veggies slip thru the yearly freezer clean out and they still taste as lovely as when they went in. No freezer burn at all.
Your blog is really nice and I am in process of reading thru all your entries.
March 23rd, 2013 at 6:39 pm
I have tried to add more kale to my diet because of the food value it provides. I found that at my store there are chips made of kale as a snack. The chips are over $4 per bag. I would love to use this as a supplement if I could find a cheaper source.
April 4th, 2013 at 9:34 pm
This is an extremely useful post – I am also wondering that with a greenhouse (this year’s dream) would I be able to overwinter kale and pick it fresh to eat?
April 6th, 2013 at 6:58 pm
I, too, saw kale chips in the store and thought they would be great. I found a recipe on another Blog; made some and was disappointed. Mine were like eating salty cotton candy, they disintegrate in your mouth; all left is a salty taste. I was happy that I did not use the whole bunch of kale, which I steamed and drizzled olive oil over; a much tastier dish. Here’s the recipe.
Kale Chips
½ bunch Kale.
Olive Oil
Salt
Directions:
Wash and dry the kale
Tear leaves (think potato chip size)
Guess amount of oil; (for ½ bunch) use about 2 – tablespoon)
Coat/toss/rub in, completely cover leaves with oil and spread out on a baking tray.
Sprinkle with salt and bake at about 350° for 9-10 minutes.
Take out of oven. Cool..cool… They are very hot!
April 10th, 2013 at 12:30 pm
Two months ago I had my first kale salad and loved it. Now I’m thinking of growing kale in my garden this year or even grow it in planter pots. The leafy green would add a nice touch from the ground up. Thanks for the tips on blanching kale and I will have to try it.
April 10th, 2013 at 3:22 pm
Great advice! Thank you for posting this. I harvest kale regularly at the local hydroponic farm but it would be better to be able to freeze some of it for later use.
Can this also be done with arugula, swiss chard and other greens?
April 28th, 2013 at 11:27 am
It works with any leafy green Ebby
April 28th, 2013 at 11:29 am
And as of today, I just used my last bag of frozen kale from my fall harvest that this post was about.
September 11th, 2013 at 4:22 pm
Hi, just wondering, do you think this would work for adding kale to smoothies? I just wasn’t sure with blanching and freezing if it would be too slimey or if it would work fine. Thanks!
October 23rd, 2013 at 11:54 am
Can you also use this method for juicing? Or do you skip the blanching and just wash , dry and freeze.
October 23rd, 2013 at 2:30 pm
To juice kale I think you’d do none of the above, just toss the fresh leaves in your juicer.